Twynau Gwynion Quarries
| Twynau Gwynion Quarries | |
 | |
| Rock Type | Quarried Carboniferous Limestone |
|---|---|
| Climbing Style | Trad |
| Approach Time | 20 minutes |
| Area | Inland Limestone |
| Geodata | |
| WGS-84 Location | 51.78468, -3.358695 |
| OS Grid Ref. | SO 06374 10431 |
| WGS-84 Parking Location | 51.77434, -3.359984 |
| GR Parking Location | SO 062 092 |
| Parking Postcode | CF48 2YA |
| Base Elevation | 425 metres (SRTM Estimation) |
| General Info | |
| Faces Direction | North West |
| Aspect | Rarely Sunny |
| Wind Sheltered | Seldomly |
| Climbing Type | Normal |
| Midge Problem | Never |
| Seepage | Needs a short dry spell |
| Crags Within 10.0 km | |
|
Abertysswg, Baltic Quarry, Bargoed, Bridge Cliff, Cefn Coed - East, Cefn Coed - West, Cefnpennar, Dan-y-Darren Quarry, Darren Fach, Darren Fawr, Deri, Dyffryn Crawnon, Gimp Cliff, Llangynidr Quarry, Morlais Quarries, New Tredegar, Taf Fechan, Trefil, Troedyrhiw, Twynau Gwynion Quarries, Vaynor | |
Contents
BOLTING POLICY
A limestone quarry with mostly trad routes.
PREAMBLE
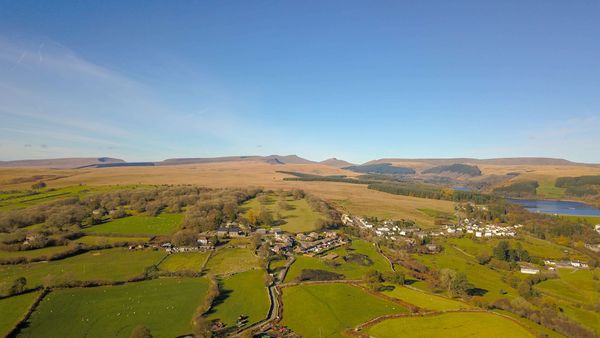
Twynau Gwynion quarries lie on the hillside above the Brecon Mountain Railway and provide some magnificent views of the Brecon Beacons. For many years it has been the secret location for outdoor centres, using it instead of the crowded and polished crags of Morlais. It is an ideal crag for the middle grade climber looking for some peaceful climbing on good rock.
ACCESS
There are several ways in to the crag, these are the most popular two:
Turn off the A465 Heads of The Valley’s Road at Dowlais roundabout (Asda superstore). Miss the superstore’s entrance and turn left, left again and then right and park. There is no parking on the narrow road after the sharp right bend. Follow the road/track through the buildings and horse boxes and turn right to follow a pot holed track (above the gas pumping station) for about 2000m. Continue into the first bay.
Follow signs for the Brecon Mountain Railway from the A465 Heads of The Valley’s Road into the village of Pant and park on the lane around the corner from the Pant Cad Ifor Inn. Follow this lane up through a farm and a gas pumping station to meet the main track running below the quarries, continue left and the crags are on your right.
DESCENTS
It is relatively easy to walk down either side of the quarry.
THE ROUTES
Bay One
This is the first wall encountered when approaching from the South. The short north facing wall offers lots of strong lines on solid rock, to the right of the arête the wall is used regularly by groups for top roping hence the pin-cushion of stakes at the top.
- Cream Cracker 10m VS 4c
The crack at the left end of the wall is short and steep.
Peter Blackburn & Kelda Jones 29th April 2017 - Trumpet Crack 10m VS 4b
The crack is steep to start then awkward as it widens to a groove.
Peter Blackburn & Kelda Jones 29th April 2017 - Crack of Lightning * 10m HVS 5a
The pumpy disjointed crackline.
Peter Blackburn & Kelda Jones 29th April 2017 - Crack of Gold 10m HS 4a
Start up the wide crack then step left at half height to finish steeply.
Peter Blackburn & Kelda Jones 29th April 2017 - Slab and Crack 10m VD
Head up the slab on good holds to finish up the grassy gully.
Peter Blackburn & Kelda Jones 29th April 2017 - Coral's Bow 10m HVS 5a
Make steep moves up until a long reach reveals a positive hold allowing access to the fine groove. Finish up the crack above.
Peter Blackburn & Paul Tucker 24th June 2017 - Spring Roll 10m S 4a
Gain and climb the crack from the right, taking care with the rock higher up, finish right of the block.
Paul Tucker & Pete Blackburn 24th June 2017 - Crack of Dowlais 10m S 4a
The left hand of the twin cracks, step left past the overlap and finish with care.
Martin Crocker - Crack of Pant 10m S
The right hand of the twin cracks, pulling on the jammed block if you're brave and its still there.
Martin Crocker - Time honoured corner 10m HS 4a
The shallow corner leads to a loose exit.
Martin Crocker - Group Chatter Fills the Distance * 10m E2 5c
Climb the crack then continue on ledges to the overlap. Make tricky moves through through this to finish up the face.
Martin Crocker 20th September 2013 - Spare Rib * 10m E1 4c
Climb the immaculate but unprotected arête, mostly on the left side, with technical moves between large holds.
Unknown Pre 1991 - Wuz 5c / J'arrive * 10m HVS 4c
Ascend ledges 2m right of the arête, continue steeply up a crack in a bulge to finish. Adequate protection.
Peter Blackburn, Emma Flaherty, Anna Shepherd 1999 - Urgh! * 10m E3 5c
A bold route up the concave wall. A steep start leads to a ledge, use small holds until a sloper can be reached above. Pull boldly into a narrow scoop and continue more easily up the slab above.
Pete Blackburn 1999 - Argh! * 10m E2 5c
Ascend steep discontinuous cracks to half height, then a long reach and fingery holds help to ascend the bulge above.
Peter Blackburn, Emma Flaherty, Anna Shepherd 1999 - Whitewall * 10m S
Step up onto the ledge and then follow the ramp up and rightwards to another ledge. Finish directly via good ledges to the top.
Pete Blackburn 1999 - The Shield 10m HS 4a
Climb directly up the middle of the steep shield of rock to ledges, then up the centre of the slab above with continued interest.
Pete Blackburn 1999 - The Flanker 10m S
Step steeply up the right side of the shield of rock. Easier but interesting climbing leads via a vague groove to the top.
Pete Blackburn 1999 - Right Trending Crack * 10m S
Follow the obvious crack/groove up and rightwards on good holds.
Pete Blackburn 1999 - White Wall * 10m VS 4c
Climb past the small hawthorn and the line of large hollow feeling scooped holds. Make a steep pull up and left to finish. Adequate gear.
Pete Blackburn 1999
Lillith 9m E5 5c, Martin Crocker 5.9.2013, Crux mantle to finish! - Right Trending Crack 2 10m HS 4a
Climb the distinctive crackline on good holds to a flake just below the top. Step left and up to exit.
Pete Blackburn 1999 - Funnel Vision 10m S
Climb the indistinct wall trending rightwards to a steeper finish.
Pete Blackburn 1999 - Groovling 10m VD
Start below the obvious crack. This offers positive and well protected climbing. The final bulge needs a decisive approach.
Pete Blackburn 1999 - Hawthorne Crack 10m D
Start below and left of the hawthorn tree (The tree at the top of the crack is not the Hawthorne). Climb the obvious groove with a steep start.
Pete Blackburn 1999 - Right Trending Slab 10m VD
Start below the hawthorn bush (removed in rockfall 2022) and follow a diagonal slabby line rightwards which eases with height.
Pete Blackburn 1999 - Right Trending Crack * 10m HS 4a
Follow the obvious crack which eases after a stiff pull up.
Pete Blackburn 1999 - White Groove ** 10m HVS 4c
The compact groove with a tricky move at 6 metres. Just sufficient protection.
Pete Blackburn 1999 - White Rib * 10m HVS 5a
The rib direct, without standing on blocks to the right. Bold.
Pete Blackburn 1999
Bay One.Five
A bay of mostly poor quality rock on the same level as Bay One. Bay Two is downslope to the north of here.
There are some Martin Crocker highball solos here.
Bay Two
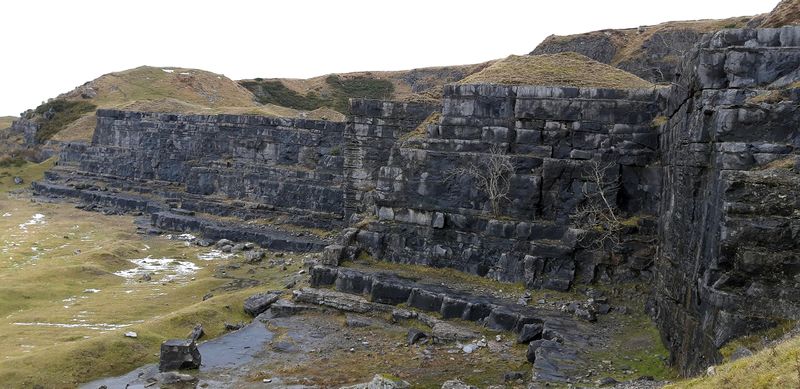
150m north of Bay One is Bay Two, a large bay with three walls.
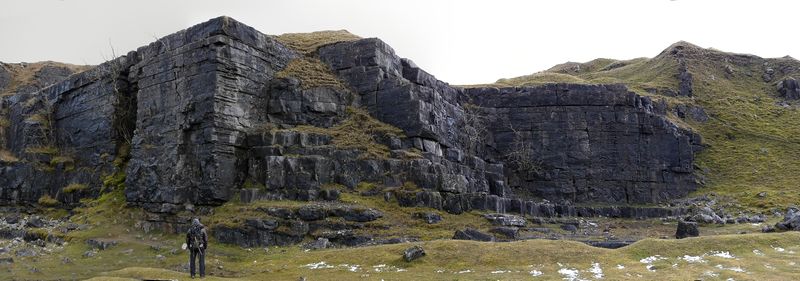
Facing West is Schoolyard Area, which is the leftmost wall in this picture, then Finishing School. The wall nearest the camera, facing North is Bay 2 Right. Corrugation is the block with clean arête in the centre of the picture.
Two more walls face north. On the left is a block with an obvious clean arête (Corrugation), on the right a vertical wall covered in cracks offers lots of options for the VS climber.
Schoolyard Area
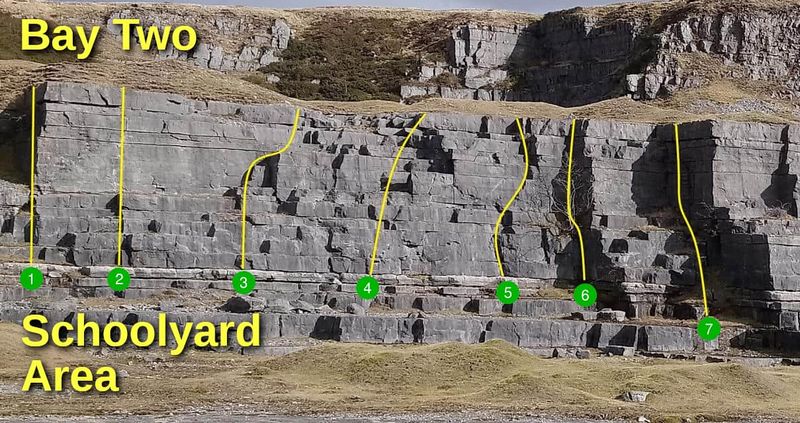
This is the wall about 40m north of Corrugation, with a full quota of belay stakes. There is 40m of wall to its right with the corner of Oscar Carrots, near its left end (joining at right-angles onto Bay 2 Left)
- When Molly Met the Giraffe * 10m S
Through the ledges to front face, around the arête and follow the first crack line above. - Beware the Flat Wall 10m HVS 4c
Up the shallow water runnel (just left of the line on the topo), and horizontal breaks above, moving around the small roof on its right. - Lily in a field of Roses 12m M
Big ledges, from bottom to top. - A Projectile 10m VS 4b
Climb steeply up and right.
A direct start is possible at HVS 4c, starting directly below the borehole, but beware the ankle breaking gaps in the limestone pavement - Smiley Riley 10m S
Using the big crack to first ledge, Follow obvious foot placements rising to the right (bold). Finish more easily. - Project JM
Project, often damp - Sam the Boy 10m S
Scrambly start to vertical wall, Follow the left indentation in rockface to top out. (as it reads this is the left water runnel on the north facing wall - nearest the corner) - Oscar Carrots 10m D
Moved from (topo line 2 above which is not Diff).
On the wall to the right of the Schoolyard, the rightmost corner in shadow on the topo. About 4m right of its arête. Up the lower ledges follow the corner above.
First Ascents
- When Molly Met the Giraffe -G. Kaye, S. Chichester. March 2021
- Beware the Flat Wall HVS FRA N Barry June 2022
- Lily in a field of Roses S. Chichester, G.Kaye. March 2021
- A Projectile & Direct FRA N Barry June 2022
- Smiley Riley S.Chichester, G.Kaye. March 2021
- Project JM J.Mills
- Sam the Boy G.Kaye, S.Chichester. March 2021
- Oscar Carrots G.Kaye, S. Chichester. March 2021
Finishing School Area
The wall between the Schoolyard and the Block containing Corrugation.
- Lowlife E1 5a/V0
The arete overlooking the schoolyard, is a bold solo given the fall potential. - Bankers’ Bonuses Bums’ Up V4
The wall between the arete and the shallow corner. - Crimpabulous V2
The steep wall about 8m right of the arete. - Zit Zapper V3
Start with a pinch to better holds. - Seamstress V0
The blind seam.
Bay Two Left
UNESCO, HVS 5a, Start just left of the worn-out tree, follow the crack. Peter Blackburn, Bob Keep 7.1990
Tweeters’ Twaddle, E4 6b, Left-hand of the parallel cracks, with a long reach to finish. Martin Crocker 5.9.2013
SWAPO, E2 5c, Right-hand of the parallel cracks. Peter Blackburn, Mick Waplington 7.1998 (?1989?)
VSO, S, Crack up the left arête of Hawthorn Chimney. Peter Blackburn, Mick Waplington 1989
- Hawthorn Chimney D
The obvious chimney above a tree. 6m.
Chimney arête 10m HS 4a, The right arête of the chimney, Unknown Pre 1973
On the Border 10m HVS 4c, Discontinuous cracks, Peter Blackburn 8.1988 - Frontal Wall * S 4a
The front wall of the block has two cracks high up, you can climb either one, but the right-hand is harder (HS 4b). 10m.
Unknown Pre 1973 - Corrugation * E1 5b
The best route here takes the right side of the crinkled arête, passing a peg and big flat holds. Can also be climbed on its left at E3 5c. 10m.
Unknown Pre 1973 - Irrigation HVS 5b
The wall right of Corrugation. 9m.
Martin Crocker 14.3.2016
Bay Two Right
To the right is the other wall:
- Suns Going Down 10m VS 4c
Follow the crack just right of the tree.
Unknown Pre 1973 - Cystitis Eat Your Heart Out VS 4c
Head up the crack in the middle of the wall, stepping left to finish. Some tough moves for the grade but it has good gear and good rests. 10m.
Unknown Pre 1973
Pained Relief 10m E1 5b * Bold bulge follwed by crack (ignoring the VS's both sdes) FA Peter Blackburn, ANO 10m - Two Fingers VS 4c
The left-hand crack of the pair. 10m.
Unknown Pre 1973 - Two Half Quids VS 4c
The right-hand crack of the pair. 10m.
Unknown Pre 1973 - Flowstone HVS 5a
Climb the flowstone wall via a crack direct to the top. 10m.
Unknown Pre 1973 - Black Crack VS 4b
The crack with an overhang at 6m, finish up the groove. 10m.
Unknown Pre 1973
An eliminiate has been climbed between Black Crack and Short Crack. Pete Blackburn (solo) Short Wall 7m E1 5b 7.1988 - Short Crack HS 4b
The short crack. 5m.
Unknown Pre 1973
Bay Three
45m north and at a lower level than Bay Two is Bay Three. The left side of this wall offers some fine crack lines whereas the right side is split into two tiers with good boulder problems down low and some mirco routes above.
Left Side
- Pleasurance 15m HS 4b
Climb up to and through the wide crack.
John Harwood 17th May 1987 - Little Owl 15m VS 4c
The thin crack leads all the way up.
John Harwood 12th May 1987 - Friends In Need 15m HVS 5a
Difficult moves gain a crack line at 6m.
Unknown Pre 1991 - Unnamed 15m E1 5b
Climb thin discontinuous cracks in the slabby wall.
Gwyn Evans & Ken Wood 1974 - Nut Wall 15m VS 4c
Follow the obvious line diagonally left to a ledge with trees. Climb the crack for 3m then move 2m left to a thin crack, which leads to a ledge.
Unknown Pre 1973 - Nut Wall Direct 15m E1 5c
Thin moves gain the first ledge, a crack leads to the second, move left to finish. Frequently wet.
Gwyn Evans & Ken Wood 1974 - Pete’s Finish 15m E1 5b
Follow a crack which is obvious high up past a number of horizontal breaks.
John Harwood 17th May 1987
Lower Tier
Descent scramble to the right.
Belays can be made at the base of the Upper Tier, with wires and small cams, for the many who consider over 5m to be a route.
- The Reach 5a
- Further than you Think 5c
- Thin Crack 5a
A good first HVS? - Finger Line 5b
- Grooves 2a
- Wide Crack 3a
- Short Cleft 4a
- Painful Crack 4a
- Staircase 2a
Upper Tier
Descent scramble to the right.
Belays can be made in the low rock wall about 10m back, with wires and small cams. About 6m, with plenty of cracks for runner placements, except on Cleanliness.
- Big Ass Crack 3b
- Puke-a-hontis 4c
- Mount Swift 3a
- Santa's Stuck 5a
- Broken Chimney 3a
- Cleanliness 4c
- Godliness 3c
- Ledge left 3b
- Ledge Right 3a
- Mount Emanuel 3c
- Shore Mountain 4a
- Pillar Groove 3b
- Far Right 3b
Bay Four
The largest of the bays.
North Wall
The following routes lie on its south-facing wall.
- Balance 9m VS,4c
A crack on the left wall gives more trouble than anticipated. - The Block 10m VS,4c
To the right is a block, climb it.
Sunburn Slab
Six Metre Wall
Hard to start but the ground is flat.
Triangular Wall
There is a stake belay in place above the wall.


