Blue Pool Area
| Blue Pool Area | |
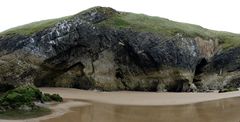
 Living Wall? - Blue Pool Area | |
| Rock Type | Natural Carboniferous Limestone |
|---|---|
| Climbing Style | Trad |
| Approach Time | 30 minutes |
| Area | Gower |
| Sub Area | North Gower |
| Geodata | |
| WGS-84 Location | 51.612197, -4.305514 |
| OS Grid Ref. | SS 404 928 |
| WGS-84 Parking Location | 51.609668, -4.289170 |
| GR Parking Location | SS 415 925 |
| Parking Postcode | SA3 1JP |
| Base Elevation | 0 metres (Other) |
| General Info | |
| Faces Direction | North West |
| Aspect | Rarely Sunny |
| Wind Sheltered | Seldomly |
| Climbing Type | Serious |
| Seepage | |
| Tidal | |
| Before/After Low Tide | 0.5 hours (See Note) |
| Crags Within 400m | |
Contents
TIDAL STATUS
Extremely Tidal. 1 hour either side of low water on Spring Tides. Danny's Buttress 2 hours either side of low water.
BOLTING POLICY
Retro-bolting permissible with first ascensionist's permission. Replacement of worn fixed gear on a point for point basis with bolts is permissible. New sports routes allowed.
PREAMBLE
Described as, "a major new development" in Gower & S.E. Wales (2003), this is an area of 25m high cliffs on the north side of the ridge running from Llangennith to Burry Holms. Nothing has been done here since except for two DWS on Living Wall and a Fr. 4c near a cave to the east of Living Wall. The area is ripe for development.
The crag is generally seepage free but the best time to visit (like Shipwreck Cove), is in the summer when dampness is at a minimum. The crag is extremely tidal but it is well worth a visit for its steep rock and uncompromising lines. There are also some easier routes on Danny's Buttress, which is worth a visit and is considerably less tidal.
N.B. The significant rocks here are 500 metres west of the actual Blue Pool and are only approachable from here at very low tides.
Most of this area appears to be neither owned by the National Trust or is a SSSI.
ACCESS
The best approach is from Llangenith village.
On entering Llangennith, follow the (narrowing) road past the front of the Kings Head for approximately 300m until you reach a mini-roundabout. Cross the roundabout and take the road signposted to Broughton. This road ends at a car park (SS 41587 92575) which, at some time of the year, charges a small parking fee.
Follow the footpath leading from the car park into the dunes to eventually reach the beach after about 1km. To the north (right) is a tidal causeway leading out to Burry Holms island.
Note that some of the conventional routes on Living Wall can be started from a non-tidal platform. This platform and the deep water solos, are gained from abseil points above the crag. The abseil points are reached by reversing the descent route described below.
DESCENTS
For Danny's Buttress, scramble down to the left back to the beach. For Living Wall, descent is by walking down the raised banking leading back down to the causeway. There are some stakes at the top. It is probably best to pre-place a lower-off rope, due to the sloping grassy banking at the top of the cliff.
THE ROUTES
Danny's Buttress

- Al'Hambra 11m E2,5b
A deep water solo. The grade for a conventional ascent is not yet known. From the seaward (left) end of the face, traverse right and climb an obvious crack. - Left Route 9m E1,5b
The left-hand groove on the main face of the crag. - Right Route 9m E2,6a *
The groove to the right of Left Route.
Living Wall
Note that there is another route in this area, but its location is unfathomable. It could be the offwidth about 100m east of Living Wall (Chimney Route E1,5c J.Mothersele, D.McCarroll 1997).
Living Wall has a gently sloping left-hand (north) flank. Descend this to gain the start of Astral Slide.

- Astral Slide 28m E4,6a **
The grade is given for a solo ascent at high tide. In normal conditions it would be much bolder. From the sloping shelf at the left end of the wall, traverse right, then down the rectangular slab (Living Wall). Drop down under the bulge to gain a traverse line leading right to finish up the chimney of Refugee. - Living Wall 20m E5,5c
This route is characterised by a recessed slab positioned high on the left-hand side of the wall. Gain the slab, then move out right and finish up a short groove. Steep climbing, with spaced protection. - Refugee 25m E4,6a **
Right of Living Wall is an obvious chimney high up on the crag. Start down and left of the chimney. Climb the lower wall directly to gain an obvious handhold. Use this to pass an overlap, then up to the obvious finishing chimney.
The next routes start from a large ledge to the right of the angle of the crag. At low water, this can be reached by an easy scramble. When the tide is in, the ledge can be gained via an abseil point on the pillar above the crag. - Anybody Who's Anybody 21m E4,6a *
Graded for a deep water solo at high water. More serious for a conventional ascent. From the left of the belay ledge move up to pockets and follow these to the base of the chimney on Refugee. Traverse left, keeping low for 4m. Finish up the exciting flake-crack in the bulges above. - Astral Sidle 20m E2,5b *
A surprisingly amenable climb. Move up from the large belay ledge to gain a break. Follow the break leftward to a corner system. Follow the corner system to an overhang (junction with Refugee) and cross it on large rounded holds. Move left to gain a bridging position, then pull out right to finish. - Into The Blue 20m E5,6a *
A serious route. From the large belay ledge, follow the leftward-slanting crack up the right side of the recessed wall to an arched roof. Pass this to reach easier ground. - Buccaneer 18m HVS,4c
Follow the corner crack above the large belay ledge, taking care with a rocking block. - Privateer 18m E1,5b *
From a few metres up Buccaneer, make a rising traverse rightwards across the pillar of Open, to gain the finish of The Thing.
To the right of the large belay ledge is a prominent pillar, bounding the left-hand side of a large recess. - Open 18m E2,5a
Take a fairly direct line up the prominent pillar. The protection is spaced.
Right of the pillar of Open is a large recess, the right-hand side of which is bounded by a prominent leftward-slanting groove, taken by The Thing. - Blue Pool Cool 27m E6,6a *
Strenuous, run-out and damp. Start right of the pillar of Open. Climb a pillar then trend right to a recess and gear. Traverse right into a verdant niche below a roof. Leave this to the right, gaining slopers and gear slots. Trend left up the wall to a pocket, pull up to a second pocket, then follow the left-trending crack left of the Thing. Finish direct. - The Thing 28m E5,6a **
Follows the obvious left-trending groove at the right side of the recess. Make unprotected, but reasonable moves up the lower wall to gain the strenuous groove. From the top of the groove walk right and up to stakes.
The next routes are deep water solos up the protruding wall to the right of The Thing. They are reached by abseil from the top and would be very serious if done ground up at low water. The 50m abseil starts from a small outcrop at the top of the grass slope. Aim for small ledges in a hollow left of the tongue at the right end of the wall. In the event of a fall, jump out as far as possible, since there is a toe of rock directly below No Ya Limits. - No Ya Limits 12m E6,6b ***
The overhanging groove right of The Thing. Traverse left for 3m from the end of the abseil to gain the groove. Move up to a projecting hold. Lurch up the wall past a jug on the arête at 8m. Pull through a white bulge to finish. - Jetski Gobsmacksy 12m E5,6b ***
From the end of the abseil, traverse left for 2m to gain the rib right of No Ya Limits. Follow the rib to a long stretch for a pocket, then extend left to a small white scoop. Finish more easily. - Fulmar Halo 12m E3,5b
From the end of the abseil ledge, go left to gain a slot up and left. Climb direct and exit up left up a pocketed ramp.
The Big Through Cave in the Hole in the Roof
Best approached by walking the boardwalk from the caravan park to the real Bluepool then crossing the beach. Several unfeasible seeping bolt lines one of which is
- In Cider Trader Fr 4c
Left hand line exiting the hole.
Additional Photos

Crags in the next bay (East) from Living Wall

Crags in the next bay (East) from Living Wall

Incider Trading is here somewhere.


First Ascents
Danny's Buttress
- Al'Hambra - M.Crocker solo 17.06.2001
- Left Route - J.Mothersele, D.McCarroll 00.04.1997
- Right Route - J.Mothersele, S.Doerr 00.08.1997
Living Wall
- Astral Slide - M.Crocker solo 07.05.2001
- Living Wall - A.Berry, J.Bullock 06.07.1997
- Refugee - A.Berry, S.Ohly 04.05.2001
- Anybody Who's Anybody - M.Crocker solo 07.05.2001
- Astral Sidle - M.Crocker, J.Harwood 07.03.2001
- Into The Blue - M.Crocker, J.Harwood 07.05.2001
- Buccaneer - S.Ohly, A.Berry 25.05.2001
- Privateer - A.Berry, S.Ohly 25.05.2001
- Open - J.Brown, A.Berry 00.00.1996
- Blue Pool Cool - M.Crocker 07.05.2001
- The Thing - S.Doerr, J.Mothersele 21.07.1997
- No Ya Limits - M.Crocker solo 17.06.2001
- Jetski Gobsmacksy - M.Crocker solo 17.06.2001
- Fulmar Halo - M.Crocker solo 17.06.2001
The Big Through Cave in the Hole in the Roof
- In Cider Trader Fr 4c - G.Ashmore R.Thomas 2006ish