Llanbradach Lower Tier
| Llanbradach Lower Tier | |
| Rock Type | Quarried Sandstone |
|---|---|
| Climbing Style | Sport/Trad |
| Approach Time | |
| Area | Sandstone |
| Sub Area | Sandstone Eastern Valleys |
| Local Area | Llanbradach |
| Geodata | |
| WGS-84 Location | 51.598057, -3.2339153 |
| OS Grid Ref. | ST 146 895 |
| WGS-84 Parking Location | 51.598429, -3.2324731 |
| GR Parking Location | ST 147 895 |
| Parking Postcode | CF83 3GR |
| Base Elevation | 111 metres (SRTM Estimation) |
| General Info | |
| Faces Direction | |
| Aspect | |
| Wind Sheltered | |
| Climbing Type | |
| Midge Problem | Serious |
| Seepage | |
| Crags Within 5.0 km | |
|
Llanbradach Lower Tier, Llanbradach Upper Tier, Ridgeway, Senghenydd | |
Contents
THE LOWER TIER
Routes on the right wing are described from right to left (anti-clockwise) as approached as far as Loss Leader Wall. The routes on the left wing (south) side of the quarry (from Bas Chevaliers Area onwards) are described from left to right as approached. If this upsets anybody’s sense of order, then they want to try and walk right the way round the quarry floor to regain their sense of proportion.
RIGHT WING
Pool Wall

- Badness - Fr. 4
Follow sloping shelves and friable flakes. - Blandess - Fr. 4+
Poor route on friable rock. - Sadness - Fr. 4+
The left facing groove. 11m - Madness - Fr. 6b
Climb the rounded bulge on small, good edges. You'd be mad to enjoy climbing the upper section. - Gladness - Fr. 4
Climb the groove, avoiding the brittle rock. You'll be glad to get to the lower-off. - Internal Reflection - Fr. 6a
A good route up the slab to the left, passing an overlap. 11m - Luxury Gap - Fr. 6c+
A route up the wall to the left, with hard moves up from the block to the BB. 12m - Slap Of Luxury - Fr. 7a *
Start down and left under the blunt arête and make a difficult couple of moves up to gain the slab right of the arête. Follow the slab and tricky wall above to a BB. 15m - Slipping Into Luxury - Fr. 6b **
Good and very well protected. Start below and left of the prominent blunt arête and climb the wall to a ledge. Climb the upper wall and arête to a BB. 15m - Slipped - Fr. 6c+
The wall just right of the corner. 15m - Slip Into Something Sexy - Fr. 7a+ ***
The leaning wall left of the corner is very impressive. 17m - Save Our NHS - Fr, 7b+
Left of Slip Into Something Sexy. The former NHS Waiting List project. Pull through the green scoop, make a couple of moves on poor rock to gain a shakeout jug, then blast up the steep wall on better rock, mostly good holds and with rapidly depleting stamina. Great moves. Sustained and droppable all the way to the end! Two different sequences exist to get through the steepest part of the route, one of which depends on reach - Shadow Of The Sun - Fr. 7a **
The steep little wall up the banking further left. 10m
The Sinister Wall
Further round to the left, before the start of the Expansionist Buttress are a series of short, leaning walls at the top of a banking. These are currently home to a number of routes. Just left of a prominent corner is:
- Sinister Fr. 7b **
An excellent route. Start below an obvious flake at 3m. Gain this with difficulty (crux) and leave it with a monster stretch. Climb up with a gathering pump, to a L.O. on the slab. Avoid the large block right of the finishing flake. - Abbatoir And Costello - Fr. 7b+ **
The wall to the left of Sinister has lost a big hold low down and may now be harder. 15m - In Blood, Of Life, Of Sin - Fr. 7a+
The wall to the left is climbed on good holds to a pocket. Reach blindly up and pull round the lip, sauntering up the slab to finish. Often wet, blind and hard to on-sight. 15m - The Evil Eye - Fr. 7a
The broken groove on the left, to a step out right onto the wall at a pocket. Pull over the overlap (crux) and saunter up the slab to a BB. 12m
Further right, the wall loses height. - Dreaming In Colour - Fr. 6c
The right arête of the wall is rapidly losing holds and may be harder now. One staple L.O. 11m - Letters Of Life - Fr. 7a **
Left of the arête is another bolt line. Climb it by a superb series of rockups and snatches. 11m - Giving It All Up - Fr. 7a+ *
The next bolt line left. Some very tricky moves. 11m - Host - Fr. 6c
The wall just left of the central drainage streak/cheesy section. 11m - Food For Parasites - Fr. 7a+ **
The next left line on the wall is thin, with a hard crux and pumpy climbing thereafter. 11m - Bringeth yon Leach - Fr. 7a+ *
Last line, similar to Food For Parasites.
The following two routes are on the tier above Sinister Wall. These are normally accessed by either Dreaming In Colour or The Evil Eye. There is a project up the wall above The Evil Eye. - Snapper - Fr. 6c **
The crack above The Evil Eye belay. 15m - Overleaf - Fr. 6a+ *
The wall above Dreaming In Colour. Watch out for the very wobbly flake! 12m

Expansionist and Cascade Walls
Further round to the left is the very obvious Expansionist crack, splitting the buttress high up. The Expansionist Wall is bounded on the left by the prominent arête of The Caerphilly Contract. A vague corner runs down from the foot of the Expansionist crack and there is a large slabby ledge splitting the Expansionist area at 15m. The area right of the corner and under the ledge is known as The Cascade Wall. The area above the half-height ledge is known as the Expansionist Wall. The short clean wall left of the corner and directly below the upper arête of The Caerphilly Contract is The Sub-Contractor’s Wall.
Cascade Walls

The Cascade Walls are split by a prominent stream emerging from a hole at 3m above which is a left-facing corner (Sphagnum 45). The first route starts from the lowest slab right of the stream.
- Bathtime - Fr. 6a+
The centre of the lowest slab. 15m - Splash It On All Over - Fr. 6c
The slab and wall to the left is thin above the ledge. 15m - Right Of Spring - Fr. 6b
The slab immediately right of the stream, starting up a blunt nose. 15m
Left of the hole from which the stream emerges: - Sphagnum 45 - Fr. 6a
The groove and faint flake above the stream. 14m - Cascade - Fr. 7a
A worthwhile route up the wall left of Spaghnum 45, passing a prominent overlap. 12m - Total Recoil - Fr. 6c *
Starting from a slight platform, climb the broken groove to a good jug at 6m, then step airily out right to the slab. Saunter up to the base of a square cut arête. Swing round this into the groove, then pull back left at the top of the arête and move left to the BB. 15m - Splashdown - Fr. 6c
As for Total Recoil, but continue up the groove and its left arête to a hard swing back right to a ledge. Step right to the same BB as Total Recoil. 14m - Falling Freely - Fr. 7a+
A sustained route up the wall to the left of Splashdown. 14m
Sub-Contractor’s Wall

The rather obvious clean orange wall to the left overhangs very slightly, staying quite dry in light drizzle.
- Too Keynes By Half - Fr. 6c *
The right-hand arête. 12m - Post Expressionist - Fr. 6b *
The superb flake line splitting the centre of the wall, stepping right at the top to the same BB. 12m - Simple Addition - Fr. 6c+ *
The pocketed wall to the left is hard for the grade. 10m - Sub Contraction - Fr. 7a
An unusual route up the right-hand side of the left arête of the wall to the BB of Simple Addition. 10m
Expansionist Wall
This is effectively a ‘middle-tier’ of the quarry, lying above Cascade and Sub-Contractors Wall. The normal approach (apart from The Caerphilly Contract and Little White Lies) is from Total Recoil/Splashdown and up The Link Pitch. The Caerphilly Contract and Little White Lies are normally started via Too Keynes By Half.

- The Link Pitch - Fr. 4
From the BB of Total Recoil/Splash down, mantle onto the ledge and climb the fin, BR to a BB. 8m - Giant Sand - Fr. 6c+ *
An excellent trip up the rightmost line on the wall right of the obvious crack of The Expansionist. 25m - Grit Box - Fr. 7a+ *
An awesome route up the steep wall just right of the Expansionist crack. Climb direct, with a hard start to sustained pulling between spaced jugs. Eventually gain the base of a shallow right-angled corner, from the top of this make a superbly exposed swing out onto the right arête to gain the belay. 25m - The Expansionist - E3, 5c *
The very striking crack splitting the centre of the face above the Cascade walls. Access the crack from the Link Pitch stance. A number of medium/large cams are required (2 to 3.5) and a house brick chock is in place below the first roof. Bolted Lower off at the top of the cliff. 60m
To the left of the Expansionist Crack are: - Little White Lies - Fr. 6c **
The wall left of the upper crack of Expansionist gained from the former route, or by abseil. Superbly positioned climbing, with one tricky move. 24m - The Caerphilly Contract - Fr. 7b+ **
Regeared and now totally direct. Start up Too Keynes By Half and from the belay, climb the nose to the base of a wall (The original route wandered up the grooves round to the right of Subcontractors Wall to gain this point). Clip the BR, pull up the crack out right for one move, then step boldly back left to climb the centre of the wall, 2BRs, to end up on a slabby section below the arête. Move up the arête and stretch right for good holds leading up to an obvious undercut and shakeout right on the arête. Now the fun begins. If over 6ft. make one hard move up the flake to a jug. If normal, make a surprisingly contrived and difficult sequence to leave the top of the flake. If successful, romp up the easy upper section to a BB at the top. Double abseil descent. 55m
Loss Leader Area

This area is back on ground level, situated above the banking left of Sub-Contractors Wall. There is a project up the wall above the sycamore in a crack halfway up the banking.
- Acatalepsia - Fr. 6a+ *
The wall left of the obvious crack on the long wall at the top of the banking. 17m - Insomnia - Fr. 6c *
The wall to the left with a very hard move to gain the ledge and some good rockovers on scabs thereafter. Take care with the final flake. 17m - Amnesia - Fr. 7a
The wall left again to the same BB. 17m
LEFT WING
Bas Chevaliers Area and Contraband Wall
The routes are described from left to right, i.e. as encountered walking round the quarry clockwise. Bas Chevaliers Area is the first area of rock encountered on the left-hand side of the quarry, when following the path in from the left-hand banking.
- Take the Horn - Fr. 6a+
The left-hand line on the buttress, taking the sharp groove and crack. 18m - Magellan’s Straight? - Fr. 6c
To the right of Horns A Plenty, is a cave at ground level. Pull out of the left hand side of the cave past some interesting structural engineering and climb the overlapping wall above. 21m - Maurice Chevaliers - Fr. 7a
Start in the centre of the roof right of Magellan’s Straight. Climb this awkwardly to a semi-rest on the arête, then swing out under the overlap. A powerful move from the jug on the lip leads to a ledge. Wander up the groove in the front face of the buttress, then swing left to gain the BB of Magellan’s Straight. 21m - Bas Chevaliers - E3, 5c
A good pitch loosely based around the right arête of the buttress. Climb the slabby right wall, until it is possible to swing out onto the groove of Maurice Chevaliers. Move up to just below the ‘fang’ roof, swing right and climb the right wall, PR, making a long stretch left for a jug on the arête. Move back right, and up to a good nut slot, then back left to the BB. 21m - Moutton Dagger - Fr. 6c *
The best route up the buttress, taking the wall to the right of Bas Chevaliers. 18m - Peel Back The Flaps - Fr. 6b
The ledgy, dirty, cheesey chimney and tower. 18m - Jam One In - E1, 5b
The jam crack to the right and just left of Hush Money. 18m
The next routes are on the striking vertical wall to the right (Contraband Wall). There is a bolt belay on the terrace. - Hush Money - Fr. 7a+
To the right is an impressively steep ‘sheet wall’. Climb the left arête of the wall with some very hard moves past the overlap. Do not wander off right at the crux. Originally given E3! 12m - Contraband - Fr. 7c ***
A fingery and reachy masterpiece up the centre of the wall. Start in the centre of the wall, and undercut to a two finger edge. Make a desperate lunge left for a very thin edge, and gain the break. Leaving this is problematical, but the wall above is easier. 18m
Boston Strangler Area
Following the path further to the right, is a bay with a prominent rectangular wall, normally marked by a waterfall.
- Boston Strangler - Fr. 7b
Boston Strangler climbs the corner for 6m to avoid the waterfall at the base, then steps out onto the left wall, to gain and climb the centre via tricky, hard to on-sight moves. 21m - Exhumation Corner - E2, 5c
A ‘never-dry’ route up the obvious angled, slabby corner. Probably better as an ice route. 20m - Balance Sheet - Fr. 6a
The centre of the slab forming the right wall of the corner is delicate and enjoyable. 21m - Expense Account - E3, 5c
Follow a faint groove in the right-hand side of the slab, to gain a thin diagonal crack. Follow this leftwards to join the finish of Balance Sheet. 24m - Cashflow Crisis - Fr. 6a+
The right arête of the wall, climbed on its right above the ledge at 18m. It can be made harder and better, by avoiding the use of the holds on Balance Sheet at the top. 25m
The next route lies in a bay at a higher level. It can be accessed from the start of Cashflow Crisis. Trend right across a ledge and under a roof. Continue for a few metres to gain a bay up on the left. - Open Project
The left-hand line on the right wall of the bay. 8m - Wert’s Famous Taxi Ride - Fr. 6b
A good route taking the crack just left of the right arête of the bay. 8m
Additional Photos
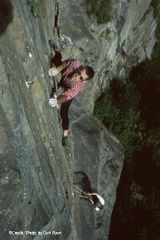
Goi Ashmore on Caerphilly Contract Photo: Carl Ryan

First Ascents
POOL WALL
- G.Jenkin, R.Thomas 06.11.1988
- R.Thomas, G.Gibson 07.04.1996
- G.Gibson 30.03.1996
- R.Thomas, G.Gibson 30.03.1996
- M.Ward, G.Jenkin, R.Thomas, M.Crocker 06.11.1988
- Bolted by P.Wardman first ascent by A.N.Other ~2009
- M.Crocker, R.Thomas 12.11.1988
- Save Our NHS Tom Williams 2020
- R.Thomas, G.Gibson 29.06.1996
SINISTER WALLS
- G.Gibson 29.06.1996
- R.Thomas 05.07.1996
- G.Gibson 04.05.1996
- G.Gibson 29.06.1996
- G.Gibson 28.04.1996
- G.Gibson 28.04.1996
- R.Thomas, G.Gibson 28.04.1996
- R.Thomas, G.Gibson 28.04.1996
- R.Thomas, G.Gibson 05.05.1996
- R.Thomas 01.07.1996
- R.Thomas, G.Royle 00.12.1996
CASCADE WALLS
- G.Gibson 05.04.1996
- G.Gibson 05.04.1996
- G.Gibson 30.03.1996
- G.Gibson 05.04.1996
- G.Gibson 03.02.1996
- G.Gibson, R.Thomas 16.03.1996
- G.Gibson, G.Ashmore 16.03.1996
- G.Gibson 17.03.1996
SUB-CONTRACTOR'S WALL
- R.Thomas, G.Gibson 05.04.1996
- R.Thomas, G.Gibson 31.03.1996
- R.Thomas, G.Gibson 05.04.1996
- G.Gibson 07.04.1996
EXPANSIONIST WALL
- G.Gibson 05.04.1996
- G.Gibson, R.Thomas 31.03.1996
- G.Gibson 05.04.1996
- P.Littlejohn, J.Harwood, C.Horsfield 25.05.1978
- M.Crocker, R.Thomas 27.11.1988
- M.Crocker, R.Thomas, M.Ward 06.11.1988
LOSS LEADER AREA
- R.Thomas 03.06.1996
- G.Gibson 05.05.1996
- G.Gibson 05.05.1996
BAS CHEVALIERS AREA AND CONTRABAND WALL
- R.Thomas 03.05.1998
- R.Thomas 07.05.1998
- G.Ashmore 05.04.1999
- M.Crocker, R.Thomas 26.11.1988
- R.Thomas 01.05.1999
- R.Thomas, Old Harrovians 01.11.1999
- R.Thomas, Old Harrovians 01.11.1999
- M.Crocker 11.12.1988
- M.Crocker, M.Ward, R.Thomas 11.12.1988
BOSTON STRANGLER AREA
- M.Crocker 00.00.1990
- R.Thomas, M.Learoyd 00.00.1989
- R.Thomas, M.Learoyd 00.00.1989
- M.Learoyd, R.Thomas 00.00.1989
- G.Ashmore 03.05.1998
- G.Ashmore 01.05.1999