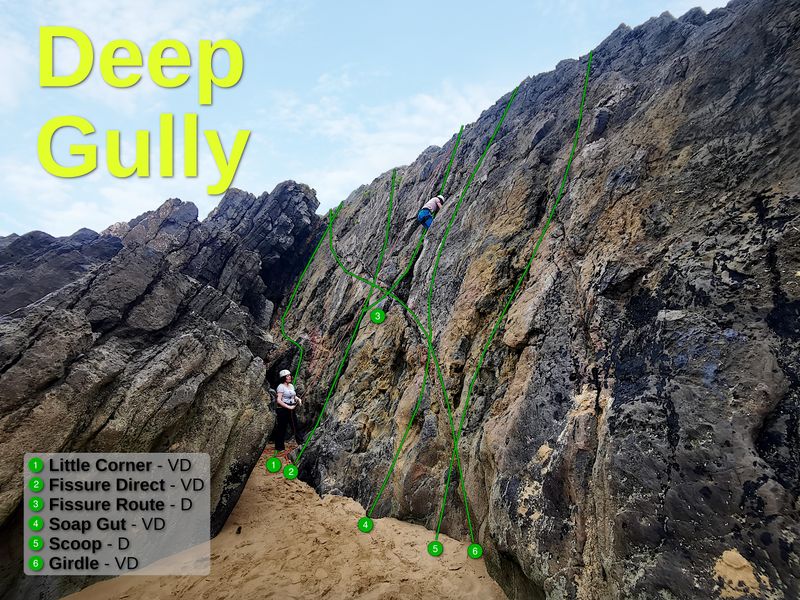
Loading map...
{"minzoom":false,"mappingservice":"openlayers","geoservice":"geonames","maxzoom":false,"width":"auto","height":"500px","centre":{"text":"","title":"","link":"","lat":51.569777,"lon":-4.109186,"icon":""},"title":"","label":"","icon":"","visitedicon":"","lines":[],"polygons":[],"circles":[],"rectangles":[],"wmsoverlay":false,"copycoords":false,"static":false,"zoom":16,"controls":["panzoombar","scaleline","overviewmap","keyboarddefaults","navigation","layerswitcher","mouseposition"],"layers":["new OpenLayers.Layer.OSM.Mapnik(\"OSM Mapnik\")"],"resizable":true,"overlays":[],"searchmarkers":"all","kml":[],"locations":[{"text":"\u003Cb\u003E\u003Cp\u003E\u003Cb\u003E\u003Ca href=\"/wiki/Barry_Island_and_Friars_Point\" title=\"Barry Island and Friars Point\"\u003EBarry Island and Friars Point\u003C/a\u003E\u003C/b\u003E\n\u003C/p\u003E\u003C/b\u003E\u003Chr /\u003E\u003Cp\u003E51.386727, -3.279161\n\u003C/p\u003E","title":"Barry Island and Friars Point\n","link":"","lat":51.386727,"lon":-3.279161,"icon":"/testwiki/images/4/43/Orange.png"},{"text":"\u003Cb\u003E\u003Cp\u003E\u003Cb\u003E\u003Ca href=\"/wiki/Pant_Quarry\" title=\"Pant Quarry\"\u003EPant Quarry\u003C/a\u003E\u003C/b\u003E\n\u003C/p\u003E\u003C/b\u003E\u003Chr /\u003E\u003Cp\u003E51.47255490, -3.59449687\n\u003C/p\u003E","title":"Pant Quarry\n","link":"","lat":51.4725549,"lon":-3.59449687,"icon":"/testwiki/images/1/16/Blue.png"},{"text":"\u003Cb\u003E\u003Cp\u003E\u003Ca href=\"/wiki/Bridge_Cliff\" title=\"Bridge Cliff\"\u003EBridge Cliff\u003C/a\u003E\n\u003C/p\u003E\u003C/b\u003E\u003Chr /\u003E\u003Cp\u003E51.763809 -3.4014836\n\u003C/p\u003E","title":"Bridge Cliff\n","link":"","lat":51.763809,"lon":-3.4014836,"icon":"/testwiki/images/1/16/Blue.png"},{"text":"\u003Cb\u003E\u003Cp\u003E\u003Ca href=\"/wiki/Cefn_Coed_-_West\" title=\"Cefn Coed - West\"\u003ECefn Coed - West\u003C/a\u003E\n\u003C/p\u003E\u003C/b\u003E\u003Chr /\u003E\u003Cp\u003E51.764481 -3.4002147\n\u003C/p\u003E","title":"Cefn Coed - West\n","link":"","lat":51.764481,"lon":-3.4002147,"icon":"/testwiki/images/1/16/Blue.png"},{"text":"\u003Cb\u003E\u003Cp\u003E\u003Ca href=\"/wiki/Cefn_Coed_-_East\" title=\"Cefn Coed - East\"\u003ECefn Coed - East\u003C/a\u003E\n\u003C/p\u003E\u003C/b\u003E\u003Chr /\u003E\u003Cp\u003E51.765239 -3.3984702\n\u003C/p\u003E","title":"Cefn Coed - East\n","link":"","lat":51.765239,"lon":-3.3984702,"icon":"/testwiki/images/4/43/Orange.png"},{"text":"\u003Cb\u003E\u003Cp\u003EParking Cefn Coed\n\u003C/p\u003E\u003C/b\u003E\u003Chr /\u003E\u003Cp\u003E51.76113002356919,-3.3980116708571586\u003Cbr /\u003ESO 035 079\u003Cbr /\u003ECF48 1EW\n\u003C/p\u003E","title":"Parking Cefn Coed\n","link":"","lat":51.761130023569,"lon":-3.3980116708572,"icon":"/testwiki/images/7/74/Parking.png"},{"text":"\u003Cb\u003E\u003Cp\u003E\u003Cb\u003E\u003Ca href=\"/wiki/Buckland_Hill\" title=\"Buckland Hill\"\u003EBuckland Hill\u003C/a\u003E\u003C/b\u003E\n\u003C/p\u003E\u003C/b\u003E\u003Chr /\u003E\u003Cp\u003E51.884167, -3.241255\n\u003C/p\u003E","title":"Buckland Hill\n","link":"","lat":51.884167,"lon":-3.241255,"icon":"/testwiki/images/0/0c/Bouldering.png"},{"text":"\u003Cb\u003E\u003Cp\u003E\u003Cb\u003E\u003Ca href=\"/wiki/Fernlea_Slabs_-_Risca\" title=\"Fernlea Slabs - Risca\"\u003EFernlea Slabs - Risca\u003C/a\u003E\u003C/b\u003E\n\u003C/p\u003E\u003C/b\u003E\u003Chr /\u003E\u003Cp\u003E51.61751, -3.10248\n\u003C/p\u003E","title":"Fernlea Slabs - Risca\n","link":"","lat":51.61751,"lon":-3.10248,"icon":"/testwiki/images/4/43/Orange.png"},{"text":"\u003Cb\u003E\u003Cp\u003E\u003Cb\u003E\u003Ca href=\"/wiki/Craig_y_Nos\" title=\"Craig y Nos\"\u003ECraig y Nos\u003C/a\u003E\u003C/b\u003E\n\u003C/p\u003E\u003C/b\u003E\u003Chr /\u003E\u003Cp\u003E51.820991, -3.682372\n\u003C/p\u003E","title":"Craig y Nos\n","link":"","lat":51.820991,"lon":-3.682372,"icon":"/testwiki/images/4/43/Orange.png"},{"text":"\u003Cb\u003E\u003Cp\u003E\u003Cb\u003E\u003Ca href=\"/wiki/Cwm_Leyshon_Quarry\" title=\"Cwm Leyshon Quarry\"\u003ECwm Leyshon Quarry\u003C/a\u003E\u003C/b\u003E\n\u003C/p\u003E\u003C/b\u003E\u003Chr /\u003E\u003Cp\u003E51.574285, -3.139208\n\u003C/p\u003E","title":"Cwm Leyshon Quarry\n","link":"","lat":51.574285,"lon":-3.139208,"icon":"/testwiki/images/1/16/Blue.png"},{"text":"\u003Cb\u003E\u003Cp\u003E\u003Cb\u003E\u003Ca href=\"/wiki/Darren_Fawr\" title=\"Darren Fawr\"\u003EDarren Fawr\u003C/a\u003E\u003C/b\u003E\n\u003C/p\u003E\u003C/b\u003E\u003Chr /\u003E\u003Cp\u003E51.781117, -3.420246\n\u003C/p\u003E","title":"Darren Fawr\n","link":"","lat":51.781117,"lon":-3.420246,"icon":"/testwiki/images/1/16/Blue.png"},{"text":"\u003Cb\u003E\u003Cp\u003E\u003Cb\u003E\u003Ca href=\"/wiki/Darren_Fach\" title=\"Darren Fach\"\u003EDarren Fach\u003C/a\u003E\u003C/b\u003E\n\u003C/p\u003E\u003C/b\u003E\u003Chr /\u003E\u003Cp\u003E51.78454, -3.423564\n\u003C/p\u003E","title":"Darren Fach\n","link":"","lat":51.78454,"lon":-3.423564,"icon":"/testwiki/images/1/16/Blue.png"},{"text":"\u003Cb\u003E\u003Cp\u003E\u003Cb\u003E\u003Ca href=\"/wiki/Gilwern_Hill_-_Crag_X\" title=\"Gilwern Hill - Crag X\"\u003EGilwern Hill - Crag X\u003C/a\u003E\u003C/b\u003E\n\u003C/p\u003E\u003C/b\u003E\u003Chr /\u003E\u003Cp\u003E51.812906, -3.106964\n\u003C/p\u003E","title":"Gilwern Hill - Crag X\n","link":"","lat":51.812906,"lon":-3.106964,"icon":"/testwiki/images/1/16/Blue.png"},{"text":"\u003Cb\u003E\u003Cp\u003E\u003Cb\u003E\u003Ca href=\"/wiki/Gilwern_East\" title=\"Gilwern East\"\u003EGilwern East\u003C/a\u003E\u003C/b\u003E\n\u003C/p\u003E\u003C/b\u003E\u003Chr /\u003E\u003Cp\u003E51.803465,-3.0922611\n\u003C/p\u003E","title":"Gilwern East\n","link":"","lat":51.803465,"lon":-3.0922611,"icon":"/testwiki/images/1/16/Blue.png"},{"text":"\u003Cb\u003E\u003Cp\u003E\u003Cb\u003E\u003Ca href=\"/wiki/Llangattock\" title=\"Llangattock\"\u003ELlangattock\u003C/a\u003E\u003C/b\u003E\n\u003C/p\u003E\u003C/b\u003E\u003Chr /\u003E\u003Cp\u003E51.831518, -3.148935\n\u003C/p\u003E","title":"Llangattock\n","link":"","lat":51.831518,"lon":-3.148935,"icon":"/testwiki/images/4/43/Orange.png"},{"text":"\u003Cb\u003E\u003Cp\u003E\u003Cb\u003E\u003Ca href=\"/wiki/Taffs_Well\" title=\"Taffs Well\"\u003ETaffs Well\u003C/a\u003E\u003C/b\u003E\n\u003C/p\u003E\u003C/b\u003E\u003Chr /\u003E\u003Cp\u003E51.536579, -3.257189\n\u003C/p\u003E","title":"Taffs Well\n","link":"","lat":51.536579,"lon":-3.257189,"icon":"/testwiki/images/1/16/Blue.png"},{"text":"\u003Cb\u003E\u003Cp\u003E\u003Cb\u003E\u003Ca href=\"/wiki/Castle_Quarry\" title=\"Castle Quarry\"\u003ECastle Quarry\u003C/a\u003E\u003C/b\u003E\n\u003C/p\u003E\u003C/b\u003E\u003Chr /\u003E\u003Cp\u003E51.535699, -3.255558\n\u003C/p\u003E","title":"Castle Quarry\n","link":"","lat":51.535699,"lon":-3.255558,"icon":"/testwiki/images/1/16/Blue.png"},{"text":"\u003Cb\u003E\u003Cp\u003E\u003Cb\u003E\u003Ca href=\"/wiki/Taffs_Well_West\" title=\"Taffs Well West\"\u003ETaffs Well West\u003C/a\u003E\u003C/b\u003E\n\u003C/p\u003E\u003C/b\u003E\u003Chr /\u003E\u003Cp\u003E51.537797, -3.267939\n\u003C/p\u003E","title":"Taffs Well West\n","link":"","lat":51.537797,"lon":-3.267939,"icon":"/testwiki/images/1/16/Blue.png"},{"text":"\u003Cb\u003E\u003Cp\u003E\u003Cb\u003E\u003Ca href=\"/wiki/Taffs_Well_Pinnacle\" title=\"Taffs Well Pinnacle\"\u003ETaffs Well Pinnacle\u003C/a\u003E\u003C/b\u003E \n\u003C/p\u003E\u003C/b\u003E\u003Chr /\u003E\u003Cp\u003E51.542279,-3.260297\n\u003C/p\u003E","title":"Taffs Well Pinnacle \n","link":"","lat":51.542279,"lon":-3.260297,"icon":"/testwiki/images/1/16/Blue.png"},{"text":"\u003Cb\u003E\u003Cp\u003E\u003Cb\u003E\u003Ca href=\"/wiki/Taffs_West_Railway_Cutting\" title=\"Taffs West Railway Cutting\"\u003ETaffs West Railway Cutting\u003C/a\u003E\u003C/b\u003E\n\u003C/p\u003E\u003C/b\u003E\u003Chr /\u003E\u003Cp\u003E51.535709 -3.263316\n\u003C/p\u003E","title":"Taffs West Railway Cutting\n","link":"","lat":51.535709,"lon":-3.263316,"icon":"/testwiki/images/1/16/Blue.png"},{"text":"\u003Cb\u003E\u003Cp\u003E\u003Cb\u003E\u003Ca href=\"/wiki/Secret_Taffs_Well\" title=\"Secret Taffs Well\"\u003ESecret Taffs Well\u003C/a\u003E\u003C/b\u003E\n\u003C/p\u003E\u003C/b\u003E\u003Chr /\u003E\u003Cp\u003E51.538584, -3.2598406\n\u003C/p\u003E","title":"Secret Taffs Well\n","link":"","lat":51.538584,"lon":-3.2598406,"icon":"/testwiki/images/1/16/Blue.png"},{"text":"\u003Cb\u003E\u003Cp\u003E\u003Cb\u003E\u003Ca href=\"/wiki/Castle_Upon_Alun\" title=\"Castle Upon Alun\"\u003ECastle Upon Alun\u003C/a\u003E\u003C/b\u003E\n\u003C/p\u003E\u003C/b\u003E\u003Chr /\u003E\u003Cp\u003E51.466967, -3.571838\n\u003C/p\u003E","title":"Castle Upon Alun\n","link":"","lat":51.466967,"lon":-3.571838,"icon":"/testwiki/images/1/16/Blue.png"},{"text":"\u003Cb\u003E\u003Cp\u003E\u003Ca href=\"/wiki/Herberts_Quarry\" class=\"mw-redirect\" title=\"Herberts Quarry\"\u003EHerberts Quarry\u003C/a\u003E\n\u003C/p\u003E\u003C/b\u003E\u003Chr /\u003E\u003Cp\u003E51.854417, -3.835990\n\u003C/p\u003E","title":"Herberts Quarry\n","link":"","lat":51.854417,"lon":-3.83599,"icon":"/testwiki/images/4/43/Orange.png"},{"text":"\u003Cb\u003E\u003Cp\u003E\u003Ca href=\"/wiki/Morlais_Quarries#Lower_Tier\" title=\"Morlais Quarries\"\u003EMorlais - Middlle and Lower Tier\u003C/a\u003E\n\u003C/p\u003E\u003C/b\u003E\u003Chr /\u003E\u003Cp\u003E51.779282, -3.381944\n\u003C/p\u003E","title":"Morlais - Middlle and Lower Tier\n","link":"","lat":51.779282,"lon":-3.381944,"icon":"/testwiki/images/4/43/Orange.png"},{"text":"\u003Cb\u003E\u003Cp\u003E\u003Ca href=\"/wiki/Morlais_Quarries#Upper_Tier\" title=\"Morlais Quarries\"\u003EMorlais - Upper Tier\u003C/a\u003E\n\u003C/p\u003E\u003C/b\u003E\u003Chr /\u003E\u003Cp\u003E51.775864, -3.37898451.772029, -3.414618\n\u003C/p\u003E","title":"Morlais - Upper Tier\n","link":"","lat":51.775864,"lon":-3.378984,"icon":"/testwiki/images/4/43/Orange.png"},{"text":"\u003Cb\u003E\u003Cp\u003E\u003Ca href=\"/wiki/Taf_Fechan\" title=\"Taf Fechan\"\u003ETaf Fechan\u003C/a\u003E\n\u003C/p\u003E\u003C/b\u003E\u003Chr /\u003E\u003Cp\u003E51.784887, -3.360876\n\u003C/p\u003E","title":"Taf Fechan\n","link":"","lat":51.784887,"lon":-3.360876,"icon":"/testwiki/images/4/43/Orange.png"},{"text":"\u003Cb\u003E\u003Cp\u003E\u003Ca href=\"/wiki/Twynau_Gwynion_Quarries\" title=\"Twynau Gwynion Quarries\"\u003ETwynau Gwynion Quarries\u003C/a\u003E\n\u003C/p\u003E\u003C/b\u003E\u003Chr /\u003E\u003Cp\u003E51.78468, -3.358695\n\u003C/p\u003E","title":"Twynau Gwynion Quarries\n","link":"","lat":51.78468,"lon":-3.358695,"icon":"/testwiki/images/4/43/Orange.png"},{"text":"\u003Cb\u003E\u003Cp\u003E\u003Ca href=\"/wiki/Baltic_Quarry\" title=\"Baltic Quarry\"\u003EBaltic Quarry\u003C/a\u003E\n\u003C/p\u003E\u003C/b\u003E\u003Chr /\u003E\u003Cp\u003E51.796196, -3.357142\n\u003C/p\u003E","title":"Baltic Quarry\n","link":"","lat":51.796196,"lon":-3.357142,"icon":"/testwiki/images/4/43/Orange.png"},{"text":"\u003Cb\u003E\u003Cp\u003E\u003Ca href=\"/wiki/Trefil\" title=\"Trefil\"\u003ETrefil\u003C/a\u003E\n\u003C/p\u003E\u003C/b\u003E\u003Chr /\u003E\u003Cp\u003E51.825688, -3.311231\n\u003C/p\u003E","title":"Trefil\n","link":"","lat":51.825688,"lon":-3.311231,"icon":"/testwiki/images/1/16/Blue.png"},{"text":"\u003Cb\u003E\u003Cp\u003E\u003Cb\u003E\u003Ca href=\"/wiki/Clogau_Mawr\" title=\"Clogau Mawr\"\u003EClogau Mawr\u003C/a\u003E\u003C/b\u003E\n\u003C/p\u003E\u003C/b\u003E\u003Chr /\u003E\u003Cp\u003E51.857187, -3.851872\n\u003C/p\u003E","title":"Clogau Mawr\n","link":"","lat":51.857187,"lon":-3.851872,"icon":"/testwiki/images/4/43/Orange.png"},{"text":"\u003Cb\u003E\u003Cp\u003E\u003Ca href=\"/testwiki/index.php?title=Wenvoe_(whitehall)_Quarry\u0026amp;action=edit\u0026amp;redlink=1\" class=\"new\" title=\"Wenvoe (whitehall) Quarry (page does not exist)\"\u003EWenvoe (whitehall) Quarry\u003C/a\u003E\n\u003C/p\u003E\u003C/b\u003E\u003Chr /\u003E\u003Cp\u003E51.459783 -3.2550323\n\u003C/p\u003E","title":"Wenvoe (whitehall) Quarry\n","link":"","lat":51.459783,"lon":-3.2550323,"icon":"/testwiki/images/4/43/Orange.png"},{"text":"\u003Cb\u003E\u003Cp\u003E\u003Ca href=\"/wiki/Vaynor\" title=\"Vaynor\"\u003EVaynor\u003C/a\u003E\n\u003C/p\u003E\u003C/b\u003E\u003Chr /\u003E\u003Cp\u003E51.781806, -3.4038332\n\u003C/p\u003E","title":"Vaynor\n","link":"","lat":51.781806,"lon":-3.4038332,"icon":"/testwiki/images/1/16/Blue.png"},{"text":"\u003Cb\u003E\u003Cp\u003E\u003Ca href=\"/wiki/Danydarren_Quarry\" class=\"mw-redirect\" title=\"Danydarren Quarry\"\u003EDanydarren Quarry\u003C/a\u003E\n\u003C/p\u003E\u003C/b\u003E\u003Chr /\u003E\u003Cp\u003E51.772029, -3.414618\n\u003C/p\u003E","title":"Danydarren Quarry\n","link":"","lat":51.772029,"lon":-3.414618,"icon":"/testwiki/images/1/16/Blue.png"},{"text":"\u003Cb\u003E\u003Cp\u003E\u003Ca href=\"/wiki/Dyffryn_Crawnon\" title=\"Dyffryn Crawnon\"\u003EDyffryn Crawnon\u003C/a\u003E\n\u003C/p\u003E\u003C/b\u003E\u003Chr /\u003E\u003Cp\u003E51.826038, -3.317496\n\u003C/p\u003E","title":"Dyffryn Crawnon\n","link":"","lat":51.826038,"lon":-3.317496,"icon":"/testwiki/images/4/43/Orange.png"},{"text":"\u003Cb\u003E\u003Cp\u003E\u003Cb\u003E\u003Ca href=\"/wiki/Ifton_Quarry\" title=\"Ifton Quarry\"\u003EIfton Quarry\u003C/a\u003E\u003C/b\u003E\n\u003C/p\u003E\u003C/b\u003E\u003Chr /\u003E\u003Cp\u003E51.596172, -2.7799630\n\u003C/p\u003E","title":"Ifton Quarry\n","link":"","lat":51.596172,"lon":-2.779963,"icon":"/testwiki/images/1/16/Blue.png"},{"text":"\u003Cb\u003E\u003Cp\u003E\u003Cb\u003E\u003Ca href=\"/wiki/Dinas_-_Main_Slab\" title=\"Dinas - Main Slab\"\u003EDinas - Main Slab\u003C/a\u003E\u003C/b\u003E\n\u003C/p\u003E\u003C/b\u003E\u003Chr /\u003E\u003Cp\u003E51.759695, -3.577719\n\u003C/p\u003E","title":"Dinas - Main Slab\n","link":"","lat":51.759695,"lon":-3.577719,"icon":"/testwiki/images/4/43/Orange.png"},{"text":"\u003Cb\u003E\u003Cp\u003E\u003Cb\u003E\u003Ca href=\"/wiki/Cheesy_Rider_Area\" title=\"Cheesy Rider Area\"\u003ECheesy Rider Area\u003C/a\u003E\u003C/b\u003E\n\u003C/p\u003E\u003C/b\u003E\u003Chr /\u003E\u003Cp\u003E51.759469, -3.577147\n\u003C/p\u003E","title":"Cheesy Rider Area\n","link":"","lat":51.759469,"lon":-3.577147,"icon":"/testwiki/images/1/16/Blue.png"},{"text":"\u003Cb\u003E\u003Cp\u003E\u003Cb\u003E\u003Ca href=\"/wiki/Love_Of_Ivy_Area\" title=\"Love Of Ivy Area\"\u003ELove Of Ivy Area\u003C/a\u003E\u003C/b\u003E\n\u003C/p\u003E\u003C/b\u003E\u003Chr /\u003E\u003Cp\u003E51.759592, -3.576589\n\u003C/p\u003E","title":"Love Of Ivy Area\n","link":"","lat":51.759592,"lon":-3.576589,"icon":"/testwiki/images/1/16/Blue.png"},{"text":"\u003Cb\u003E\u003Cp\u003E\u003Cb\u003E\u003Ca href=\"/wiki/Inflated_Roundhead_Area\" title=\"Inflated Roundhead Area\"\u003EInflated Roundhead Area\u003C/a\u003E\u003C/b\u003E\n\u003C/p\u003E\u003C/b\u003E\u003Chr /\u003E\u003Cp\u003E51.759528, -3.576814\n\u003C/p\u003E","title":"Inflated Roundhead Area\n","link":"","lat":51.759528,"lon":-3.576814,"icon":"/testwiki/images/1/16/Blue.png"},{"text":"\u003Cb\u003E\u003Cp\u003E\u003Cb\u003E\u003Ca href=\"/wiki/Dinas_Main_Crag\" title=\"Dinas Main Crag\"\u003EDinas Main Crag\u003C/a\u003E\u003C/b\u003E\n\u003C/p\u003E\u003C/b\u003E\u003Chr /\u003E\u003Cp\u003E51.760546, -3.572933\n\u003C/p\u003E","title":"Dinas Main Crag\n","link":"","lat":51.760546,"lon":-3.572933,"icon":"/testwiki/images/1/16/Blue.png"},{"text":"\u003Cb\u003E\u003Cp\u003E\u003Cb\u003E\u003Ca href=\"/wiki/Kennelgarth_Wall\" title=\"Kennelgarth Wall\"\u003EKennelgarth Wall\u003C/a\u003E\u003C/b\u003E\n\u003C/p\u003E\u003C/b\u003E\u003Chr /\u003E\u003Cp\u003E51.760034, -3.574529 \n\u003C/p\u003E","title":"Kennelgarth Wall\n","link":"","lat":51.760034,"lon":-3.574529,"icon":"/testwiki/images/0/0c/Bouldering.png"},{"text":"\u003Cb\u003E\u003Cp\u003E\u003Cb\u003E\u003Ca href=\"/wiki/Lower_Cave_Area\" title=\"Lower Cave Area\"\u003ELower Cave Area\u003C/a\u003E\u003C/b\u003E\n\u003C/p\u003E\u003C/b\u003E\u003Chr /\u003E\u003Cp\u003E51.759543, -3.573455 \n\u003C/p\u003E","title":"Lower Cave Area\n","link":"","lat":51.759543,"lon":-3.573455,"icon":"/testwiki/images/1/16/Blue.png"},{"text":"\u003Cb\u003E\u003Cp\u003E\u003Cb\u003EDinas Car Park - (Free)\u003C/b\u003E\n\u003C/p\u003E\u003C/b\u003E\u003Chr /\u003E\u003Cp\u003E51.759553, -3.578206\u003Cbr /\u003E\nGates close at 5:00pm in summer,\u003Cbr /\u003E\nsmall parking spaces available outside gate.\n\u003C/p\u003E","title":"Dinas Car Park - (Free)\n","link":"","lat":51.759553,"lon":-3.578206,"icon":"/testwiki/images/7/74/Parking.png"},{"text":"\u003Cb\u003E\u003Cp\u003E\u003Ca href=\"/wiki/Pant_Quarry\" title=\"Pant Quarry\"\u003EPant Quarry\u003C/a\u003E\n\u003C/p\u003E\u003C/b\u003E\u003Chr /\u003E\u003Cp\u003E51.47255490, -3.59449687 \n\u003C/p\u003E","title":"Pant Quarry\n","link":"","lat":51.4725549,"lon":-3.59449687,"icon":"/testwiki/images/1/16/Blue.png"},{"text":"\u003Cb\u003E\u003Cp\u003E\u003Cb\u003E\u003Ca href=\"/wiki/Blaenllechau\" title=\"Blaenllechau\"\u003EBlaenllechau\u003C/a\u003E\u003C/b\u003E\n\u003C/p\u003E\u003C/b\u003E\u003Chr /\u003E\u003Cp\u003E51.661308, -3.4409201 \n\u003C/p\u003E","title":"Blaenllechau\n","link":"","lat":51.661308,"lon":-3.4409201,"icon":"/testwiki/images/1/16/Blue.png"},{"text":"\u003Cb\u003E\u003Cp\u003E\u003Cb\u003E\u003Ca href=\"/wiki/Bwlch_Mountain_Road\" title=\"Bwlch Mountain Road\"\u003EBwlch Mountain Road\u003C/a\u003E\u003C/b\u003E\n\u003C/p\u003E\u003C/b\u003E\u003Chr /\u003E\u003Cp\u003E51.647606, -3.536228\n\u003C/p\u003E","title":"Bwlch Mountain Road\n","link":"","lat":51.647606,"lon":-3.536228,"icon":"/testwiki/images/1/16/Blue.png"},{"text":"\u003Cb\u003E\u003Cp\u003E\u003Cb\u003E\u003Ca href=\"/wiki/Glynfach\" title=\"Glynfach\"\u003EGlynfach\u003C/a\u003E\u003C/b\u003E\n\u003C/p\u003E\u003C/b\u003E\u003Chr /\u003E\u003Cp\u003E51.603673, -3.4043906 \n\u003C/p\u003E","title":"Glynfach\n","link":"","lat":51.603673,"lon":-3.4043906,"icon":"/testwiki/images/1/16/Blue.png"},{"text":"\u003Cb\u003E\u003Cp\u003E\u003Cb\u003E\u003Ca href=\"/wiki/Punk_Rocks\" title=\"Punk Rocks\"\u003EPunk Rocks\u003C/a\u003E\u003C/b\u003E\n\u003C/p\u003E\u003C/b\u003E\u003Chr /\u003E\u003Cp\u003E51.608452, -3.4174748 \n\u003C/p\u003E","title":"Punk Rocks\n","link":"","lat":51.608452,"lon":-3.4174748,"icon":"/testwiki/images/4/43/Orange.png"},{"text":"\u003Cb\u003E\u003Cp\u003E\u003Cb\u003E\u003Ca href=\"/wiki/Edmonston_Quarry_and_Edge\" title=\"Edmonston Quarry and Edge\"\u003EEdmonston Quarry and Edge\u003C/a\u003E\u003C/b\u003E\n\u003C/p\u003E\u003C/b\u003E\u003Chr /\u003E\u003Cp\u003E51.604945, -3.4327769\n\u003C/p\u003E","title":"Edmonston Quarry and Edge\n","link":"","lat":51.604945,"lon":-3.4327769,"icon":"/testwiki/images/4/43/Orange.png"},{"text":"\u003Cb\u003E\u003Cp\u003E\u003Cb\u003E\u003Ca href=\"/wiki/Sheriff_Quarry,_Maerdy\" title=\"Sheriff Quarry, Maerdy\"\u003ESheriff Quarry, Maerdy\u003C/a\u003E\u003C/b\u003E\n\u003C/p\u003E\u003C/b\u003E\u003Chr /\u003E\u003Cp\u003E51.675450, -3.4919472 \n\u003C/p\u003E","title":"Sheriff Quarry, Maerdy\n","link":"","lat":51.67545,"lon":-3.4919472,"icon":"/testwiki/images/1/16/Blue.png"},{"text":"\u003Cb\u003E\u003Cp\u003E\u003Cb\u003E\u003Ca href=\"/wiki/Llwynypia\" title=\"Llwynypia\"\u003ELlwynypia\u003C/a\u003E\u003C/b\u003E\n\u003C/p\u003E\u003C/b\u003E\u003Chr /\u003E\u003Cp\u003E51.633693, -3.4577067 \n\u003C/p\u003E","title":"Llwynypia\n","link":"","lat":51.633693,"lon":-3.4577067,"icon":"/testwiki/images/1/16/Blue.png"},{"text":"\u003Cb\u003E\u003Cp\u003E\u003Cb\u003E\u003Ca href=\"/wiki/Cwm_Dimbath\" title=\"Cwm Dimbath\"\u003ECwm Dimbath\u003C/a\u003E\u003C/b\u003E\n\u003C/p\u003E\u003C/b\u003E\u003Chr /\u003E\u003Cp\u003E51.595178, -3.5149399 \n\u003C/p\u003E","title":"Cwm Dimbath\n","link":"","lat":51.595178,"lon":-3.5149399,"icon":"/testwiki/images/4/43/Orange.png"},{"text":"\u003Cb\u003E\u003Cp\u003E\u003Cb\u003E\u003Ca href=\"/wiki/Ton_Pentre\" title=\"Ton Pentre\"\u003ETon Pentre\u003C/a\u003E\u003C/b\u003E\n\u003C/p\u003E\u003C/b\u003E\u003Chr /\u003E\u003Cp\u003E51.64898, -3.48372\n\u003C/p\u003E","title":"Ton Pentre\n","link":"","lat":51.64898,"lon":-3.48372,"icon":"/testwiki/images/1/16/Blue.png"},{"text":"\u003Cb\u003E\u003Cp\u003E\u003Cb\u003E\u003Ca href=\"/wiki/Coed_Ely\" title=\"Coed Ely\"\u003ECoed Ely\u003C/a\u003E\u003C/b\u003E\n\u003C/p\u003E\u003C/b\u003E\u003Chr /\u003E\u003Cp\u003E51.561698, -3.412639\n\u003C/p\u003E","title":"Coed Ely\n","link":"","lat":51.561698,"lon":-3.412639,"icon":"/testwiki/images/1/16/Blue.png"},{"text":"\u003Cb\u003E\u003Cp\u003E\u003Cb\u003E\u003Ca href=\"/wiki/Dan_Dicks\" title=\"Dan Dicks\"\u003EDan Dicks\u003C/a\u003E\u003C/b\u003E\n\u003C/p\u003E\u003C/b\u003E\u003Chr /\u003E\u003Cp\u003E51.624221, -3.418770\n\u003C/p\u003E","title":"Dan Dicks\n","link":"","lat":51.624221,"lon":-3.41877,"icon":"/testwiki/images/1/16/Blue.png"},{"text":"\u003Cb\u003E\u003Cp\u003E\u003Cb\u003E\u003Ca href=\"/wiki/Trebanog\" title=\"Trebanog\"\u003ETrebanog\u003C/a\u003E\u003C/b\u003E\n\u003C/p\u003E\u003C/b\u003E\u003Chr /\u003E\u003Cp\u003E51.601966, -3.425766\n\u003C/p\u003E","title":"Trebanog\n","link":"","lat":51.601966,"lon":-3.425766,"icon":"/testwiki/images/4/43/Orange.png"},{"text":"\u003Cb\u003E\u003Cp\u003E\u003Cb\u003E\u003Ca href=\"/wiki/Trehafod\" title=\"Trehafod\"\u003ETrehafod\u003C/a\u003E\u003C/b\u003E\n\u003C/p\u003E\u003C/b\u003E\u003Chr /\u003E\u003Cp\u003E51.611946, -3.383923\n\u003C/p\u003E","title":"Trehafod\n","link":"","lat":51.611946,"lon":-3.383923,"icon":"/testwiki/images/1/16/Blue.png"},{"text":"\u003Cb\u003E\u003Cp\u003E\u003Cb\u003E\u003Ca href=\"/wiki/Ferndale_Main\" title=\"Ferndale Main\"\u003EFerndale Main\u003C/a\u003E\u003C/b\u003E\n\u003C/p\u003E\u003C/b\u003E\u003Chr /\u003E\u003Cp\u003E51.662003, -3.455565\n\u003C/p\u003E","title":"Ferndale Main\n","link":"","lat":51.662003,"lon":-3.455565,"icon":"/testwiki/images/1/16/Blue.png"},{"text":"\u003Cb\u003E\u003Cp\u003E\u003Cb\u003E\u003Ca href=\"/wiki/Ferndale_Lower_Quarry\" title=\"Ferndale Lower Quarry\"\u003EFerndale Lower Quarry\u003C/a\u003E\u003C/b\u003E\n\u003C/p\u003E\u003C/b\u003E\u003Chr /\u003E\u003Cp\u003E51.666043,-3.4557306\n\u003C/p\u003E","title":"Ferndale Lower Quarry\n","link":"","lat":51.666043,"lon":-3.4557306,"icon":"/testwiki/images/1/16/Blue.png"},{"text":"\u003Cb\u003E\u003Cp\u003E\u003Cb\u003E\u003Ca href=\"/wiki/Ferndale_Right\" title=\"Ferndale Right\"\u003EFerndale Right\u003C/a\u003E\u003C/b\u003E\n\u003C/p\u003E\u003C/b\u003E\u003Chr /\u003E\u003Cp\u003E51\u00b0 39\u2032 48.99\u2033 N, 3\u00b0 27\u2032 18.95\u2033 W\n\u003C/p\u003E","title":"Ferndale Right\n","link":"","lat":51.663608333333,"lon":-3.4552638888889,"icon":"/testwiki/images/1/16/Blue.png"},{"text":"\u003Cb\u003E\u003Cp\u003E\u003Cb\u003E\u003Ca href=\"/wiki/Treherbert_Quarrry_(Rhondda_Pillar)\" class=\"mw-redirect\" title=\"Treherbert Quarrry (Rhondda Pillar)\"\u003ETreherbert Quarrry (RhonddaPillar)\u003C/a\u003E\u003C/b\u003E\n\u003C/p\u003E\u003C/b\u003E\u003Chr /\u003E\u003Cp\u003E51.667596, -3.538399\n\u003C/p\u003E","title":"Treherbert Quarrry (RhonddaPillar)\n","link":"","lat":51.667596,"lon":-3.538399,"icon":"/testwiki/images/1/16/Blue.png"},{"text":"\u003Cb\u003E\u003Cp\u003E\u003Cb\u003E\u003Ca href=\"/wiki/Gelli\" title=\"Gelli\"\u003EGelli\u003C/a\u003E\u003C/b\u003E\n\u003C/p\u003E\u003C/b\u003E\u003Chr /\u003E\u003Cp\u003E51.640823,-3.4725460\n\u003C/p\u003E","title":"Gelli\n","link":"","lat":51.640823,"lon":-3.472546,"icon":"/testwiki/images/1/16/Blue.png"},{"text":"\u003Cb\u003E\u003Cp\u003E\u003Cb\u003E\u003Ca href=\"/wiki/Llantrisant_Drugs_Cliff\" title=\"Llantrisant Drugs Cliff\"\u003ELlantrisant Drugs Cliff\u003C/a\u003E\u003C/b\u003E\n\u003C/p\u003E\u003C/b\u003E\u003Chr /\u003E\u003Cp\u003E51.542323, -3.383063\n\u003C/p\u003E","title":"Llantrisant Drugs Cliff\n","link":"","lat":51.542323,"lon":-3.383063,"icon":"/testwiki/images/1/16/Blue.png"},{"text":"\u003Cb\u003E\u003Cp\u003E\u003Cb\u003E\u003Ca href=\"/wiki/Darren_Fawr_-_Garw_Valley\" class=\"mw-redirect\" title=\"Darren Fawr - Garw Valley\"\u003EDarren Fawr - Garw Valley\u003C/a\u003E\u003C/b\u003E\n\u003C/p\u003E\u003C/b\u003E\u003Chr /\u003E\u003Cp\u003E51.622706 -3.5956836\n\u003C/p\u003E","title":"Darren Fawr - Garw Valley\n","link":"","lat":51.622706,"lon":-3.5956836,"icon":"/testwiki/images/1/16/Blue.png"},{"text":"\u003Cb\u003E\u003Cp\u003E\u003Cb\u003E\u003Ca href=\"/wiki/Lewistown\" title=\"Lewistown\"\u003ELewistown\u003C/a\u003E\u003C/b\u003E\n\u003C/p\u003E\u003C/b\u003E\u003Chr /\u003E\u003Cp\u003E51.586257, -3.5404247\n\u003C/p\u003E","title":"Lewistown\n","link":"","lat":51.586257,"lon":-3.5404247,"icon":"/testwiki/images/1/16/Blue.png"},{"text":"\u003Cb\u003E\u003Cp\u003E\u003Cb\u003E\u003Ca href=\"/wiki/Sugardaddy_Gasworks\" title=\"Sugardaddy Gasworks\"\u003ESugardaddy Gasworks \u003C/a\u003E\u003C/b\u003E\n\u003C/p\u003E\u003C/b\u003E\u003Chr /\u003E\u003Cp\u003E51.571104, -3.3497518\n\u003C/p\u003E","title":"Sugardaddy Gasworks \n","link":"","lat":51.571104,"lon":-3.3497518,"icon":"/testwiki/images/1/16/Blue.png"},{"text":"\u003Cb\u003E\u003Cp\u003E\u003Cb\u003E\u003Ca href=\"/wiki/Porth\" title=\"Porth\"\u003EPorth\u003C/a\u003E\u003C/b\u003E\n\u003C/p\u003E\u003C/b\u003E\u003Chr /\u003E\u003Cp\u003E51.615049, -3.4037018\n\u003C/p\u003E","title":"Porth\n","link":"","lat":51.615049,"lon":-3.4037018,"icon":"/testwiki/images/1/16/Blue.png"},{"text":"\u003Cb\u003E\u003Cp\u003E\u003Cb\u003E\u003Ca href=\"/wiki/Pen_Pych\" title=\"Pen Pych\"\u003EPen Pych\u003C/a\u003E\u003C/b\u003E\n\u003C/p\u003E\u003C/b\u003E\u003Chr /\u003E\u003Cp\u003E51.684593, -3.565994\n\u003C/p\u003E","title":"Pen Pych\n","link":"","lat":51.684593,"lon":-3.565994,"icon":"/testwiki/images/1/16/Blue.png"},{"text":"\u003Cb\u003E\u003Cp\u003E\u003Cb\u003E\u003Ca href=\"/wiki/Maerdy_-_Rhondda_Fach\" title=\"Maerdy - Rhondda Fach\"\u003EMaerdy - Rhondda Fach\u003C/a\u003E\u003C/b\u003E\n\u003C/p\u003E\u003C/b\u003E\u003Chr /\u003E\u003Cp\u003E51.674531 -3.4909782\n\u003C/p\u003E","title":"Maerdy - Rhondda Fach\n","link":"","lat":51.674531,"lon":-3.4909782,"icon":"/testwiki/images/1/16/Blue.png"},{"text":"\u003Cb\u003E\u003Cp\u003E\u003Cb\u003E\u003Ca href=\"/wiki/Tylorstown_Quarry\" title=\"Tylorstown Quarry\"\u003ETylorstown Quarry\u003C/a\u003E\u003C/b\u003E\n\u003C/p\u003E\u003C/b\u003E\u003Chr /\u003E\u003Cp\u003E51.652320, -3.425395\n\u003C/p\u003E","title":"Tylorstown Quarry\n","link":"","lat":51.65232,"lon":-3.425395,"icon":"/testwiki/images/1/16/Blue.png"},{"text":"\u003Cb\u003E\u003Cp\u003E\u003Cb\u003E\u003Ca href=\"/wiki/Coedcaerau-bach\" title=\"Coedcaerau-bach\"\u003ECoedcaerau-bach\u003C/a\u003E\u003C/b\u003E\n\u003C/p\u003E\u003C/b\u003E\u003Chr /\u003E\u003Cp\u003E51.53926 -3.354268\n\u003C/p\u003E","title":"Coedcaerau-bach\n","link":"","lat":51.53926,"lon":-3.354268,"icon":"/testwiki/images/1/16/Blue.png"},{"text":"\u003Cb\u003E\u003Cp\u003E\u003Ca href=\"/wiki/Tyn-y-coed\" title=\"Tyn-y-coed\"\u003ETyn-y-coed\u003C/a\u003E\n\u003C/p\u003E\u003C/b\u003E\u003Chr /\u003E\u003Cpre\u003E51.539026, -3.322476\n\u003C/pre\u003E\n","title":"Tyn-y-coed\n","link":"","lat":51.539026,"lon":-3.322476,"icon":"/testwiki/images/1/16/Blue.png"},{"text":"\u003Cb\u003E\u003Cp\u003E\u003Ca href=\"/wiki/Ynyshir_West\" title=\"Ynyshir West\"\u003EYnyshir West\u003C/a\u003E\n\u003C/p\u003E\u003C/b\u003E\u003Chr /\u003E\u003Cp\u003E51.624112, -3.4166952\n\u003C/p\u003E","title":"Ynyshir West\n","link":"","lat":51.624112,"lon":-3.4166952,"icon":"/testwiki/images/1/16/Blue.png"},{"text":"\u003Cb\u003E\u003Cp\u003E\u003Ca href=\"/wiki/Ynyshir_Quarry\" title=\"Ynyshir Quarry\"\u003EYnyshir Quarry\u003C/a\u003E\n\u003C/p\u003E\u003C/b\u003E\u003Chr /\u003E\u003Cp\u003E51.620446 -3.405830\n\u003C/p\u003E","title":"Ynyshir Quarry\n","link":"","lat":51.620446,"lon":-3.40583,"icon":"/testwiki/images/1/16/Blue.png"},{"text":"\u003Cb\u003E\u003Cp\u003E\u003Ca href=\"/wiki/Space_Mountain\" title=\"Space Mountain\"\u003ESpace Mountain\u003C/a\u003E\n\u003C/p\u003E\u003C/b\u003E\u003Chr /\u003E\u003Cp\u003E51.67966 -3.5707 \n\u003C/p\u003E","title":"Space Mountain\n","link":"","lat":51.67966,"lon":-3.5707,"icon":"/testwiki/images/1/16/Blue.png"},{"text":"\u003Cb\u003E\u003Cp\u003E\u003Ca href=\"/wiki/Clydach_Vale_Cambrian_Quarry\" title=\"Clydach Vale Cambrian Quarry\"\u003EClydach Vale Cambrian Quarry\u003C/a\u003E\n\u003C/p\u003E\u003C/b\u003E\u003Chr /\u003E\u003Cp\u003E51.63232, -3.477354 \n\u003C/p\u003E","title":"Clydach Vale Cambrian Quarry\n","link":"","lat":51.63232,"lon":-3.477354,"icon":"/testwiki/images/1/16/Blue.png"},{"text":"\u003Cb\u003E\u003Cp\u003E\u003Ca href=\"/wiki/Clydach_Vale_Bogmonster_Quarry\" title=\"Clydach Vale Bogmonster Quarry\"\u003EClydach Vale Bogmonster Quarry\u003C/a\u003E\n\u003C/p\u003E\u003C/b\u003E\u003Chr /\u003E\u003Cpre\u003E51.628019, -3.488374\n\u003C/pre\u003E\n","title":"Clydach Vale Bogmonster Quarry\n","link":"","lat":51.628019,"lon":-3.488374,"icon":"/testwiki/images/1/16/Blue.png"},{"text":"\u003Cb\u003E\u003Cp\u003E\u003Ca href=\"/wiki/The_Farm\" title=\"The Farm\"\u003EThe Farm\u003C/a\u003E\n\u003C/p\u003E\u003C/b\u003E\u003Chr /\u003E\u003Cp\u003E51.63641, -3.48814\n\u003C/p\u003E","title":"The Farm\n","link":"","lat":51.63641,"lon":-3.48814,"icon":"/testwiki/images/1/16/Blue.png"},{"text":"\u003Cb\u003E\u003Cp\u003E\u003Cb\u003E\u003Ca href=\"/wiki/Gelli\" title=\"Gelli\"\u003EGelli\u003C/a\u003E\u003C/b\u003E Parking\n\u003C/p\u003E\u003C/b\u003E\u003Chr /\u003E\u003Cp\u003E51.642345 -3.4777790\n\u003C/p\u003E","title":"Gelli Parking\n","link":"","lat":51.642345,"lon":-3.477779,"icon":"/testwiki/images/7/74/Parking.png"},{"text":"\u003Cb\u003E\u003Cp\u003E\u003Cb\u003EParking - Coed Ely\u003C/b\u003E\n\u003C/p\u003E\u003C/b\u003E\u003Chr /\u003E\u003Cp\u003E51.561985, -3.414828\n\u003C/p\u003E","title":"Parking - Coed Ely\n","link":"","lat":51.561985,"lon":-3.414828,"icon":"/testwiki/images/7/74/Parking.png"},{"text":"\u003Cb\u003E\u003Cp\u003E\u003Cb\u003EParking \u003Ca href=\"/wiki/Ferndale\" class=\"mw-redirect\" title=\"Ferndale\"\u003EFerndale Quarry\u003C/a\u003E\u003C/b\u003E and\u003Cbr /\u003E\u003Ca href=\"/wiki/Ferndale_Lower_Quarry\" title=\"Ferndale Lower Quarry\"\u003EFerndale Lower Quarry\u003C/a\u003E\n\u003C/p\u003E\u003C/b\u003E\u003Chr /\u003E\u003Cp\u003E51.664906, -3.4527031\n\u003C/p\u003E","title":"Parking Ferndale Quarry andFerndale Lower Quarry\n","link":"","lat":51.664906,"lon":-3.4527031,"icon":"/testwiki/images/7/74/Parking.png"},{"text":"\u003Cb\u003E\u003Cp\u003E\u003Cb\u003EParking \u003Ca href=\"/wiki/Pen_Pych\" title=\"Pen Pych\"\u003EPen Pych\u003C/a\u003E\u003C/b\u003E\n\u003C/p\u003E\u003C/b\u003E\u003Chr /\u003E\u003Cp\u003E51.680362, -3.557406\n\u003C/p\u003E","title":"Parking Pen Pych\n","link":"","lat":51.680362,"lon":-3.557406,"icon":"/testwiki/images/7/74/Parking.png"},{"text":"\u003Cb\u003E\u003Cp\u003E\u003Cb\u003EParking Tylorstown\u003C/b\u003E\n\u003C/p\u003E\u003C/b\u003E\u003Chr /\u003E\u003Cp\u003E51.654628, -3.421544\n\u003C/p\u003E","title":"Parking Tylorstown\n","link":"","lat":51.654628,"lon":-3.421544,"icon":"/testwiki/images/7/74/Parking.png"},{"text":"\u003Cb\u003E\u003Cp\u003E\u003Cb\u003EParking Cwm Dimbath\u003C/b\u003E\n\u003C/p\u003E\u003C/b\u003E\u003Chr /\u003E\u003Cp\u003E51.581727, -3.5176206\n\u003C/p\u003E","title":"Parking Cwm Dimbath\n","link":"","lat":51.581727,"lon":-3.5176206,"icon":"/testwiki/images/7/74/Parking.png"},{"text":"\u003Cb\u003E\u003Cp\u003E\u003Cb\u003EParking Space Mountain\u003C/b\u003E\n\u003C/p\u003E\u003C/b\u003E\u003Chr /\u003E\u003Cp\u003E51.67595 -3.565857\n\u003C/p\u003E","title":"Parking Space Mountain\n","link":"","lat":51.67595,"lon":-3.565857,"icon":"/testwiki/images/7/74/Parking.png"},{"text":"\u003Cb\u003E\u003Cp\u003E\u003Cb\u003EParking Clydach Quarry\u003C/b\u003E\n\u003C/p\u003E\u003C/b\u003E\u003Chr /\u003E\u003Cp\u003E51.62947 -3.477635 - \tCF40 2DT\n\u003C/p\u003E","title":"Parking Clydach Quarry\n","link":"","lat":51.62947,"lon":-3.477635,"icon":"/testwiki/images/7/74/Parking.png"},{"text":"\u003Cb\u003E\u003Cp\u003E\u003Cb\u003E\u003Ca href=\"/wiki/Abercynon_High_Buttress\" title=\"Abercynon High Buttress\"\u003EAbercynon High Buttress\u003C/a\u003E\u003C/b\u003E\n\u003C/p\u003E\u003C/b\u003E\u003Chr /\u003E\u003Cp\u003E51.654376, -3.326472\n\u003C/p\u003E","title":"Abercynon High Buttress\n","link":"","lat":51.654376,"lon":-3.326472,"icon":"/testwiki/images/4/43/Orange.png"},{"text":"\u003Cb\u003E\u003Cp\u003E\u003Cb\u003E\u003Ca href=\"/wiki/The_Gap\" title=\"The Gap\"\u003EThe Gap\u003C/a\u003E\u003C/b\u003E\n\u003C/p\u003E\u003C/b\u003E\u003Chr /\u003E\u003Cp\u003E51.65793,-3.330898\n\u003C/p\u003E","title":"The Gap\n","link":"","lat":51.65793,"lon":-3.330898,"icon":"/testwiki/images/1/16/Blue.png"},{"text":"\u003Cb\u003E\u003Cp\u003E\u003Cb\u003E\u003Ca href=\"/wiki/Cefnpennar\" title=\"Cefnpennar\"\u003ECefnpennar\u003C/a\u003E\u003C/b\u003E\n\u003C/p\u003E\u003C/b\u003E\u003Chr /\u003E\u003Cp\u003E51.702420, -3.399990\n\u003C/p\u003E","title":"Cefnpennar\n","link":"","lat":51.70242,"lon":-3.39999,"icon":"/testwiki/images/4/43/Orange.png"},{"text":"\u003Cb\u003E\u003Cp\u003E\u003Cb\u003E\u003Ca href=\"/wiki/Ynysybwl_Upper_Quarry\" title=\"Ynysybwl Upper Quarry\"\u003EYnysybwl Upper Quarry\u003C/a\u003E\u003C/b\u003E\n\u003C/p\u003E\u003C/b\u003E\u003Chr /\u003E\u003Cp\u003E51.640283, -3.3521548\n\u003C/p\u003E","title":"Ynysybwl Upper Quarry\n","link":"","lat":51.640283,"lon":-3.3521548,"icon":"/testwiki/images/4/43/Orange.png"},{"text":"\u003Cb\u003E\u003Cp\u003E\u003Cb\u003E\u003Ca href=\"/wiki/The_Darren\" title=\"The Darren\"\u003EThe Darren\u003C/a\u003E\u003C/b\u003E\n\u003C/p\u003E\u003C/b\u003E\u003Chr /\u003E\u003Cp\u003E51.6115613, -3.344559\n\u003C/p\u003E","title":"The Darren\n","link":"","lat":51.6115613,"lon":-3.344559,"icon":"/testwiki/images/1/16/Blue.png"},{"text":"\u003Cb\u003E\u003Cp\u003E\u003Cb\u003E\u003Ca href=\"/wiki/Mountain_Ash\" title=\"Mountain Ash\"\u003EMountain Ash\u003C/a\u003E\u003C/b\u003E\n\u003C/p\u003E\u003C/b\u003E\u003Chr /\u003E\u003Cp\u003E51.677583, -3.364094\n\u003C/p\u003E","title":"Mountain Ash\n","link":"","lat":51.677583,"lon":-3.364094,"icon":"/testwiki/images/1/16/Blue.png"},{"text":"\u003Cb\u003E\u003Cp\u003E\u003Cb\u003E\u003Ca href=\"/wiki/Mountain_Ash_Natural_Buttress\" title=\"Mountain Ash Natural Buttress\"\u003EMountain Ash Natural Buttress\u003C/a\u003E\u003C/b\u003E\n\u003C/p\u003E\u003C/b\u003E\u003Chr /\u003E\u003Cp\u003E51.677728, -3.3644959\n\u003C/p\u003E","title":"Mountain Ash Natural Buttress\n","link":"","lat":51.677728,"lon":-3.3644959,"icon":"/testwiki/images/4/43/Orange.png"},{"text":"\u003Cb\u003E\u003Cp\u003E\u003Cb\u003E\u003Ca href=\"/wiki/Navigation_Quarry_-_Cilfynydd\" title=\"Navigation Quarry - Cilfynydd\"\u003ENavigation Quarry - Cilfynydd\u003C/a\u003E\u003C/b\u003E\n\u003C/p\u003E\u003C/b\u003E\u003Chr /\u003E\u003Cp\u003E51.637311, -3.320671\n\u003C/p\u003E","title":"Navigation Quarry - Cilfynydd\n","link":"","lat":51.637311,"lon":-3.320671,"icon":"/testwiki/images/1/16/Blue.png"},{"text":"\u003Cb\u003E\u003Cp\u003E\u003Cb\u003E\u003Ca href=\"/wiki/Edwardsville_(X1)\" class=\"mw-redirect\" title=\"Edwardsville (X1)\"\u003EEdwardsville_(X1)\u003C/a\u003E\u003C/b\u003E\n\u003C/p\u003E\u003C/b\u003E\u003Chr /\u003E\u003Cp\u003E51.672212, -3.326186\n\u003C/p\u003E","title":"Edwardsville_(X1)\n","link":"","lat":51.672212,"lon":-3.326186,"icon":"/testwiki/images/1/16/Blue.png"},{"text":"\u003Cb\u003E\u003Cp\u003E\u003Cb\u003E\u003Ca href=\"/wiki/Golf_Club_Crag\" title=\"Golf Club Crag\"\u003EGolf Club Crag\u003C/a\u003E\u003C/b\u003E\n\u003C/p\u003E\u003C/b\u003E\u003Chr /\u003E\u003Cp\u003E51.607539, -3.324675\n\u003C/p\u003E","title":"Golf Club Crag\n","link":"","lat":51.607539,"lon":-3.324675,"icon":"/testwiki/images/4/43/Orange.png"},{"text":"\u003Cb\u003E\u003Cp\u003E\u003Cb\u003E\u003Ca href=\"/wiki/Troedyrhiw\" title=\"Troedyrhiw\"\u003ETroedyrhiw\u003C/a\u003E\u003C/b\u003E\n\u003C/p\u003E\u003C/b\u003E\u003Chr /\u003E\u003Cp\u003E51.707711, -3.337481\n\u003C/p\u003E","title":"Troedyrhiw\n","link":"","lat":51.707711,"lon":-3.337481,"icon":"/testwiki/images/4/43/Orange.png"},{"text":"\u003Cb\u003E\u003Cp\u003E\u003Cb\u003E\u003Ca href=\"/testwiki/index.php?title=Ynsboeth\u0026amp;action=edit\u0026amp;redlink=1\" class=\"new\" title=\"Ynsboeth (page does not exist)\"\u003EYnsboeth\u003C/a\u003E\u003C/b\u003E\n\u003C/p\u003E\u003C/b\u003E\u003Chr /\u003E\u003Cp\u003E51.659750, -3.336697\n\u003C/p\u003E","title":"Ynsboeth\n","link":"","lat":51.65975,"lon":-3.336697,"icon":"/testwiki/images/4/43/Orange.png"},{"text":"\u003Cb\u003E\u003Cp\u003E\u003Cb\u003E\u003Ca href=\"/wiki/Cwmaman_Main\" title=\"Cwmaman Main\"\u003ECwmaman Main\u003C/a\u003E\u003C/b\u003E\n\u003C/p\u003E\u003C/b\u003E\u003Chr /\u003E\u003Cp\u003E51.684590, -3.4376907\n\u003C/p\u003E","title":"Cwmaman Main\n","link":"","lat":51.684509,"lon":-3.4376907,"icon":"/testwiki/images/1/16/Blue.png"},{"text":"\u003Cb\u003E\u003Cp\u003E\u003Cb\u003E\u003Ca href=\"/wiki/Cwmaman_West\" title=\"Cwmaman West\"\u003ECwmaman West\u003C/a\u003E\u003C/b\u003E\n\u003C/p\u003E\u003C/b\u003E\u003Chr /\u003E\u003Cp\u003E51.681924, -3.4467351 \n\u003C/p\u003E","title":"Cwmaman West\n","link":"","lat":51.681924,"lon":-3.4467351,"icon":"/testwiki/images/1/16/Blue.png"},{"text":"\u003Cb\u003E\u003Cp\u003E\u003Cb\u003E\u003Ca href=\"/wiki/Penrhiwceiber_Quarry\" title=\"Penrhiwceiber Quarry\"\u003EPenrhiwceiber Quarry\u003C/a\u003E\u003C/b\u003E\n\u003C/p\u003E\u003C/b\u003E\u003Chr /\u003E\u003Cp\u003E51.670347, -3.3691683\n\u003C/p\u003E","title":"Penrhiwceiber Quarry\n","link":"","lat":51.670347,"lon":-3.3691683,"icon":"/testwiki/images/1/16/Blue.png"},{"text":"\u003Cb\u003E\u003Cp\u003E\u003Cb\u003E\u003Ca href=\"/wiki/Turberville_Road_Quarry\" title=\"Turberville Road Quarry\"\u003ETurberville Road Quarry\u003C/a\u003E\u003C/b\u003E\n\u003C/p\u003E\u003C/b\u003E\u003Chr /\u003E\u003Cp\u003E51.621459, -3.417624\n\u003C/p\u003E","title":"Turberville Road Quarry\n","link":"","lat":51.621459,"lon":-3.417624,"icon":"/testwiki/images/1/16/Blue.png"},{"text":"\u003Cb\u003E\u003Cp\u003E\u003Cb\u003EMountain Ash Parking\u003C/b\u003E\n\u003C/p\u003E\u003C/b\u003E\u003Chr /\u003E\u003Cp\u003E51.677518, -3.36791\n\u003C/p\u003E","title":"Mountain Ash Parking\n","link":"","lat":51.677518,"lon":-3.36791,"icon":"/testwiki/images/7/74/Parking.png"},{"text":"\u003Cb\u003E\u003Cp\u003E\u003Cb\u003ENavigation Parking 1\u003C/b\u003E\n\u003C/p\u003E\u003C/b\u003E\u003Chr /\u003E\u003Cp\u003E51.644405, -3.3246732\n\u003C/p\u003E","title":"Navigation Parking 1\n","link":"","lat":51.644405,"lon":-3.3246732,"icon":"/testwiki/images/7/74/Parking.png"},{"text":"\u003Cb\u003E\u003Cp\u003E\u003Cb\u003ENavigation Parking 2\u003C/b\u003E\n\u003C/p\u003E\u003C/b\u003E\u003Chr /\u003E\u003Cp\u003E51.644562, -3.3253169\n\u003C/p\u003E","title":"Navigation Parking 2\n","link":"","lat":51.644562,"lon":-3.3253169,"icon":"/testwiki/images/7/74/Parking.png"},{"text":"\u003Cb\u003E\u003Cp\u003E\u003Cb\u003ENavigation Parking 3\u003C/b\u003E\n\u003C/p\u003E\u003C/b\u003E\u003Chr /\u003E\u003Cp\u003E51.642739, -3.3236244\n\u003C/p\u003E","title":"Navigation Parking 3\n","link":"","lat":51.642739,"lon":-3.3236244,"icon":"/testwiki/images/7/74/Parking.png"},{"text":"\u003Cb\u003E\u003Cp\u003E\u003Cb\u003ENavigation Parking Adventurous 1\u003C/b\u003E\n\u003C/p\u003E\u003C/b\u003E\u003Chr /\u003E\u003Cp\u003E51.629463, -3.3130538\n\u003C/p\u003E","title":"Navigation Parking Adventurous 1\n","link":"","lat":51.629463,"lon":-3.3130538,"icon":"/testwiki/images/7/74/Parking.png"},{"text":"\u003Cb\u003E\u003Cp\u003E\u003Cb\u003ENavigation Parking Adventurous 2\u003C/b\u003E\n\u003C/p\u003E\u003C/b\u003E\u003Chr /\u003E\u003Cp\u003E51.645547, -3.3164549\n\u003C/p\u003E","title":"Navigation Parking Adventurous 2\n","link":"","lat":51.645547,"lon":-3.3164549,"icon":"/testwiki/images/7/74/Parking.png"},{"text":"\u003Cb\u003E\u003Cp\u003E\u003Cb\u003E\u003Ca href=\"/wiki/Inn_Crag\" title=\"Inn Crag\"\u003EInn Crag\u003C/a\u003E\u003C/b\u003E\n\u003C/p\u003E\u003C/b\u003E\u003Chr /\u003E\u003Cp\u003E51.692652, -3.741261\n\u003C/p\u003E","title":"Inn Crag\n","link":"","lat":51.692652,"lon":-3.741261,"icon":"/testwiki/images/4/43/Orange.png"},{"text":"\u003Cb\u003E\u003Cp\u003E\u003Cb\u003E\u003Ca href=\"/wiki/Blaengwynfi\" title=\"Blaengwynfi\"\u003EBlaengwynfi\u003C/a\u003E\u003C/b\u003E\n\u003C/p\u003E\u003C/b\u003E\u003Chr /\u003E\u003Cp\u003E51.657644, -3.598834\n\u003C/p\u003E","title":"Blaengwynfi\n","link":"","lat":51.657644,"lon":-3.598834,"icon":"/testwiki/images/1/16/Blue.png"},{"text":"\u003Cb\u003E\u003Cp\u003E\u003Cb\u003E\u003Ca href=\"/wiki/Cwm_Capel\" title=\"Cwm Capel\"\u003ECwm Capel\u003C/a\u003E\u003C/b\u003E\n\u003C/p\u003E\u003C/b\u003E\u003Chr /\u003E\u003Cp\u003E51.695810, -4.2429346 \n\u003C/p\u003E","title":"Cwm Capel\n","link":"","lat":51.69581,"lon":-4.2429346,"icon":"/testwiki/images/1/16/Blue.png"},{"text":"\u003Cb\u003E\u003Cp\u003E\u003Cb\u003E\u003Ca href=\"/wiki/Cefnstylle_Quarry\" title=\"Cefnstylle Quarry\"\u003ECefnstylle Quarry\u003C/a\u003E\u003C/b\u003E\n\u003C/p\u003E\u003C/b\u003E\u003Chr /\u003E\u003Cp\u003E51.646625, -4.064993\n\u003C/p\u003E","title":"Cefnstylle Quarry\n","link":"","lat":51.646625,"lon":-4.064993,"icon":"/testwiki/images/1/16/Blue.png"},{"text":"\u003Cb\u003E\u003Cp\u003E\u003Cb\u003E\u003Ca href=\"/wiki/Cwmafan\" title=\"Cwmafan\"\u003ECwmafan\u003C/a\u003E\u003C/b\u003E\n\u003C/p\u003E\u003C/b\u003E\u003Chr /\u003E\u003Cp\u003E51.602904, -3.779051707\n\u003C/p\u003E","title":"Cwmafan\n","link":"","lat":51.602904,"lon":-3.7790517,"icon":"/testwiki/images/4/43/Orange.png"},{"text":"\u003Cb\u003E\u003Cp\u003E\u003Cb\u003E\u003Ca href=\"/wiki/Drumau_Road\" title=\"Drumau Road\"\u003EDrumau Road\u003C/a\u003E\u003C/b\u003E\n\u003C/p\u003E\u003C/b\u003E\u003Chr /\u003E\u003Cp\u003E51.665426, -3.846663\n\u003C/p\u003E","title":"Drumau Road\n","link":"","lat":51.665426,"lon":-3.846663,"icon":"/testwiki/images/1/16/Blue.png"},{"text":"\u003Cb\u003E\u003Cp\u003E\u003Cb\u003E\u003Ca href=\"/wiki/Kilvey_Quarry\" title=\"Kilvey Quarry\"\u003EKilvey Quarry\u003C/a\u003E\u003C/b\u003E\n\u003C/p\u003E\u003C/b\u003E\u003Chr /\u003E\u003Cp\u003E51.626753, -3.9128813\n\u003C/p\u003E","title":"Kilvey Quarry\n","link":"","lat":51.626753,"lon":-3.9128813,"icon":"/testwiki/images/1/16/Blue.png"},{"text":"\u003Cb\u003E\u003Cp\u003E\u003Cb\u003E\u003Ca href=\"/wiki/Seacombe_Slab\" title=\"Seacombe Slab\"\u003ESeacombe Slab\u003C/a\u003E\u003C/b\u003E\n\u003C/p\u003E\u003C/b\u003E\u003Chr /\u003E\u003Cp\u003E51.626108, -3.9044470\n\u003C/p\u003E","title":"Seacombe Slab\n","link":"","lat":51.626108,"lon":-3.904447,"icon":"/testwiki/images/1/16/Blue.png"},{"text":"\u003Cb\u003E\u003Cp\u003E\u003Cb\u003E\u003Ca href=\"/wiki/Cilfrew_Main_Crag\" title=\"Cilfrew Main Crag\"\u003ECilfrew Main Crag\u003C/a\u003E\u003C/b\u003E\n\u003C/p\u003E\u003C/b\u003E\u003Chr /\u003E\u003Cp\u003E51.682792 -3.7866968\n\u003C/p\u003E","title":"Cilfrew Main Crag\n","link":"","lat":51.682792,"lon":-3.7866968,"icon":"/testwiki/images/4/43/Orange.png"},{"text":"\u003Cb\u003E\u003Cp\u003E\u003Cb\u003E\u003Ca href=\"/wiki/Cilfrew_Ravens_Cliff\" title=\"Cilfrew Ravens Cliff\"\u003ECilfrew Ravens Cliff\u003C/a\u003E\u003C/b\u003E\n\u003C/p\u003E\u003C/b\u003E\u003Chr /\u003E\u003Cp\u003E51.683341, -3.7863256\n\u003C/p\u003E","title":"Cilfrew Ravens Cliff\n","link":"","lat":51.683341,"lon":-3.7863256,"icon":"/testwiki/images/4/43/Orange.png"},{"text":"\u003Cb\u003E\u003Cp\u003E\u003Ca href=\"/wiki/Cilfrew_Outlying_Areas\" title=\"Cilfrew Outlying Areas\"\u003ECilfrew Outlying Areas\u003C/a\u003E\n\u003C/p\u003E\u003C/b\u003E\u003Chr /\u003E\u003Cp\u003E51.681700, -3.7878626\n\u003C/p\u003E","title":"Cilfrew Outlying Areas\n","link":"","lat":51.6817,"lon":-3.7878626,"icon":"/testwiki/images/4/43/Orange.png"},{"text":"\u003Cb\u003E\u003Cp\u003E\u003Cb\u003E\u003Ca href=\"/wiki/Graig_Fawr\" title=\"Graig Fawr\"\u003EGraig Fawr\u003C/a\u003E\u003C/b\u003E\n\u003C/p\u003E\u003C/b\u003E\u003Chr /\u003E\u003Cp\u003E51.566960, -3.734944\n\u003C/p\u003E","title":"Graig Fawr\n","link":"","lat":51.56696,"lon":-3.734944,"icon":"/testwiki/images/4/43/Orange.png"},{"text":"\u003Cb\u003E\u003Cp\u003E\u003Cb\u003E\u003Ca href=\"/wiki/Neath_Abbey_Quarry\" title=\"Neath Abbey Quarry\"\u003ENeath Abbey Quarry\u003C/a\u003E\u003C/b\u003E\n\u003C/p\u003E\u003C/b\u003E\u003Chr /\u003E\u003Cp\u003E51.67244, -3.84446\n\u003C/p\u003E","title":"Neath Abbey Quarry\n","link":"","lat":51.67244,"lon":-3.84446,"icon":"/testwiki/images/1/16/Blue.png"},{"text":"\u003Cb\u003E\u003Cp\u003E\u003Cb\u003E\u003Ca href=\"/wiki/Dyffryn_Woods_Crag\" title=\"Dyffryn Woods Crag\"\u003EDyffryn Woods Crag\u003C/a\u003E\u003C/b\u003E\n\u003C/p\u003E\u003C/b\u003E\u003Chr /\u003E\u003Cp\u003E51.6843, -3.84168\n\u003C/p\u003E","title":"Dyffryn Woods Crag\n","link":"","lat":51.6843,"lon":-3.84168,"icon":"/testwiki/images/1/16/Blue.png"},{"text":"\u003Cb\u003E\u003Cp\u003E\u003Cb\u003E\u003Ca href=\"/wiki/Graigola\" title=\"Graigola\"\u003EGraigola\u003C/a\u003E\u003C/b\u003E\n\u003C/p\u003E\u003C/b\u003E\u003Chr /\u003E\u003Cp\u003E51.69682, -3.86663\n\u003C/p\u003E","title":"Graigola\n","link":"","lat":51.69682,"lon":-3.86663,"icon":"/testwiki/images/1/16/Blue.png"},{"text":"\u003Cb\u003E\u003Cp\u003E\u003Cb\u003E\u003Ca href=\"/wiki/Abbey_Buttress\" title=\"Abbey Buttress\"\u003EAbbey Buttress\u003C/a\u003E\u003C/b\u003E\n\u003C/p\u003E\u003C/b\u003E\u003Chr /\u003E\u003Cp\u003E51.584990, -3.763139\n\u003C/p\u003E","title":"Abbey Buttress\n","link":"","lat":51.58499,"lon":-3.763139,"icon":"/testwiki/images/1/16/Blue.png"},{"text":"\u003Cb\u003E\u003Cp\u003E\u003Cb\u003E\u003Ca href=\"/wiki/Craig_y_Pal-Glais\" title=\"Craig y Pal-Glais\"\u003ECraig y Pal-Glais\u003C/a\u003E\u003C/b\u003E\n\u003C/p\u003E\u003C/b\u003E\u003Chr /\u003E\u003Cp\u003E51.688471, -3.872254\n\u003C/p\u003E","title":"Craig y Pal-Glais\n","link":"","lat":51.688471,"lon":-3.872254,"icon":"/testwiki/images/1/16/Blue.png"},{"text":"\u003Cb\u003E\u003Cp\u003E\u003Cb\u003E\u003Ca href=\"/wiki/Brombil_Woods_Crag\" title=\"Brombil Woods Crag\"\u003EBrombil Woods Crag\u003C/a\u003E\u003C/b\u003E\n\u003C/p\u003E\u003C/b\u003E\u003Chr /\u003E\u003Cp\u003E51.571668, -3.7466651\n\u003C/p\u003E","title":"Brombil Woods Crag\n","link":"","lat":51.571668,"lon":-3.7466651,"icon":"/testwiki/images/1/16/Blue.png"},{"text":"\u003Cb\u003E\u003Cp\u003E\u003Cb\u003E\u003Ca href=\"/wiki/Dell,_The\" class=\"mw-redirect\" title=\"Dell, The\"\u003EThe Dell\u003C/a\u003E\u003C/b\u003E\n\u003C/p\u003E\u003C/b\u003E\u003Chr /\u003E\u003Cp\u003E51.694035, -4.167102\n\u003C/p\u003E","title":"The Dell\n","link":"","lat":51.694035,"lon":-4.167102,"icon":"/testwiki/images/1/16/Blue.png"},{"text":"\u003Cb\u003E\u003Cp\u003E\u003Cb\u003E\u003Ca href=\"/wiki/Craig_Tyle-Cam\" title=\"Craig Tyle-Cam\"\u003ECraig Tyle-Cam\u003C/a\u003E\u003C/b\u003E\n\u003C/p\u003E\u003C/b\u003E\u003Chr /\u003E\u003Cp\u003E51.696601, -3.609588\n\u003C/p\u003E","title":"Craig Tyle-Cam\n","link":"","lat":51.696601,"lon":-3.609588,"icon":"/testwiki/images/4/43/Orange.png"},{"text":"\u003Cb\u003E\u003Cp\u003E\u003Cb\u003E\u003Ca href=\"/wiki/Llandarcy\" title=\"Llandarcy\"\u003ELlandarcy\u003C/a\u003E\u003C/b\u003E\n\u003C/p\u003E\u003C/b\u003E\u003Chr /\u003E\u003Cp\u003E51.644697, -3.8581428\n\u003C/p\u003E","title":"Llandarcy\n","link":"","lat":51.644697,"lon":-3.8581428,"icon":"/testwiki/images/1/16/Blue.png"},{"text":"\u003Cb\u003E\u003Cp\u003E\u003Cb\u003E\u003Ca href=\"/wiki/Red_Jacket_Pill\" title=\"Red Jacket Pill\"\u003ERed Jacket Pill\u003C/a\u003E\u003C/b\u003E\n\u003C/p\u003E\u003C/b\u003E\u003Chr /\u003E\u003Cp\u003E51.634875, -3.847027\n\u003C/p\u003E","title":"Red Jacket Pill\n","link":"","lat":51.633805,"lon":-3.846963,"icon":"/testwiki/images/1/16/Blue.png"},{"text":"\u003Cb\u003E\u003Cp\u003E\u003Cb\u003E\u003Ca href=\"/wiki/Apple_Tree_Buttress\" title=\"Apple Tree Buttress\"\u003EApple Tree Buttress\u003C/a\u003E\u003C/b\u003E\n\u003C/p\u003E\u003C/b\u003E\u003Chr /\u003E\u003Cp\u003E51.611305, -3.763952\n\u003C/p\u003E","title":"Apple Tree Buttress\n","link":"","lat":51.611305,"lon":-3.763952,"icon":"/testwiki/images/1/16/Blue.png"},{"text":"\u003Cb\u003E\u003Cp\u003E\u003Cb\u003E\u003Ca href=\"/wiki/Sunnybank\" title=\"Sunnybank\"\u003ESunnybank\u003C/a\u003E\u003C/b\u003E\n\u003C/p\u003E\u003C/b\u003E\u003Chr /\u003E\u003Cp\u003E51.624062, -4.034783\n\u003C/p\u003E","title":"Sunnybank\n","link":"","lat":51.624062,"lon":-4.034783,"icon":"/testwiki/images/1/16/Blue.png"},{"text":"\u003Cb\u003E\u003Cp\u003E\u003Cb\u003E\u003Ca href=\"/wiki/Craig_Cwm\" title=\"Craig Cwm\"\u003ECraig Cwm\u003C/a\u003E\u003C/b\u003E\n\u003C/p\u003E\u003C/b\u003E\u003Chr /\u003E\u003Cp\u003E51.729960, -3.911298\n\u003C/p\u003E","title":"Craig Cwm\n","link":"","lat":51.72996,"lon":-3.911298,"icon":"/testwiki/images/1/16/Blue.png"},{"text":"\u003Cb\u003E\u003Cp\u003E\u003Ca href=\"/wiki/Dunvant_Quarry\" title=\"Dunvant Quarry\"\u003EDunvant Quarry\u003C/a\u003E\n\u003C/p\u003E\u003C/b\u003E\u003Chr /\u003E\u003Cp\u003E51.627780, -4.029495\n\u003C/p\u003E","title":"Dunvant Quarry\n","link":"","lat":51.62778,"lon":-4.029495,"icon":"/testwiki/images/1/16/Blue.png"},{"text":"\u003Cb\u003E\u003Cp\u003E\u003Cb\u003E\u003Ca href=\"/wiki/Gelliwastad\" title=\"Gelliwastad\"\u003EGelliwastad\u003C/a\u003E\u003C/b\u003E\n\u003C/p\u003E\u003C/b\u003E\u003Chr /\u003E\u003Cp\u003E51.695131, -3.914317\n\u003C/p\u003E","title":"Gelliwastad\n","link":"","lat":51.695131,"lon":-3.914317,"icon":"/testwiki/images/1/16/Blue.png"},{"text":"\u003Cb\u003E\u003Cp\u003E\u003Cb\u003E\u003Ca href=\"/wiki/Abercregan\" title=\"Abercregan\"\u003EAbercregan\u003C/a\u003E\u003C/b\u003E\n\u003C/p\u003E\u003C/b\u003E\u003Chr /\u003E\u003Cp\u003E51.6504996, -3.6720153\n\u003C/p\u003E","title":"Abercregan\n","link":"","lat":51.6504996,"lon":-3.6720153,"icon":"/testwiki/images/1/16/Blue.png"},{"text":"\u003Cb\u003E\u003Cp\u003E\u003Cb\u003ECilfrew Edge Parking\u003C/b\u003E\n\u003C/p\u003E\u003C/b\u003E\u003Chr /\u003E\u003Cp\u003E51.682635, -3.781926\u003Cbr /\u003E\u003Cbr /\u003E\nPark outside gate here: locked at 3:15pm in Winter and 4:45pm in Summer\u003Cbr /\u003E\n\u003C/p\u003E","title":"Cilfrew Edge Parking\n","link":"","lat":51.682635,"lon":-3.781926,"icon":"/testwiki/images/7/74/Parking.png"},{"text":"\u003Cb\u003E\u003Cp\u003E\u003Cb\u003E\u003Ca href=\"/wiki/Graig_Fawr\" title=\"Graig Fawr\"\u003EGraig Fawr\u003C/a\u003E\u003C/b\u003E Parking\n\u003C/p\u003E\u003C/b\u003E\u003Chr /\u003E\u003Cp\u003E51.563626, -3.733613\n\u003C/p\u003E","title":"Graig Fawr Parking\n","link":"","lat":51.563626,"lon":-3.733613,"icon":"/testwiki/images/7/74/Parking.png"},{"text":"\u003Cb\u003E\u003Cp\u003E\u003Cb\u003E\u003Ca href=\"/wiki/Abbey_Buttress\" title=\"Abbey Buttress\"\u003EAbbey Buttress\u003C/a\u003EParking\u003C/b\u003E\n\u003C/p\u003E\u003C/b\u003E\u003Chr /\u003E\u003Cp\u003E51.585695, -3.7657713\n\u003C/p\u003E","title":"Abbey ButtressParking\n","link":"","lat":51.585695,"lon":-3.7657713,"icon":"/testwiki/images/7/74/Parking.png"},{"text":"\u003Cb\u003E\u003Cp\u003E\u003Cb\u003E\u003Ca href=\"/wiki/Gelliwastad\" title=\"Gelliwastad\"\u003EGelliwastad Parking\u003C/a\u003E\u003C/b\u003E\n\u003C/p\u003E\u003C/b\u003E\u003Chr /\u003E\u003Cp\u003E51.70494, -3.910531\n\u003C/p\u003E","title":"Gelliwastad Parking\n","link":"","lat":51.70494,"lon":-3.910531,"icon":"/testwiki/images/7/74/Parking.png"},{"text":"\u003Cb\u003E\u003Cp\u003E\u003Cb\u003E\u003Ca href=\"/wiki/Glyn_Quarry\" title=\"Glyn Quarry\"\u003EGlyn Quarry\u003C/a\u003E\u003Cbr /\u003EAKA Crymlyn X3\u003C/b\u003E\n\u003C/p\u003E\u003C/b\u003E\u003Chr /\u003E\u003Cp\u003E51.689108, -3.0746536\n\u003C/p\u003E","title":"Glyn QuarryAKA Crymlyn X3\n","link":"","lat":51.689108,"lon":-3.0746536,"icon":"/testwiki/images/1/16/Blue.png"},{"text":"\u003Cb\u003E\u003Cp\u003E\u003Cb\u003E\u003Ca href=\"/wiki/Abertwssyg\" class=\"mw-redirect\" title=\"Abertwssyg\"\u003EAbertwssyg\u003C/a\u003E\u003C/b\u003E\n\u003C/p\u003E\u003C/b\u003E\u003Chr /\u003E\u003Cp\u003E51.735796, -3.249022\n\u003C/p\u003E","title":"Abertwssyg\n","link":"","lat":51.735796,"lon":-3.249022,"icon":"/testwiki/images/1/16/Blue.png"},{"text":"\u003Cb\u003E\u003Cp\u003E\u003Cb\u003E\u003Ca href=\"/wiki/Oakdale\" title=\"Oakdale\"\u003EOakdale\u003C/a\u003E\u003C/b\u003E\n\u003C/p\u003E\u003C/b\u003E\u003Chr /\u003E\u003Cp\u003E51.682348, -3.1808342\n\u003C/p\u003E","title":"Oakdale\n","link":"","lat":51.682348,"lon":-3.1808342,"icon":"/testwiki/images/1/16/Blue.png"},{"text":"\u003Cb\u003E\u003Cp\u003E\u003Cb\u003E\u003Ca href=\"/wiki/Swffryd_Wood_Quarry\" title=\"Swffryd Wood Quarry\"\u003ESwffryd Wood Quarry\u003C/a\u003E\u003C/b\u003E\n\u003C/p\u003E\u003C/b\u003E\u003Chr /\u003E\u003Cp\u003E51.68403, -3.12314\n\u003C/p\u003E","title":"Swffryd Wood Quarry\n","link":"","lat":51.68403,"lon":-3.12314,"icon":"/testwiki/images/4/43/Orange.png"},{"text":"\u003Cb\u003E\u003Cp\u003E\u003Cb\u003E\u003Ca href=\"/wiki/Crymlyn_Quarries#Monk.27s_Quarry\" title=\"Crymlyn Quarries\"\u003EMonk's Quarry\u003C/a\u003E\u003C/b\u003E\n\u003C/p\u003E\u003C/b\u003E\u003Chr /\u003E\u003Cp\u003E51.686193, -3.136350\n\u003C/p\u003E","title":"Monk's Quarry\n","link":"","lat":51.686193,"lon":-3.13635,"icon":"/testwiki/images/1/16/Blue.png"},{"text":"\u003Cb\u003E\u003Cp\u003E\u003Cb\u003E\u003Ca href=\"/wiki/Crymlyn_Quarries#Tunnel_Quarry\" title=\"Crymlyn Quarries\"\u003ETunnel Quarry\u003C/a\u003E\u003C/b\u003E\n\u003C/p\u003E\u003C/b\u003E\u003Chr /\u003E\u003Cp\u003E51.686700, -3.135500\n\u003C/p\u003E","title":"Tunnel Quarry\n","link":"","lat":51.6867,"lon":-3.1355,"icon":"/testwiki/images/1/16/Blue.png"},{"text":"\u003Cb\u003E\u003Cp\u003E\u003Cb\u003E\u003Ca href=\"/wiki/Crymlyn_Quarries#Viaduct_Quarry\" title=\"Crymlyn Quarries\"\u003EViaduct Quarry\u003C/a\u003E\u003C/b\u003E\n\u003C/p\u003E\u003C/b\u003E\u003Chr /\u003E\u003Cp\u003E51.685000, -3.139800\n\u003C/p\u003E","title":"Viaduct Quarry\n","link":"","lat":51.685,"lon":-3.1398,"icon":"/testwiki/images/1/16/Blue.png"},{"text":"\u003Cb\u003E\u003Cp\u003E\u003Cb\u003E\u003Ca href=\"/wiki/Ridgeway\" title=\"Ridgeway\"\u003ERidgeway\u003C/a\u003E\u003C/b\u003E\n\u003C/p\u003E\u003C/b\u003E\u003Chr /\u003E\u003Cp\u003E51.62946, -3.20069\n\u003C/p\u003E","title":"Ridgeway\n","link":"","lat":51.62946,"lon":-3.20069,"icon":"/testwiki/images/1/16/Blue.png"},{"text":"\u003Cb\u003E\u003Cp\u003E\u003Cb\u003E\u003Ca href=\"/wiki/Tyle_y_Coch\" title=\"Tyle y Coch\"\u003ETyle y Coch\u003C/a\u003E\u003C/b\u003E\n\u003C/p\u003E\u003C/b\u003E\u003Chr /\u003E\u003Cp\u003E51.654088, -3.135846\n\u003C/p\u003E","title":"Tyle y Coch\n","link":"","lat":51.654088,"lon":-3.135846,"icon":"/testwiki/images/1/16/Blue.png"},{"text":"\u003Cb\u003E\u003Cp\u003E\u003Cb\u003E\u003Ca href=\"/wiki/Bargoed\" title=\"Bargoed\"\u003EBargoed\u003C/a\u003E\u003C/b\u003E\n\u003C/p\u003E\u003C/b\u003E\u003Chr /\u003E\u003Cp\u003E51.696600, -3.228714\n\u003C/p\u003E","title":"Bargoed\n","link":"","lat":51.6966,"lon":-3.228714,"icon":"/testwiki/images/1/16/Blue.png"},{"text":"\u003Cb\u003E\u003Cp\u003E\u003Cb\u003E\u003Ca href=\"/wiki/Cwmcarn\" title=\"Cwmcarn\"\u003ECwmcarn\u003C/a\u003E\u003C/b\u003E\n\u003C/p\u003E\u003C/b\u003E\u003Chr /\u003E\u003Cp\u003E51.638413, -3.129065\n\u003C/p\u003E","title":"Cwmcarn\n","link":"","lat":51.638413,"lon":-3.129065,"icon":"/testwiki/images/1/16/Blue.png"},{"text":"\u003Cb\u003E\u003Cp\u003E\u003Cb\u003E\u003Ca href=\"/wiki/New_Tredegar\" title=\"New Tredegar\"\u003ENew Tredegar\u003C/a\u003E\u003C/b\u003E\n\u003C/p\u003E\u003C/b\u003E\u003Chr /\u003E\u003Cp\u003E51.705168, -3.221367\n\u003C/p\u003E","title":"New Tredegar\n","link":"","lat":51.705168,"lon":-3.221367,"icon":"/testwiki/images/1/16/Blue.png"},{"text":"\u003Cb\u003E\u003Cp\u003E\u003Cb\u003E\u003Ca href=\"/wiki/Crosskeys_Quarry\" title=\"Crosskeys Quarry\"\u003ECrosskeys Quarry\u003C/a\u003E\u003C/b\u003E\n\u003C/p\u003E\u003C/b\u003E\u003Chr /\u003E\u003Cp\u003E51.632510, -3.124430\n\u003C/p\u003E","title":"Crosskeys Quarry\n","link":"","lat":51.63251,"lon":-3.12443,"icon":"/testwiki/images/1/16/Blue.png"},{"text":"\u003Cb\u003E\u003Cp\u003E\u003Cb\u003E\u003Ca href=\"/wiki/Llanbradach_Upper_Tier\" title=\"Llanbradach Upper Tier\"\u003ELlanbradach Upper Tier\u003C/a\u003E\u003C/b\u003E\n\u003C/p\u003E\u003C/b\u003E\u003Chr /\u003E\u003Cp\u003E51.597808 -3.2352617\n\u003C/p\u003E","title":"Llanbradach Upper Tier\n","link":"","lat":51.597808,"lon":-3.2352617,"icon":"/testwiki/images/1/16/Blue.png"},{"text":"\u003Cb\u003E\u003Cp\u003E\u003Cb\u003E\u003Ca href=\"/wiki/Llanbradach_Lower_Tier\" title=\"Llanbradach Lower Tier\"\u003ELlanbradach Lower Tier\u003C/a\u003E\u003C/b\u003E\n\u003C/p\u003E\u003C/b\u003E\u003Chr /\u003E\u003Cp\u003E51.598057 -3.2339153\n\u003C/p\u003E","title":"Llanbradach Lower Tier\n","link":"","lat":51.598057,"lon":-3.2339153,"icon":"/testwiki/images/1/16/Blue.png"},{"text":"\u003Cb\u003E\u003Cp\u003E\u003Cb\u003E\u003Ca href=\"/wiki/Sirhowy_-_Quarry_Mawr#The_Rust_Curtain\" title=\"Sirhowy - Quarry Mawr\"\u003ESirhowy - The Rust Curtain\u003C/a\u003E\u003C/b\u003E\n\u003C/p\u003E\u003C/b\u003E\u003Chr /\u003E\u003Cp\u003E51.612307, -3.1502545\n\u003C/p\u003E","title":"Sirhowy - The Rust Curtain\n","link":"","lat":51.612307,"lon":-3.1502545,"icon":"/testwiki/images/1/16/Blue.png"},{"text":"\u003Cb\u003E\u003Cp\u003E\u003Cb\u003E\u003Ca href=\"/wiki/Sirhowy_-_Quarry_Mawr#Western_Walls\" title=\"Sirhowy - Quarry Mawr\"\u003ESirhowy - Western Walls\u003C/a\u003E\u003C/b\u003E\n\u003C/p\u003E\u003C/b\u003E\u003Chr /\u003E\u003Cp\u003E51.611568, -3.1506836\n\u003C/p\u003E","title":"Sirhowy - Western Walls\n","link":"","lat":51.611568,"lon":-3.1506836,"icon":"/testwiki/images/1/16/Blue.png"},{"text":"\u003Cb\u003E\u003Cp\u003E\u003Cb\u003E\u003Ca href=\"/wiki/Tirpentwys\" title=\"Tirpentwys\"\u003ETirpentwys\u003C/a\u003E\u003C/b\u003E\n\u003C/p\u003E\u003C/b\u003E\u003Chr /\u003E\u003Cp\u003E51.693790, -3.090722\n\u003C/p\u003E","title":"Tirpentwys\n","link":"","lat":51.69379,"lon":-3.090722,"icon":"/testwiki/images/1/16/Blue.png"},{"text":"\u003Cb\u003E\u003Cp\u003E\u003Cb\u003E\u003Ca href=\"/wiki/Penallta\" title=\"Penallta\"\u003EPenallta\u003C/a\u003E\u003C/b\u003E\n\u003C/p\u003E\u003C/b\u003E\u003Chr /\u003E\u003Cp\u003E51.645867, -3.246825\n\u003C/p\u003E","title":"Penallta\n","link":"","lat":51.645867,"lon":-3.246825,"icon":"/testwiki/images/4/43/Orange.png"},{"text":"\u003Cb\u003E\u003Cp\u003E\u003Cb\u003E\u003Ca href=\"/wiki/Deri\" title=\"Deri\"\u003EDeri\u003C/a\u003E\u003C/b\u003E\n\u003C/p\u003E\u003C/b\u003E\u003Chr /\u003E\u003Cp\u003E51.696736, -3.256872\n\u003C/p\u003E","title":"Deri\n","link":"","lat":51.696736,"lon":-3.256872,"icon":"/testwiki/images/1/16/Blue.png"},{"text":"\u003Cb\u003E\u003Cp\u003E\u003Cb\u003E\u003Ca href=\"/wiki/Cox%27s_Quarry\" title=\"Cox's Quarry\"\u003ECox's Quarry\u003C/a\u003E\u003C/b\u003E\n\u003C/p\u003E\u003C/b\u003E\u003Chr /\u003E\u003Cp\u003E51.621500, -3.133614\n\u003C/p\u003E","title":"Cox's Quarry\n","link":"","lat":51.6215,"lon":-3.133614,"icon":"/testwiki/images/1/16/Blue.png"},{"text":"\u003Cb\u003E\u003Cp\u003E\u003Cb\u003E\u003Ca href=\"/wiki/Henllys_Quarry\" title=\"Henllys Quarry\"\u003EHenllys Quarry\u003C/a\u003E\u003C/b\u003E\n\u003C/p\u003E\u003C/b\u003E\u003Chr /\u003E\u003Cp\u003E51.643857, -3.076156\n\u003C/p\u003E","title":"Henllys Quarry\n","link":"","lat":51.643857,"lon":-3.076156,"icon":"/testwiki/images/4/43/Orange.png"},{"text":"\u003Cb\u003E\u003Cp\u003E\u003Cb\u003EBouldering - \u003Ca href=\"/wiki/The_Childrens_Circuit_-_Swffryd\" title=\"The Childrens Circuit - Swffryd\"\u003EThe Childrens Circuit - Swffryd\u003C/a\u003E\u003C/b\u003E\n\u003C/p\u003E\u003C/b\u003E\u003Chr /\u003E\u003Cp\u003E51.68622, -3.12712\n\u003C/p\u003E","title":"Bouldering - The Childrens Circuit - Swffryd\n","link":"","lat":51.68622,"lon":-3.12712,"icon":"/testwiki/images/0/0c/Bouldering.png"},{"text":"\u003Cb\u003E\u003Cp\u003E\u003Cb\u003E\u003Ca href=\"/wiki/Gimp_Cliff\" title=\"Gimp Cliff\"\u003EGimp Cliff\u003C/a\u003E\u003C/b\u003E\n\u003C/p\u003E\u003C/b\u003E\u003Chr /\u003E\u003Cp\u003E51.744474, -3.2281989\n\u003C/p\u003E","title":"Gimp Cliff\n","link":"","lat":51.744474,"lon":-3.2281989,"icon":"/testwiki/images/1/16/Blue.png"},{"text":"\u003Cb\u003E\u003Cp\u003E\u003Cb\u003E\u003Ca href=\"/wiki/Senghenydd\" title=\"Senghenydd\"\u003ESenghenydd\u003C/a\u003E\u003C/b\u003E\n\u003C/p\u003E\u003C/b\u003E\u003Chr /\u003E\u003Cp\u003E51.609607, -3.2755029\n\u003C/p\u003E","title":"Senghenydd\n","link":"","lat":51.609607,"lon":-3.2755029,"icon":"/testwiki/images/1/16/Blue.png"},{"text":"\u003Cb\u003E\u003Cp\u003E\u003Cb\u003E\u003Ca href=\"/wiki/Siocled_Seren_Pysgod_Quarry\" title=\"Siocled Seren Pysgod Quarry\"\u003ESiocled Seren Pysgod Quarry \u003C/a\u003E\u003C/b\u003E\n\u003C/p\u003E\u003C/b\u003E\u003Chr /\u003E\u003Cp\u003E51.716345, -3.1311893\n\u003C/p\u003E","title":"Siocled Seren Pysgod Quarry \n","link":"","lat":51.716345,"lon":-3.1311893,"icon":"/testwiki/images/1/16/Blue.png"},{"text":"\u003Cb\u003E\u003Cp\u003E\u003Cb\u003E\u003Ca href=\"/wiki/Abertwssyg\" class=\"mw-redirect\" title=\"Abertwssyg\"\u003EAbertwssyg\u003C/a\u003E\u003C/b\u003E\n\u003C/p\u003E\u003C/b\u003E\u003Chr /\u003E\u003Cp\u003E51.735796, -3.249022\n\u003C/p\u003E","title":"Abertwssyg\n","link":"","lat":51.735796,"lon":-3.249022,"icon":"/testwiki/images/1/16/Blue.png"},{"text":"\u003Cb\u003E\u003Cp\u003E\u003Cb\u003E\u003Ca href=\"/wiki/Mount_Pleasant_(X2)\" title=\"Mount Pleasant (X2)\"\u003EMount Pleasant (X2)\u200e\u200e\u003C/a\u003E\u003C/b\u003E\n\u003C/p\u003E\u003C/b\u003E\u003Chr /\u003E\u003Cp\u003E51.677186 -3.3301932\n\u003C/p\u003E","title":"Mount Pleasant (X2)\u200e\u200e\n","link":"","lat":51.677186,"lon":-3.3301932,"icon":"/testwiki/images/1/16/Blue.png"},{"text":"\u003Cb\u003E\u003Cp\u003E\u003Cb\u003E\u003Ca href=\"/wiki/Navigation_Quarry_-_Cilfynydd\" title=\"Navigation Quarry - Cilfynydd\"\u003ENavigation Quarry - Cilfynydd\u003C/a\u003E\u003C/b\u003E\n\u003C/p\u003E\u003C/b\u003E\u003Chr /\u003E\u003Cp\u003E51.637311, -3.320671\n\u003C/p\u003E","title":"Navigation Quarry - Cilfynydd\n","link":"","lat":51.637311,"lon":-3.320671,"icon":"/testwiki/images/1/16/Blue.png"},{"text":"\u003Cb\u003E\u003Cp\u003E\u003Cb\u003E\u003Ca href=\"/wiki/Edwardsville_(X1)\" class=\"mw-redirect\" title=\"Edwardsville (X1)\"\u003EEdwardsville_(X1)\u003C/a\u003E\u003C/b\u003E\n\u003C/p\u003E\u003C/b\u003E\u003Chr /\u003E\u003Cp\u003E51.672212, -3.326186\n\u003C/p\u003E","title":"Edwardsville_(X1)\n","link":"","lat":51.672212,"lon":-3.326186,"icon":"/testwiki/images/1/16/Blue.png"},{"text":"\u003Cb\u003E\u003Cp\u003E\u003Cb\u003E\u003Ca href=\"/wiki/Cwm_Leyshon_Quarry\" title=\"Cwm Leyshon Quarry\"\u003ECwm Leyshon Quarry\u003C/a\u003E\u003C/b\u003E\n\u003C/p\u003E\u003C/b\u003E\u003Chr /\u003E\u003Cp\u003E51.574285, -3.139208\n\u003C/p\u003E","title":"Cwm Leyshon Quarry\n","link":"","lat":51.574285,"lon":-3.139208,"icon":"/testwiki/images/1/16/Blue.png"},{"text":"\u003Cb\u003E\u003Cp\u003E\u003Cb\u003E\u003Ca href=\"/wiki/Cwm\" title=\"Cwm\"\u003ECwm\u003C/a\u003E\u003C/b\u003E\n\u003C/p\u003E\u003C/b\u003E\u003Chr /\u003E\u003Cp\u003E\u003Cb\u003E51.736364, -3.1840762\u003C/b\u003E\n\u003C/p\u003E","title":"Cwm\n","link":"","lat":51.736364,"lon":-3.1840762,"icon":"/testwiki/images/1/16/Blue.png"},{"text":"\u003Cb\u003E\u003Cp\u003E\u003Cb\u003E\u003Ca href=\"/wiki/Blaen_Bran_Quarry\" title=\"Blaen Bran Quarry\"\u003EBlaen Bran Quarry\u003C/a\u003E\u003C/b\u003E\n\u003C/p\u003E\u003C/b\u003E\u003Chr /\u003E\u003Cp\u003E\u003Cb\u003E51.666830, -3.0645365 \u003C/b\u003E\n\u003C/p\u003E","title":"Blaen Bran Quarry\n","link":"","lat":51.66683,"lon":-3.0645365,"icon":"/testwiki/images/1/16/Blue.png"},{"text":"\u003Cb\u003E\u003Cp\u003E\u003Cb\u003ETirpentwys Parking\u003C/b\u003E\n\u003C/p\u003E\u003C/b\u003E\u003Chr /\u003E\u003Cp\u003E51.696359, -3.079332\n\u003C/p\u003E","title":"Tirpentwys Parking\n","link":"","lat":51.696359,"lon":-3.079332,"icon":"/testwiki/images/7/74/Parking.png"},{"text":"\u003Cb\u003E\u003Cp\u003E\u003Cb\u003ESirhowy Parking\u003C/b\u003E\n\u003C/p\u003E\u003C/b\u003E\u003Chr /\u003E\u003Cp\u003E51.613573, -3.1519282\n\u003C/p\u003E","title":"Sirhowy Parking\n","link":"","lat":51.613573,"lon":-3.1519282,"icon":"/testwiki/images/7/74/Parking.png"},{"text":"\u003Cb\u003E\u003Cp\u003E\u003Cb\u003EParking - Tyle Y Coch\u003C/b\u003E\n\u003C/p\u003E\u003C/b\u003E\u003Chr /\u003E\u003Cp\u003E51.652460, -3.1373879\n\u003C/p\u003E","title":"Parking - Tyle Y Coch\n","link":"","lat":51.65246,"lon":-3.1373879,"icon":"/testwiki/images/7/74/Parking.png"},{"text":"\u003Cb\u003E\u003Cp\u003E\u003Cb\u003EParking \u003Ca href=\"/wiki/Cwmcarn\" title=\"Cwmcarn\"\u003ECwmcarn\u003C/a\u003E \u0026amp; \u003Ca href=\"/wiki/Crosskeys_Quarry\" title=\"Crosskeys Quarry\"\u003ECrosskeys Quarry\u003C/a\u003E\u003C/b\u003E\n\u003C/p\u003E\u003C/b\u003E\u003Chr /\u003E\u003Cp\u003E51.636178, -3.1286195\n\u003C/p\u003E","title":"Parking Cwmcarn \u0026amp; Crosskeys Quarry\n","link":"","lat":51.636178,"lon":-3.1286195,"icon":"/testwiki/images/7/74/Parking.png"},{"text":"\u003Cb\u003E\u003Cp\u003E\u003Cb\u003EParking for:\u003C/b\u003E\u003Cbr /\u003E\n\u003Ca href=\"/wiki/Viaduct_Quarry\" class=\"mw-redirect\" title=\"Viaduct Quarry\"\u003EViaduct Quarry\u003C/a\u003E\u003Cbr /\u003E\n\u003Ca href=\"/wiki/Monk%27s_Quarry\" class=\"mw-redirect\" title=\"Monk's Quarry\"\u003EMonk's Quarry\u003C/a\u003E\u003Cbr /\u003E\n\u003Ca href=\"/wiki/Swffryd_Wood_Quarry\" title=\"Swffryd Wood Quarry\"\u003ESwffryd Wood Quarry\u003C/a\u003E\u003Cbr /\u003E\n\u003Ca href=\"/wiki/The_Childrens_Circuit_-_Swffryd\" title=\"The Childrens Circuit - Swffryd\"\u003EThe Childrens Circuit - Swffryd\u003C/a\u003E\u003Cbr /\u003E\n\u003Ca href=\"/wiki/Tunnel_Quarry\" class=\"mw-redirect\" title=\"Tunnel Quarry\"\u003ETunnel Quarry\u003C/a\u003E\u003Cbr /\u003E\n\u003C/p\u003E\u003C/b\u003E\u003Chr /\u003E\u003Cp\u003E51.682577, -3.1408613\n\u003C/p\u003E","title":"Parking for:\nViaduct Quarry\nMonk's Quarry\nSwffryd Wood Quarry\nThe Childrens Circuit - Swffryd\nTunnel Quarry\n","link":"","lat":51.682577,"lon":-3.1408613,"icon":"/testwiki/images/7/74/Parking.png"},{"text":"\u003Cb\u003E\u003Cp\u003E\u003Cb\u003EParking \u003Ca href=\"/wiki/Oakdale\" title=\"Oakdale\"\u003EOakdale\u003C/a\u003E\u003C/b\u003E\n\u003C/p\u003E\u003C/b\u003E\u003Chr /\u003E\u003Cp\u003E51.681751, -3.1835551\n\u003C/p\u003E","title":"Parking Oakdale\n","link":"","lat":51.681751,"lon":-3.1835551,"icon":"/testwiki/images/7/74/Parking.png"},{"text":"\u003Cb\u003E\u003Cp\u003E\u003Cb\u003EParking \u003Ca href=\"/wiki/Ridgeway\" title=\"Ridgeway\"\u003ERidgeway\u003C/a\u003E\u003C/b\u003E\n\u003C/p\u003E\u003C/b\u003E\u003Chr /\u003E\u003Cp\u003E51.630356, -3.2007772\n\u003C/p\u003E","title":"Parking Ridgeway\n","link":"","lat":51.630356,"lon":-3.2007772,"icon":"/testwiki/images/7/74/Parking.png"},{"text":"\u003Cb\u003E\u003Cp\u003E\u003Cb\u003EParking \u003Ca href=\"/wiki/Llanbradach\" class=\"mw-redirect\" title=\"Llanbradach\"\u003ELlanbradach\u003C/a\u003E\u003C/b\u003E\n\u003C/p\u003E\u003C/b\u003E\u003Chr /\u003E\u003Cp\u003E51.598429, -3.2324731\n\u003C/p\u003E","title":"Parking Llanbradach\n","link":"","lat":51.598429,"lon":-3.2324731,"icon":"/testwiki/images/7/74/Parking.png"},{"text":"\u003Cb\u003E\u003Cp\u003E\u003Cb\u003EBlaen Bran Quarry Parking\u003C/b\u003E\n\u003C/p\u003E\u003C/b\u003E\u003Chr /\u003E\u003Cp\u003E51.666296, -3.0551362 \n\u003C/p\u003E","title":"Blaen Bran Quarry Parking\n","link":"","lat":51.666296,"lon":-3.0551362,"icon":"/testwiki/images/7/74/Parking.png"},{"text":"\u003Cb\u003E\u003Cp\u003E\u003Cb\u003ENavigation Parking 1\u003C/b\u003E\n\u003C/p\u003E\u003C/b\u003E\u003Chr /\u003E\u003Cp\u003E51.644405, -3.3246732\n\u003C/p\u003E","title":"Navigation Parking 1\n","link":"","lat":51.644405,"lon":-3.3246732,"icon":"/testwiki/images/7/74/Parking.png"},{"text":"\u003Cb\u003E\u003Cp\u003E\u003Cb\u003ENavigation Parking 2\u003C/b\u003E\n\u003C/p\u003E\u003C/b\u003E\u003Chr /\u003E\u003Cp\u003E51.644562, -3.3253169\n\u003C/p\u003E","title":"Navigation Parking 2\n","link":"","lat":51.644562,"lon":-3.3253169,"icon":"/testwiki/images/7/74/Parking.png"},{"text":"\u003Cb\u003E\u003Cp\u003E\u003Cb\u003ENavigation Parking 3\u003C/b\u003E\n\u003C/p\u003E\u003C/b\u003E\u003Chr /\u003E\u003Cp\u003E51.642739, -3.3236244\n\u003C/p\u003E","title":"Navigation Parking 3\n","link":"","lat":51.642739,"lon":-3.3236244,"icon":"/testwiki/images/7/74/Parking.png"},{"text":"\u003Cb\u003E\u003Cp\u003E\u003Cb\u003ENavigation Parking Adventurous 1\u003C/b\u003E\n\u003C/p\u003E\u003C/b\u003E\u003Chr /\u003E\u003Cp\u003E51.629463, -3.3130538\n\u003C/p\u003E","title":"Navigation Parking Adventurous 1\n","link":"","lat":51.629463,"lon":-3.3130538,"icon":"/testwiki/images/7/74/Parking.png"},{"text":"\u003Cb\u003E\u003Cp\u003E\u003Cb\u003ENavigation Parking Adventurous 2\u003C/b\u003E\n\u003C/p\u003E\u003C/b\u003E\u003Chr /\u003E\u003Cp\u003E51.645547, -3.3164549\n\u003C/p\u003E","title":"Navigation Parking Adventurous 2\n","link":"","lat":51.645547,"lon":-3.3164549,"icon":"/testwiki/images/7/74/Parking.png"},{"text":"\u003Cb\u003E\u003Cp\u003E\u003Cb\u003E\u003Ca href=\"/wiki/The_Western_Crag\" title=\"The Western Crag\"\u003EWestern Crag\u003C/a\u003E\u003C/b\u003E\n\u003C/p\u003E\u003C/b\u003E\u003Chr /\u003E\u003Cp\u003E\u003Cbr /\u003E\n\u003C/p\u003E","title":"Western Crag\n","link":"","lat":51.4538005,"lon":-3.6229514,"icon":"/testwiki/images/4/43/Orange.png"},{"text":"\u003Cb\u003E\u003Cp\u003E\u003Cb\u003E\u003Ca href=\"/wiki/Twinkle_Buttress\" title=\"Twinkle Buttress\"\u003ETwinkle Buttress\u003C/a\u003E\u003C/b\u003E\n\u003C/p\u003E\u003C/b\u003E\u003Chr /\u003E\u003Cp\u003E\u003Cbr /\u003E\n\u003C/p\u003E","title":"Twinkle Buttress\n","link":"","lat":51.4535262,"lon":-3.6225426,"icon":"/testwiki/images/4/43/Orange.png"},{"text":"\u003Cb\u003E\u003Cp\u003E\u003Cb\u003E51.453234, -3.622041\u003C/b\u003E\n\u003C/p\u003E\u003C/b\u003E\u003Chr /\u003E\u003Cp\u003E\u003Cb\u003E\u003Ca href=\"/wiki/Popular_End\" class=\"mw-redirect\" title=\"Popular End\"\u003EPopular End\u003C/a\u003E\u003C/b\u003E\n\u003C/p\u003E","title":"51.453234, -3.622041\n","link":"","lat":51.453234,"lon":-3.622041,"icon":"/testwiki/images/4/43/Orange.png"},{"text":"\u003Cb\u003E\u003Cp\u003E\u003Cb\u003E51.453117, -3.621518\u003C/b\u003E\n\u003C/p\u003E\u003C/b\u003E\u003Chr /\u003E\u003Cp\u003E\u003Cb\u003E\u003Ca href=\"/wiki/Elephant_Wall\" title=\"Elephant Wall\"\u003EElephant Wall\u003C/a\u003E\u003C/b\u003E\n\u003C/p\u003E","title":"51.453117, -3.621518\n","link":"","lat":51.453117,"lon":-3.621518,"icon":"/testwiki/images/4/43/Orange.png"},{"text":"\u003Cb\u003E\u003Cp\u003E\u003Cb\u003E\u003Ca href=\"/wiki/Tiger_Bay#Sorcery_Wall\" title=\"Tiger Bay\"\u003EScorcery Wall\u003C/a\u003E\u003C/b\u003E\n\u003C/p\u003E\u003C/b\u003E\u003Chr /\u003E\u003Cp\u003E\u003Cbr /\u003E\n\u003C/p\u003E","title":"Scorcery Wall\n","link":"","lat":51.4528606,"lon":-3.6207761,"icon":"/testwiki/images/4/43/Orange.png"},{"text":"\u003Cb\u003E\u003Cp\u003E\u003Cb\u003E\u003Ca href=\"/wiki/The_Castle_Area\" title=\"The Castle Area\"\u003ECastle Area\u003C/a\u003E\u003C/b\u003E\n\u003C/p\u003E\u003C/b\u003E\u003Chr /\u003E\u003Cp\u003E\u003Cbr /\u003E\n\u003C/p\u003E","title":"Castle Area\n","link":"","lat":51.4525004,"lon":-3.6197838,"icon":"/testwiki/images/4/43/Orange.png"},{"text":"\u003Cb\u003E\u003Cp\u003E\u003Cb\u003E\u003Ca href=\"/wiki/The_Biscuit\" title=\"The Biscuit\"\u003EOgmore - Biscuit Bay Area\u003C/a\u003E\u003C/b\u003E\n\u003C/p\u003E\u003C/b\u003E\u003Chr /\u003E\u003Cp\u003E\u003Cbr /\u003E\n\u003C/p\u003E","title":"Ogmore - Biscuit Bay Area\n","link":"","lat":51.4523136,"lon":-3.6186752,"icon":"/testwiki/images/4/43/Orange.png"},{"text":"\u003Cb\u003E\u003Cp\u003E\u003Cb\u003E\u003Ca href=\"/wiki/Davy_Jones%27_Locker_and_the_Sea_Caves\" title=\"Davy Jones' Locker and the Sea Caves\"\u003EOgmore - Davy Jones' Locker\u003C/a\u003E\u003C/b\u003E\n\u003C/p\u003E\u003C/b\u003E\u003Chr /\u003E\u003Cp\u003E\u003Cbr /\u003E\n\u003C/p\u003E","title":"Ogmore - Davy Jones' Locker\n","link":"","lat":51.4514745,"lon":-3.6177795,"icon":"/testwiki/images/4/43/Orange.png"},{"text":"\u003Cb\u003E\u003Cp\u003E\u003Cb\u003E\u003Ca href=\"/wiki/Phaser_Wall\" title=\"Phaser Wall\"\u003EOgmore - Phaser Wall\u003C/a\u003E\u003C/b\u003E\n\u003C/p\u003E\u003C/b\u003E\u003Chr /\u003E\u003Cp\u003E\u003Cbr /\u003E\n\u003C/p\u003E","title":"Ogmore - Phaser Wall\n","link":"","lat":51.4511359,"lon":-3.6172964,"icon":"/testwiki/images/4/43/Orange.png"},{"text":"\u003Cb\u003E\u003Cp\u003E\u003Cb\u003E\u003Ca href=\"/wiki/Right_Hand_Wall\" title=\"Right Hand Wall\"\u003EOgmore - Right Hand Wall\u003C/a\u003E\u003C/b\u003E\n\u003C/p\u003E\u003C/b\u003E\u003Chr /\u003E\u003Cp\u003E\u003Cbr /\u003E\n\u003C/p\u003E","title":"Ogmore - Right Hand Wall\n","link":"","lat":51.4499155,"lon":-3.6143329,"icon":"/testwiki/images/4/43/Orange.png"},{"text":"\u003Cb\u003E\u003Cp\u003E\u003Cb\u003E\u003Ca href=\"/wiki/Mitzy_Wall\" title=\"Mitzy Wall\"\u003EOgmore - Mitzy Wall\u003C/a\u003E\u003C/b\u003E\n\u003C/p\u003E\u003C/b\u003E\u003Chr /\u003E\u003Cp\u003E\u003Cbr /\u003E\n\u003C/p\u003E","title":"Ogmore - Mitzy Wall\n","link":"","lat":51.4502203,"lon":-3.6144082,"icon":"/testwiki/images/4/43/Orange.png"},{"text":"\u003Cb\u003E\u003Cp\u003E\u003Cb\u003E\u003Ca href=\"/wiki/Stout_Point\" title=\"Stout Point\"\u003EStout Point\u003C/a\u003E\u003C/b\u003E\n\u003C/p\u003E\u003C/b\u003E\u003Chr /\u003E\u003Cp\u003E51.392084, -3.478126\n\u003C/p\u003E","title":"Stout Point\n","link":"","lat":51.392084,"lon":-3.478126,"icon":"/testwiki/images/1/16/Blue.png"},{"text":"\u003Cb\u003E\u003Cp\u003E\u003Cb\u003E51.453795, -3.620713\u003C/b\u003E\n\u003C/p\u003E\u003C/b\u003E\u003Chr /\u003E\u003Cp\u003E\u003Cb\u003EOgmore Parking\u003C/b\u003E\u003Cbr /\u003ECF32 0PY\u003Cbr /\u003E\n\u003C/p\u003E","title":"51.453795, -3.620713\n","link":"","lat":51.453795,"lon":-3.620713,"icon":"/testwiki/images/7/74/Parking.png"},{"text":"\u003Cb\u003E\u003Cp\u003E\u003Cb\u003E\u003Ca href=\"/wiki/Temple_Bay_Inlets#Temple_Bay_Inlets\" class=\"mw-redirect\" title=\"Temple Bay Inlets\"\u003ETemple Bay Inlets - Cave Inlet\u003C/a\u003E\u003C/b\u003E\n\u003C/p\u003E\u003C/b\u003E\u003Chr /\u003E\u003Cp\u003E51.441406,-3.6040641\n\u003C/p\u003E","title":"Temple Bay Inlets - Cave Inlet\n","link":"","lat":51.441406,"lon":-3.6040641,"icon":"/testwiki/images/1/16/Blue.png"},{"text":"\u003Cb\u003E\u003Cp\u003E\u003Cb\u003E\u003Ca href=\"/wiki/DUNRAVEN_CLIFF\" class=\"mw-redirect\" title=\"DUNRAVEN CLIFF\"\u003EDunraven Cliff\u003C/a\u003E\u003C/b\u003E\n\u003C/p\u003E\u003C/b\u003E\u003Chr /\u003E\u003Cp\u003E51.442431,-3.605030\n\u003C/p\u003E","title":"Dunraven Cliff\n","link":"","lat":51.4424311,"lon":-3.6050301,"icon":"/testwiki/images/1/16/Blue.png"},{"text":"\u003Cb\u003E\u003Cp\u003E\u003Cb\u003E\u003Ca href=\"/wiki/Temple_Bay_Inlets#First_Inlet\" class=\"mw-redirect\" title=\"Temple Bay Inlets\"\u003ETemple Bay Inlets - First Inlet\u003C/a\u003E\u003C/b\u003E\n\u003C/p\u003E\u003C/b\u003E\u003Chr /\u003E\u003Cp\u003E51.441603,-3.606109\n\u003C/p\u003E","title":"Temple Bay Inlets - First Inlet\n","link":"","lat":51.441603,"lon":-3.606109,"icon":"/testwiki/images/1/16/Blue.png"},{"text":"\u003Cb\u003E\u003Cp\u003E\u003Cb\u003E\u003Ca href=\"/wiki/Temple_Bay_Inlets#Playtime_Wall\" class=\"mw-redirect\" title=\"Temple Bay Inlets\"\u003ETemple Bay Inlets - Playtime Wall\u003C/a\u003E\u003C/b\u003E\n\u003C/p\u003E\u003C/b\u003E\u003Chr /\u003E\u003Cp\u003E51.441493,-3.60347\n\u003C/p\u003E","title":"Temple Bay Inlets - Playtime Wall\n","link":"","lat":51.441493,"lon":-3.60347,"icon":"/testwiki/images/1/16/Blue.png"},{"text":"\u003Cb\u003E\u003Cp\u003E\u003Cb\u003E\u003Ca href=\"/wiki/Temple_Bay_Inlets#Sea_Walls\" class=\"mw-redirect\" title=\"Temple Bay Inlets\"\u003ETemple Bay Inlets - Sea Walls\u003C/a\u003E\u003C/b\u003E\n\u003C/p\u003E\u003C/b\u003E\u003Chr /\u003E\u003Cp\u003E51.441733,-3.606431\n\u003C/p\u003E","title":"Temple Bay Inlets - Sea Walls\n","link":"","lat":51.4417331,"lon":-3.606431,"icon":"/testwiki/images/1/16/Blue.png"},{"text":"\u003Cb\u003E\u003Cp\u003E\u003Cb\u003E\u003Ca href=\"/wiki/Temple_Bay_Inlets#Second_Inlet\" class=\"mw-redirect\" title=\"Temple Bay Inlets\"\u003ETemple Bay Inlets - Second Inlet\u003C/a\u003E\u003C/b\u003E\n\u003C/p\u003E\u003C/b\u003E\u003Chr /\u003E\u003Cp\u003E51.441395,-3.604864\n\u003C/p\u003E","title":"Temple Bay Inlets - Second Inlet\n","link":"","lat":51.4413951,"lon":-3.604864,"icon":"/testwiki/images/1/16/Blue.png"},{"text":"\u003Cb\u003E\u003Cp\u003E\u003Cb\u003E\u003Ca href=\"/wiki/STONE_WINGS_CLIFF\" class=\"mw-redirect\" title=\"STONE WINGS CLIFF\"\u003EStone Wings Cliff\u003C/a\u003E\u003C/b\u003E\n\u003C/p\u003E\u003C/b\u003E\u003Chr /\u003E\u003Cp\u003E51.4424781,-3.604571\n\u003C/p\u003E","title":"Stone Wings Cliff\n","link":"","lat":51.4424781,"lon":-3.604571,"icon":"/testwiki/images/1/16/Blue.png"},{"text":"\u003Cb\u003E\u003Cp\u003E\u003Cb\u003E\u003Ca href=\"/wiki/Dunraven_Cliff#The_Gantry\" title=\"Dunraven Cliff\"\u003EThe Gantry\u003C/a\u003E\u003C/b\u003E\n\u003C/p\u003E\u003C/b\u003E\u003Chr /\u003E\u003Cp\u003E51.442258,-3.605524\n\u003C/p\u003E","title":"The Gantry\n","link":"","lat":51.442258,"lon":-3.605524,"icon":"/testwiki/images/1/16/Blue.png"},{"text":"\u003Cb\u003E\u003Cp\u003E\u003Cb\u003E\u003Ca href=\"/wiki/Temple_Bay_Inlets#The_Long_Wall\" class=\"mw-redirect\" title=\"Temple Bay Inlets\"\u003ETemple Bay Inlets - The Long Wall\u003C/a\u003E\u003C/b\u003E\n\u003C/p\u003E\u003C/b\u003E\u003Chr /\u003E\u003Cp\u003E51.4414281,-3.6037531\n\u003C/p\u003E","title":"Temple Bay Inlets - The Long Wall\n","link":"","lat":51.4414281,"lon":-3.603753,"icon":"/testwiki/images/1/16/Blue.png"},{"text":"\u003Cb\u003E\u003Cp\u003E\u003Cb\u003E\u003Ca href=\"/wiki/Dunraven_Cliff#Tufa_Terrace\" title=\"Dunraven Cliff\"\u003ETufa Terrace\u003C/a\u003E\u003C/b\u003E\n\u003C/p\u003E\u003C/b\u003E\u003Chr /\u003E\u003Cp\u003E51.4424451,-3.604709\n\u003C/p\u003E","title":"Tufa Terrace\n","link":"","lat":51.4424451,"lon":-3.604709,"icon":"/testwiki/images/1/16/Blue.png"},{"text":"\u003Cb\u003E\u003Cp\u003E\u003Cb\u003E\u003Ca href=\"/wiki/Witches_Cave\" title=\"Witches Cave\"\u003EWitches Cave\u003C/a\u003E\u003C/b\u003E\n\u003C/p\u003E\u003C/b\u003E\u003Chr /\u003E\u003Cp\u003E51.4421271,-3.605996\n\u003C/p\u003E","title":"Witches Cave\n","link":"","lat":51.4421271,"lon":-3.605996,"icon":"/testwiki/images/1/16/Blue.png"},{"text":"\u003Cb\u003E\u003Cp\u003E\u003Cb\u003E\u003Ca href=\"/wiki/Witches_Cave#Wrasse_Wall\" title=\"Witches Cave\"\u003E Witches Cave - Wrasse Wall\u003C/a\u003E\u003C/b\u003E\n\u003C/p\u003E\u003C/b\u003E\u003Chr /\u003E\u003Cp\u003E51.441974,-3.606586\n\u003C/p\u003E","title":" Witches Cave - Wrasse Wall\n","link":"","lat":51.441974,"lon":-3.606586,"icon":"/testwiki/images/1/16/Blue.png"},{"text":"\u003Cb\u003E\u003Cp\u003E\u003Cb\u003E\u003Ca href=\"/wiki/Folded_Walls\" title=\"Folded Walls\"\u003EFolded Walls\u003C/a\u003E\u003C/b\u003E\n\u003C/p\u003E\u003C/b\u003E\u003Chr /\u003E\u003Cp\u003E51.442213, -3.605850\n\u003C/p\u003E","title":"Folded Walls\n","link":"","lat":51.442213,"lon":-3.60585,"icon":"/testwiki/images/1/16/Blue.png"},{"text":"\u003Cb\u003E\u003Cp\u003E\u003Cb\u003E\u003Ca href=\"/wiki/Black_Zawn\" title=\"Black Zawn\"\u003EBlack Zawn\u003C/a\u003E\u003C/b\u003E\n\u003C/p\u003E\u003C/b\u003E\u003Chr /\u003E\u003Cp\u003E51.442243, -3.605796\n\u003C/p\u003E","title":"Black Zawn\n","link":"","lat":51.442243,"lon":-3.605796,"icon":"/testwiki/images/1/16/Blue.png"},{"text":"\u003Cb\u003E\u003Cp\u003E\u003Cb\u003EParking Witches Point\u003C/b\u003E\n\u003C/p\u003E\u003C/b\u003E\u003Chr /\u003E\u003Cp\u003E51.446124 -3.6053771\n\u003C/p\u003E","title":"Parking Witches Point\n","link":"","lat":51.446124,"lon":-3.6053771,"icon":"/testwiki/images/7/74/Parking.png"},{"text":"\u003Cb\u003E\u003Cp\u003E\u003Cb\u003E\u003Ca href=\"/wiki/Sully_Island\" title=\"Sully Island\"\u003ESully Island\u003C/a\u003E\u003C/b\u003E\n\u003C/p\u003E\u003C/b\u003E\u003Chr /\u003E\u003Cp\u003E51.396153, -3.199511\n\u003C/p\u003E","title":"Sully Island\n","link":"","lat":51.396153,"lon":-3.199511,"icon":"/testwiki/images/4/43/Orange.png"},{"text":"\u003Cb\u003E\u003Cp\u003E\u003Cb\u003E\u003Ca href=\"/wiki/Nash_Point\" title=\"Nash Point\"\u003ENash Point\u003C/a\u003E\u003C/b\u003E\n\u003C/p\u003E\u003C/b\u003E\u003Chr /\u003E\u003Cp\u003E51.402947, -3.560107\n\u003C/p\u003E","title":"Nash Point\n","link":"","lat":51.402947,"lon":-3.560107,"icon":"/testwiki/images/1/16/Blue.png"},{"text":"\u003Cb\u003E\u003Cp\u003E\u003Cb\u003E\u003Ca href=\"/wiki/Stout_Point\" title=\"Stout Point\"\u003EStout Point\u003C/a\u003E\u003C/b\u003E\n\u003C/p\u003E\u003C/b\u003E\u003Chr /\u003E\u003Cp\u003E51.392084, -3.478126\n\u003C/p\u003E","title":"Stout Point\n","link":"","lat":51.392084,"lon":-3.478126,"icon":"/testwiki/images/1/16/Blue.png"},{"text":"\u003Cb\u003E\u003Cp\u003E\u003Cb\u003E\u003Ca href=\"/wiki/Costa_del_Major\" title=\"Costa del Major\"\u003ECosta del Major\u003C/a\u003E\u003C/b\u003E\n\u003C/p\u003E\u003C/b\u003E\u003Chr /\u003E\u003Cp\u003E51.393078, -3.480009\n\u003C/p\u003E","title":"Costa del Major\n","link":"","lat":51.393078,"lon":-3.480009,"icon":"/testwiki/images/1/16/Blue.png"},{"text":"\u003Cb\u003E\u003Cp\u003E\u003Cb\u003E\u003Ca href=\"/wiki/Telpyn_Point_-_Amroth\" title=\"Telpyn Point - Amroth\"\u003ETelpyn Point - Amroth\u003C/a\u003E\u003C/b\u003E\n\u003C/p\u003E\u003C/b\u003E\u003Chr /\u003E\u003Cp\u003E51.73400, -4.629388\n\u003C/p\u003E","title":"Telpyn Point - Amroth\n","link":"","lat":51.734,"lon":-4.629388,"icon":"/testwiki/images/1/16/Blue.png"},{"text":"\u003Cb\u003E\u003Cp\u003E\u003Cb\u003E\u003Ca href=\"/wiki/Morfa_Bychan_and_Pendine\" title=\"Morfa Bychan and Pendine\"\u003EMorfa Bychan and Pendine\u003C/a\u003E\u003C/b\u003E\n\u003C/p\u003E\u003C/b\u003E\u003Chr /\u003E\u003Cp\u003E51.73766, -4.569089\n\u003C/p\u003E","title":"Morfa Bychan and Pendine\n","link":"","lat":51.73766,"lon":-4.569089,"icon":"/testwiki/images/1/16/Blue.png"},{"text":"\u003Cb\u003E\u003Cp\u003E\u003Cb\u003E\u003Ca href=\"/wiki/Tor_Gro#Overhang_Slab\" title=\"Tor Gro\"\u003EOverhang Slab\u003C/a\u003E\u003C/b\u003E\n\u003C/p\u003E\u003C/b\u003E\u003Chr /\u003E\u003Cp\u003E\u003Cb\u003E51.620499,-4.226668\u003C/b\u003E\n\u003C/p\u003E","title":"Overhang Slab\n","link":"","lat":51.620499,"lon":-4.226668,"icon":"/testwiki/images/4/43/Orange.png"},{"text":"\u003Cb\u003E\u003Cp\u003E\u003Cb\u003E\u003Ca href=\"/wiki/Tor_Gro\" title=\"Tor Gro\"\u003ETor Gro\u003C/a\u003E\u003C/b\u003E\n\u003C/p\u003E\u003C/b\u003E\u003Chr /\u003E\u003Cp\u003E51.621189, -4.227353\n\u003C/p\u003E","title":"Tor Gro\n","link":"","lat":51.621189,"lon":-4.227353,"icon":"/testwiki/images/4/43/Orange.png"},{"text":"\u003Cb\u003E\u003Cp\u003E\u003Cb\u003E\u003Ca href=\"/wiki/Tor_Gro#Hidden_Slab\" title=\"Tor Gro\"\u003EHidden Slab\u003C/a\u003E\u003C/b\u003E\n\u003C/p\u003E\u003C/b\u003E\u003Chr /\u003E\u003Cp\u003E51.62122, -4.22803\n\u003C/p\u003E","title":"Hidden Slab\n","link":"","lat":51.62122,"lon":-4.22803,"icon":"/testwiki/images/4/43/Orange.png"},{"text":"\u003Cb\u003E\u003Cp\u003E\u003Cb\u003E\u003Ca href=\"/wiki/North_Hill_Tor\" title=\"North Hill Tor\"\u003ENorth Hill Tor\u003C/a\u003E\u003C/b\u003E\n\u003C/p\u003E\u003C/b\u003E\u003Chr /\u003E\u003Cp\u003E51.622161, -4.236871\n\u003C/p\u003E","title":"North Hill Tor\n","link":"","lat":51.622161,"lon":-4.236871,"icon":"/testwiki/images/4/43/Orange.png"},{"text":"\u003Cb\u003E\u003Cp\u003E\u003Ca href=\"/wiki/Cwm_Ivy_Tor\" title=\"Cwm Ivy Tor\"\u003ECwm Ivy Tor\u003C/a\u003E\n\u003C/p\u003E\u003C/b\u003E\u003Chr /\u003E\u003Cp\u003E51.623593, -4.261914\n\u003C/p\u003E","title":"Cwm Ivy Tor\n","link":"","lat":51.623593,"lon":-4.261914,"icon":"/testwiki/images/4/43/Orange.png"},{"text":"\u003Cb\u003E\u003Cp\u003E\u003Cb\u003E\u003Ca href=\"/wiki/Prissen%27s_Tor\" title=\"Prissen's Tor\"\u003EPrissen's Tor\u003C/a\u003E\u003C/b\u003E\n\u003C/p\u003E\u003C/b\u003E\u003Chr /\u003E\u003Cp\u003E51.619862,-4.275357\n\u003C/p\u003E","title":"Prissen's Tor\n","link":"","lat":51.619862,"lon":-4.275357,"icon":"/testwiki/images/4/43/Orange.png"},{"text":"\u003Cb\u003E\u003Cp\u003E\u003Cb\u003E\u003Ca href=\"/wiki/Blue_Pool_Area#Livung_Wall\" title=\"Blue Pool Area\"\u003ELiving Wall\u003C/a\u003E\u003C/b\u003E\n\u003C/p\u003E\u003C/b\u003E\u003Chr /\u003E\u003Cp\u003E51.61236291378677,-4.304979879237635\n\u003C/p\u003E","title":"Living Wall\n","link":"","lat":51.612362913787,"lon":-4.3049798792376,"icon":"/testwiki/images/4/43/Orange.png"},{"text":"\u003Cb\u003E\u003Cp\u003E\u003Cb\u003E\u003Ca href=\"/wiki/Burry_Holms#Southern_Area\" title=\"Burry Holms\"\u003EBurry Holms#Southern Area\u003C/a\u003E\u003C/b\u003E\n\u003C/p\u003E\u003C/b\u003E\u003Chr /\u003E\u003Cp\u003E51.608186, -4.312364\n\u003C/p\u003E","title":"Burry Holms#Southern Area\n","link":"","lat":51.608186,"lon":-4.312364,"icon":"/testwiki/images/4/43/Orange.png"},{"text":"\u003Cb\u003E\u003Cp\u003E\u003Cb\u003E\u003Ca href=\"/wiki/Burry_Holms#Midsummer_Cove\" title=\"Burry Holms\"\u003EBurry Holms#Midsummer Cove\u003C/a\u003E\u003C/b\u003E\n\u003C/p\u003E\u003C/b\u003E\u003Chr /\u003E\u003Cp\u003E51.608718, -4.312093\n\u003C/p\u003E","title":"Burry Holms#Midsummer Cove\n","link":"","lat":51.608718,"lon":-4.312093,"icon":"/testwiki/images/4/43/Orange.png"},{"text":"\u003Cb\u003E\u003Cp\u003E\u003Cb\u003E\u003Ca href=\"/wiki/Burry_Holms#Littlejohn_Legacy_Area\" title=\"Burry Holms\"\u003ELittlejohn Legacy Area\u003C/a\u003E\u003C/b\u003E\n\u003C/p\u003E\u003C/b\u003E\u003Chr /\u003E\u003Cp\u003E51.608717, -4.312907\n\u003C/p\u003E","title":"Littlejohn Legacy Area\n","link":"","lat":51.608717,"lon":-4.312907,"icon":"/testwiki/images/4/43/Orange.png"},{"text":"\u003Cb\u003E\u003Cp\u003E\u003Cb\u003E\u003Ca href=\"/wiki/Burry_Holms#Pincer_Cove\" title=\"Burry Holms\"\u003EPincer Cove\u003C/a\u003E\u003C/b\u003E\n\u003C/p\u003E\u003C/b\u003E\u003Chr /\u003E\u003Cp\u003E51.609597, -4.315268\n\u003C/p\u003E","title":"Pincer Cove\n","link":"","lat":51.609597,"lon":-4.315268,"icon":"/testwiki/images/4/43/Orange.png"},{"text":"\u003Cb\u003E\u003Cp\u003E\u003Ca href=\"/wiki/Cefnstylle_Quarry\" title=\"Cefnstylle Quarry\"\u003ECefnstylle Quarry\u003C/a\u003E\n\u003C/p\u003E\u003C/b\u003E\u003Chr /\u003E\u003Cp\u003E51.646625, -4.064993\n\u003C/p\u003E","title":"Cefnstylle Quarry\n","link":"","lat":51.646625,"lon":-4.064993,"icon":"/testwiki/images/1/16/Blue.png"},{"text":"\u003Cb\u003E\u003Cp\u003E\u003Ca href=\"/wiki/Dunvant_Quarry\" title=\"Dunvant Quarry\"\u003EDunvant Quarry\u003C/a\u003E\n\u003C/p\u003E\u003C/b\u003E\u003Chr /\u003E\u003Cp\u003E51.627780, -4.029495\n\u003C/p\u003E","title":"Dunvant Quarry\n","link":"","lat":51.62778,"lon":-4.029495,"icon":"/testwiki/images/1/16/Blue.png"},{"text":"\u003Cb\u003E\u003Cp\u003E\u003Ca href=\"/wiki/Sunnybank\" title=\"Sunnybank\"\u003ESunnybank\u003C/a\u003E\n\u003C/p\u003E\u003C/b\u003E\u003Chr /\u003E\u003Cp\u003E51.624062, -4.0347830\n\u003C/p\u003E","title":"Sunnybank\n","link":"","lat":51.624062,"lon":-4.034783,"icon":"/testwiki/images/1/16/Blue.png"},{"text":"\u003Cb\u003E\u003Cp\u003EParking run by campsite. Charges may apply at busy times.\n\u003C/p\u003E\u003C/b\u003E\u003Chr /\u003E\u003Cp\u003E51.609668, -4.289170\n\u003C/p\u003E","title":"Parking run by campsite. Charges may apply at busy times.\n","link":"","lat":51.609668,"lon":-4.28917,"icon":"/testwiki/images/7/74/Parking.png"},{"text":"\u003Cb\u003E\u003Cp\u003E\u003Cb\u003E51.619601, -4.219431\u003Cbr /\u003E\u003Cbr /\u003ELandimore - Parking\u003C/b\u003E\n\u003C/p\u003E\u003C/b\u003E\u003Chr /\u003E\u003Cp\u003EFree\u003Cbr /\u003E\u003Cbr /\u003E\n\u003Ca href=\"/wiki/Tor_Gro\" title=\"Tor Gro\"\u003ETor Gro\u003C/a\u003E\u003Cbr /\u003E\n\u003Ca href=\"/wiki/North_Hill_Tor\" title=\"North Hill Tor\"\u003ENorth Hill Tor\u003C/a\u003E\n\u003C/p\u003E","title":"51.619601, -4.219431Landimore - Parking\n","link":"","lat":51.619601,"lon":-4.219431,"icon":"/testwiki/images/7/74/Parking.png"},{"text":"\u003Cb\u003E\u003Cp\u003E\u003Cb\u003E\u003Ca href=\"/wiki/West_Tor\" title=\"West Tor\"\u003EWest Tor\u003C/a\u003E\u003C/b\u003E\n\u003C/p\u003E\u003C/b\u003E\u003Chr /\u003E\u003Cp\u003E51.570017, -4.129828\n\u003C/p\u003E","title":"West Tor\n","link":"","lat":51.570017,"lon":-4.129828,"icon":"/testwiki/images/4/43/Orange.png"},{"text":"\u003Cb\u003E\u003Cp\u003E\u003Cb\u003E\u003Ca href=\"/wiki/Little_Tor\" title=\"Little Tor\"\u003ELittle Tor\u003C/a\u003E\u003C/b\u003E\n\u003C/p\u003E\u003C/b\u003E\u003Chr /\u003E\u003Cp\u003E51.569370, -4.127980\n\u003C/p\u003E","title":"Little Tor\n","link":"","lat":51.56937,"lon":-4.12798,"icon":"/testwiki/images/4/43/Orange.png"},{"text":"\u003Cb\u003E\u003Cp\u003E\u003Cb\u003E\u003Ca href=\"/wiki/Little_Tor#Little_Star_Wall\" title=\"Little Tor\"\u003ELittle Star Wall\u003C/a\u003E\u003C/b\u003E\n\u003C/p\u003E\u003C/b\u003E\u003Chr /\u003E\u003Cp\u003E51.569483, -4.127549\n\u003C/p\u003E","title":"Little Star Wall\n","link":"","lat":51.569483,"lon":-4.127549,"icon":"/testwiki/images/4/43/Orange.png"},{"text":"\u003Cb\u003E\u003Cp\u003E\u003Cb\u003E\u003Ca href=\"/wiki/Great_Tor_Proper\" title=\"Great Tor Proper\"\u003EGreat Tor Proper\u003C/a\u003E\u003C/b\u003E\n\u003C/p\u003E\u003C/b\u003E\u003Chr /\u003E\u003Cp\u003E51.568593, -4.122941\n\u003C/p\u003E","title":"Great Tor Proper\n","link":"","lat":51.568593,"lon":-4.122941,"icon":"/testwiki/images/4/43/Orange.png"},{"text":"\u003Cb\u003E\u003Cp\u003E\u003Cb\u003E\u003Ca href=\"/wiki/Odin%27s_Cave\" title=\"Odin's Cave\"\u003EOdin's Cave\u003C/a\u003E\u003C/b\u003E\n\u003C/p\u003E\u003C/b\u003E\u003Chr /\u003E\u003Cp\u003E51.568967, -4.121902\n\u003C/p\u003E","title":"Odin's Cave\n","link":"","lat":51.568967,"lon":-4.121902,"icon":"/testwiki/images/4/43/Orange.png"},{"text":"\u003Cb\u003E\u003Cp\u003E\u003Cb\u003E\u003Ca href=\"/wiki/First_Corner\" title=\"First Corner\"\u003EFirst Corner\u003C/a\u003E\u003C/b\u003E\n\u003C/p\u003E\u003C/b\u003E\u003Chr /\u003E\u003Cp\u003E51.570235, -4.119228\n\u003C/p\u003E","title":"First Corner\n","link":"","lat":51.570235,"lon":-4.119228,"icon":"/testwiki/images/4/43/Orange.png"},{"text":"\u003Cb\u003E\u003Cp\u003E\u003Cb\u003E\u003Ca href=\"/wiki/Second_Corner\" title=\"Second Corner\"\u003ESecond Corner\u003C/a\u003E\u003C/b\u003E\n\u003C/p\u003E\u003C/b\u003E\u003Chr /\u003E\u003Cp\u003E51.569805, -4.119753\n\u003C/p\u003E","title":"Second Corner\n","link":"","lat":51.569805,"lon":-4.119753,"icon":"/testwiki/images/4/43/Orange.png"},{"text":"\u003Cb\u003E\u003Cp\u003E\u003Cb\u003E\u003Ca href=\"/wiki/Odin%27s_Wall\" title=\"Odin's Wall\"\u003EOdin's Wall\u003C/a\u003E\u003C/b\u003E\n\u003C/p\u003E\u003C/b\u003E\u003Chr /\u003E\u003Cp\u003E51.5689669, -4.1217401\n\u003C/p\u003E","title":"Odin's Wall\n","link":"","lat":51.5689669,"lon":-4.1217401,"icon":"/testwiki/images/4/43/Orange.png"},{"text":"\u003Cb\u003E\u003Cp\u003E\u003Cb\u003E\u003Ca href=\"/wiki/Crawley_Woods_Rocks\" title=\"Crawley Woods Rocks\"\u003ECrawley Woods Rocks\u003C/a\u003E\u003C/b\u003E\n\u003C/p\u003E\u003C/b\u003E\u003Chr /\u003E\u003Cp\u003E51.570694, -4.1388014\n\u003C/p\u003E","title":"Crawley Woods Rocks\n","link":"","lat":51.5702793,"lon":-4.1380857,"icon":"/testwiki/images/4/43/Orange.png"},{"text":"\u003Cb\u003E\u003Cp\u003E\u003Cb\u003E\u003Ca href=\"/wiki/Ramp_Zawn\" title=\"Ramp Zawn\"\u003ERamp Zawn\u003C/a\u003E\u003C/b\u003E\n\u003C/p\u003E\u003C/b\u003E\u003Chr /\u003E\u003Cp\u003E51.570307, -4.117544\n\u003C/p\u003E","title":"Ramp Zawn\n","link":"","lat":51.570307,"lon":-4.117544,"icon":"/testwiki/images/4/43/Orange.png"},{"text":"\u003Cb\u003E\u003Cp\u003E\u003Cb\u003E\u003Ca href=\"/wiki/Great_Tor_Proper#Great_Tor_Lower_Tier\" title=\"Great Tor Proper\"\u003EGreat Tor Lower Tier\u003C/a\u003E\u003C/b\u003E\n\u003C/p\u003E\u003C/b\u003E\u003Chr /\u003E\u003Cp\u003E51.568960, -4.123477\n\u003C/p\u003E","title":"Great Tor Lower Tier\n","link":"","lat":51.56896,"lon":-4.123477,"icon":"/testwiki/images/4/43/Orange.png"},{"text":"\u003Cb\u003E\u003Cp\u003E\u003Cb\u003E\u003Ca href=\"/wiki/Great_Tor_Proper#The_Col_Routes\" title=\"Great Tor Proper\"\u003EThe Col Routes\u003C/a\u003E\u003C/b\u003E\n\u003C/p\u003E\u003C/b\u003E\u003Chr /\u003E\u003Cp\u003E51.568627, -4.122814\n\u003C/p\u003E","title":"The Col Routes\n","link":"","lat":51.568627,"lon":-4.122814,"icon":"/testwiki/images/4/43/Orange.png"},{"text":"\u003Cb\u003E\u003Cp\u003E\u003Cb\u003E\u003Ca href=\"/wiki/Monty%27s_Slab\" title=\"Monty's Slab\"\u003EMonty's Slab\u003C/a\u003E\u003C/b\u003E\n\u003C/p\u003E\u003C/b\u003E\u003Chr /\u003E\u003Cp\u003E51.570162, -4.119346\n\u003C/p\u003E","title":"Monty's Slab\n","link":"","lat":51.570162,"lon":-4.119346,"icon":"/testwiki/images/4/43/Orange.png"},{"text":"\u003Cb\u003E\u003Cp\u003E\u003Cb\u003E51.575583, -4.127859\u003Cbr /\u003E\u003Cbr /\u003EFree Parking - Penmaen\u003C/b\u003E\n\u003C/p\u003E\u003C/b\u003E\u003Chr /\u003E\u003Cp\u003EIncorrectly described in the recent guidebook as being,\u003Cbr /\u003E\n\u003Ci\u003E\"next to the Post Office and village shop at Penmaen.\"\u003C/i\u003E\u003Cbr /\u003E \nThese facilities are no longer there.\u003Cbr /\u003E\u003Cbr /\u003E\nOn fine days this car park will fill very quickly.\u003Cbr /\u003E\u003Cbr /\u003E\n\u003Cb\u003EFor\u003C/b\u003E \u003Ca href=\"/wiki/The_Three_Tors\" class=\"mw-redirect\" title=\"The Three Tors\"\u003EThe Three Tors\u003C/a\u003E,\u003Cbr /\u003E \n\u003Ca href=\"/wiki/Three_Cliffs\" title=\"Three Cliffs\"\u003EThree Cliffs\u003C/a\u003E,\u003Cbr /\u003E \n\u003Ca class=\"mw-selflink selflink\"\u003EPobbles Bays\u003C/a\u003E,\u003Cbr /\u003E \n\u003Ca href=\"/wiki/Odin%27s_Wall\" title=\"Odin's Wall\"\u003EOdin's Wall\u003C/a\u003E\n\u003C/p\u003E","title":"51.575583, -4.127859Free Parking - Penmaen\n","link":"","lat":51.575583,"lon":-4.127859,"icon":"/testwiki/images/7/74/Parking.png"},{"text":"\u003Cb\u003E\u003Cp\u003E\u003Cb\u003E51.575583, -4.127859\u003Cbr /\u003E\u003Cbr /\u003EPenmaen Parking - Donation Box\u003C/b\u003E\n\u003C/p\u003E\u003C/b\u003E\u003Chr /\u003E\u003Cp\u003E\u003Cb\u003EFor\u003C/b\u003E \u003Ca href=\"/wiki/The_Three_Tors\" class=\"mw-redirect\" title=\"The Three Tors\"\u003EThe Three Tors\u003C/a\u003E,\u003Cbr /\u003E \n\u003Ca href=\"/wiki/Three_Cliffs\" title=\"Three Cliffs\"\u003EThree Cliffs\u003C/a\u003E,\u003Cbr /\u003E \n\u003Ca class=\"mw-selflink selflink\"\u003EPobbles Bays\u003C/a\u003E,\u003Cbr /\u003E \n\u003Ca href=\"/wiki/Odin%27s_Wall\" title=\"Odin's Wall\"\u003EOdin's Wall\u003C/a\u003E\n\u003C/p\u003E","title":"51.575583, -4.127859Penmaen Parking - Donation Box\n","link":"","lat":51.576053,"lon":-4.12722,"icon":"/testwiki/images/7/74/Parking.png"},{"text":"\u003Cb\u003E\u003Cp\u003E\u003Cb\u003E\u003Ca href=\"/wiki/Retribution_Wall\" title=\"Retribution Wall\"\u003ERetribution Wall\u003C/a\u003E\u003C/b\u003E\n\u003C/p\u003E\u003C/b\u003E\u003Chr /\u003E\u003Cp\u003E51.567155, -4.300356\n\u003C/p\u003E","title":"Retribution Wall\n","link":"","lat":51.567077,"lon":-4.300475,"icon":"/testwiki/images/1/16/Blue.png"},{"text":"\u003Cb\u003E\u003Cp\u003E\u003Cb\u003E\u003Ca href=\"/wiki/Trial_Wall\" title=\"Trial Wall\"\u003ETrial Wall\u003C/a\u003E\u003C/b\u003E\n\u003C/p\u003E\u003C/b\u003E\u003Chr /\u003E\u003Cp\u003E51.5669483, -4.3004663\n\u003C/p\u003E","title":"Trial Wall\n","link":"","lat":51.566857,"lon":-4.300424,"icon":"/testwiki/images/4/43/Orange.png"},{"text":"\u003Cb\u003E\u003Cp\u003E\u003Cb\u003E\u003Ca href=\"/wiki/Wedge_Wall\" title=\"Wedge Wall\"\u003EWedge Wall\u003C/a\u003E\u003C/b\u003E\n\u003C/p\u003E\u003C/b\u003E\u003Chr /\u003E\u003Cp\u003E51.566653, -4.300759\n\u003C/p\u003E","title":"Wedge Wall\n","link":"","lat":51.566653,"lon":-4.300759,"icon":"/testwiki/images/1/16/Blue.png"},{"text":"\u003Cb\u003E\u003Cp\u003E\u003Cb\u003E\u003Ca href=\"/wiki/Mossy_Slab\" class=\"mw-redirect\" title=\"Mossy Slab\"\u003EMossy Slab\u003C/a\u003E\u003C/b\u003E\n\u003C/p\u003E\u003C/b\u003E\u003Chr /\u003E\u003Cp\u003E51.566274, -4.301571\n\u003C/p\u003E","title":"Mossy Slab\n","link":"","lat":51.566274,"lon":-4.301571,"icon":"/testwiki/images/4/43/Orange.png"},{"text":"\u003Cb\u003E\u003Cp\u003E\u003Cb\u003E\u003Ca href=\"/wiki/Lifebuoy_Buttress\" title=\"Lifebuoy Buttress\"\u003ELifebuoy Buttress\u003C/a\u003E\u003C/b\u003E\n\u003C/p\u003E\u003C/b\u003E\u003Chr /\u003E\u003Cp\u003E51.566113, -4.301817\n\u003C/p\u003E","title":"Lifebuoy Buttress\n","link":"","lat":51.566113,"lon":-4.301817,"icon":"/testwiki/images/4/43/Orange.png"},{"text":"\u003Cb\u003E\u003Cp\u003E\u003Cb\u003E\u003Ca href=\"/wiki/Black_Buttress#Black_Buttress_Left\" title=\"Black Buttress\"\u003EBlack Buttress Left\u003C/a\u003E\u003C/b\u003E\n\u003C/p\u003E\u003C/b\u003E\u003Chr /\u003E\u003Cp\u003E51.565802, -4.302324\n\u003C/p\u003E","title":"Black Buttress Left\n","link":"","lat":51.565802,"lon":-4.302324,"icon":"/testwiki/images/1/16/Blue.png"},{"text":"\u003Cb\u003E\u003Cp\u003E\u003Cb\u003E\u003Ca href=\"/wiki/Black_Buttress#Black_Buttress_Right\" title=\"Black Buttress\"\u003EBlack Buttress Right\u003C/a\u003E\u003C/b\u003E\n\u003C/p\u003E\u003C/b\u003E\u003Chr /\u003E\u003Cp\u003E51.565474, -4.302656\n\u003C/p\u003E","title":"Black Buttress Right\n","link":"","lat":51.565474,"lon":-4.302656,"icon":"/testwiki/images/1/16/Blue.png"},{"text":"\u003Cb\u003E\u003Cp\u003E\u003Cb\u003E\u003Ca href=\"/wiki/Black_Buttress#Black_Buttress_Far_Right\" title=\"Black Buttress\"\u003EBlack Buttress Far Right\u003C/a\u003E\u003C/b\u003E aka \u003Ca href=\"/wiki/Veggie_Slab\" class=\"mw-redirect\" title=\"Veggie Slab\"\u003EVeggie Slab\u003C/a\u003E\n\u003C/p\u003E\u003C/b\u003E\u003Chr /\u003E\u003Cp\u003E51.565487, -4.303063\n\u003C/p\u003E","title":"Black Buttress Far Right aka Veggie Slab\n","link":"","lat":51.565487,"lon":-4.303063,"icon":"/testwiki/images/1/16/Blue.png"},{"text":"\u003Cb\u003E\u003Cp\u003E\u003Cb\u003E\u003Ca href=\"/wiki/Silent_Walls\" title=\"Silent Walls\"\u003ESilent Walls\u003C/a\u003E\u003C/b\u003E\n\u003C/p\u003E\u003C/b\u003E\u003Chr /\u003E\u003Cp\u003E51.565321, -4.303461\n\u003C/p\u003E","title":"Silent Walls\n","link":"","lat":51.565321,"lon":-4.303461,"icon":"/testwiki/images/1/16/Blue.png"},{"text":"\u003Cb\u003E\u003Cp\u003E\u003Cb\u003E\u003Ca href=\"/wiki/Silent_Fright_Buttress\" title=\"Silent Fright Buttress\"\u003ESilent Fright Buttress\u003C/a\u003E\u003C/b\u003E\n\u003C/p\u003E\u003C/b\u003E\u003Chr /\u003E\u003Cp\u003E51.565188, -4.303595\n\u003C/p\u003E","title":"Silent Fright Buttress\n","link":"","lat":51.565188,"lon":-4.303595,"icon":"/testwiki/images/4/43/Orange.png"},{"text":"\u003Cb\u003E\u003Cp\u003E\u003Cb\u003E\u003Ca href=\"/wiki/Calcite_Bay#Calcite_Bay_Right\" title=\"Calcite Bay\"\u003ECalcite Bay Right\u003C/a\u003E\u003C/b\u003E\n\u003C/p\u003E\u003C/b\u003E\u003Chr /\u003E\u003Cp\u003E51.564993, -4.304148\n\u003C/p\u003E","title":"Calcite Bay Right\n","link":"","lat":51.564993,"lon":-4.304148,"icon":"/testwiki/images/1/16/Blue.png"},{"text":"\u003Cb\u003E\u003Cp\u003E\u003Cb\u003E\u003Ca href=\"/wiki/Sinners_Walls\" title=\"Sinners Walls\"\u003ESinners Walls\u003C/a\u003E\u003C/b\u003E\n\u003C/p\u003E\u003C/b\u003E\u003Chr /\u003E\u003Cp\u003E51.564559, -4.304656\n\u003C/p\u003E","title":"Sinners Walls\n","link":"","lat":51.564559,"lon":-4.304656,"icon":"/testwiki/images/1/16/Blue.png"},{"text":"\u003Cb\u003E\u003Cp\u003E\u003Cb\u003E\u003Ca href=\"/wiki/Windy_Buttress\" title=\"Windy Buttress\"\u003EWindy Buttress\u003C/a\u003E\u003C/b\u003E\n\u003C/p\u003E\u003C/b\u003E\u003Chr /\u003E\u003Cp\u003E51.564384, -4.304897\n\u003C/p\u003E","title":"Windy Buttress\n","link":"","lat":51.564384,"lon":-4.304897,"icon":"/testwiki/images/1/16/Blue.png"},{"text":"\u003Cb\u003E\u003Cp\u003E\u003Cb\u003E\u003Ca href=\"/wiki/Fat_Lady_Wall\" title=\"Fat Lady Wall\"\u003EFat Lady Wall\u003C/a\u003E\u003C/b\u003E\n\u003C/p\u003E\u003C/b\u003E\u003Chr /\u003E\u003Cp\u003E51.564042, -4.304955\n\u003C/p\u003E","title":"Fat Lady Wall\n","link":"","lat":51.564042,"lon":-4.304955,"icon":"/testwiki/images/1/16/Blue.png"},{"text":"\u003Cb\u003E\u003Cp\u003E\u003Cb\u003E\u003Ca href=\"/wiki/Carbon_Slab\" title=\"Carbon Slab\"\u003ECarbon Slab\u003C/a\u003E\u003C/b\u003E\n\u003C/p\u003E\u003C/b\u003E\u003Chr /\u003E\u003Cp\u003E51.563995, -4.305359\n\u003C/p\u003E","title":"Carbon Slab\n","link":"","lat":51.563995,"lon":-4.305359,"icon":"/testwiki/images/1/16/Blue.png"},{"text":"\u003Cb\u003E\u003Cp\u003E\u003Cb\u003E\u003Ca href=\"/wiki/Tears_Point\" title=\"Tears Point\"\u003ETears Point\u003C/a\u003E\u003C/b\u003E\n\u003C/p\u003E\u003C/b\u003E\u003Chr /\u003E\u003Cp\u003E51.559840, -4.296507\n\u003C/p\u003E","title":"Tears Point\n","link":"","lat":51.55984,"lon":-4.296507,"icon":"/testwiki/images/4/43/Orange.png"},{"text":"\u003Cb\u003E\u003Cp\u003E\u003Cb\u003E\u003Ca href=\"/wiki/Black_Wall\" title=\"Black Wall\"\u003EBlack Wall\u003C/a\u003E\u003C/b\u003E\n\u003C/p\u003E\u003C/b\u003E\u003Chr /\u003E\u003Cp\u003E51.569264,-4.294105\n\u003C/p\u003E","title":"Black Wall\n","link":"","lat":51.569264,"lon":-4.294105,"icon":"/testwiki/images/1/16/Blue.png"},{"text":"\u003Cb\u003E\u003Cp\u003E\u003Cb\u003E\u003Ca href=\"/wiki/Shipwreck_Cove\" title=\"Shipwreck Cove\"\u003EShipwreck Cove\u003C/a\u003E\u003C/b\u003E\n\u003C/p\u003E\u003C/b\u003E\u003Chr /\u003E\u003Cp\u003E51.56896, -4.29483\n\u003C/p\u003E","title":"Shipwreck Cove\n","link":"","lat":51.56896,"lon":-4.29483,"icon":"/testwiki/images/1/16/Blue.png"},{"text":"\u003Cb\u003E\u003Cp\u003E\u003Cb\u003E\u003Ca href=\"/wiki/Castaway_Cove\" title=\"Castaway Cove\"\u003ECastaway Cove\u003C/a\u003E\u003C/b\u003E\n\u003C/p\u003E\u003C/b\u003E\u003Chr /\u003E\u003Cp\u003E51.569045, -4.295540\n\u003C/p\u003E","title":"Castaway Cove\n","link":"","lat":51.569045,"lon":-4.29554,"icon":"/testwiki/images/1/16/Blue.png"},{"text":"\u003Cb\u003E\u003Cp\u003E\u003Cb\u003E\u003Ca href=\"/wiki/Seamen_Wall\" title=\"Seamen Wall\"\u003ESeamen Wall\u003C/a\u003E\u003C/b\u003E\n\u003C/p\u003E\u003C/b\u003E\u003Chr /\u003E\u003Cp\u003E51.569174, -4.296596\n\u003C/p\u003E","title":"Seamen Wall\n","link":"","lat":51.569174,"lon":-4.296596,"icon":"/testwiki/images/1/16/Blue.png"},{"text":"\u003Cb\u003E\u003Cp\u003E\u003Cb\u003E\u003Ca href=\"/wiki/Mermaid_Wall\" title=\"Mermaid Wall\"\u003EMermaid Wall\u003C/a\u003E\u003C/b\u003E\n\u003C/p\u003E\u003C/b\u003E\u003Chr /\u003E\u003Cp\u003E51.568416, -4.298232\n\u003C/p\u003E","title":"Mermaid Wall\n","link":"","lat":51.568416,"lon":-4.298232,"icon":"/testwiki/images/1/16/Blue.png"},{"text":"\u003Cb\u003E\u003Cp\u003E\u003Cb\u003E\u003Ca href=\"/wiki/Sheepbone_Wall\" title=\"Sheepbone Wall\"\u003ESheepbone Wall\u003C/a\u003E\u003C/b\u003E\n\u003C/p\u003E\u003C/b\u003E\u003Chr /\u003E\u003Cp\u003E51.567190, -4.300633\n\u003C/p\u003E","title":"Sheepbone Wall\n","link":"","lat":51.56719,"lon":-4.300633,"icon":"/testwiki/images/4/43/Orange.png"},{"text":"\u003Cb\u003E\u003Cp\u003E\u003Cb\u003E\u003Ca href=\"/wiki/Sinister_Sister_Zawn\" title=\"Sinister Sister Zawn\"\u003ESinister Sister Zawn\u003C/a\u003E\u003C/b\u003E\n\u003C/p\u003E\u003C/b\u003E\u003Chr /\u003E\u003Cp\u003E51.566464, -4.301587\n\u003C/p\u003E","title":"Sinister Sister Zawn\n","link":"","lat":51.566464,"lon":-4.301587,"icon":"/testwiki/images/4/43/Orange.png"},{"text":"\u003Cb\u003E\u003Cp\u003E\u003Cb\u003E\u003Ca href=\"/wiki/Evening_Wall\" title=\"Evening Wall\"\u003EEvening Wall\u003C/a\u003E\u003C/b\u003E\n\u003C/p\u003E\u003C/b\u003E\u003Chr /\u003E\u003Cp\u003E51.565597, -4.303813\n\u003C/p\u003E","title":"Evening Wall\n","link":"","lat":51.565597,"lon":-4.303813,"icon":"/testwiki/images/4/43/Orange.png"},{"text":"\u003Cb\u003E\u003Cp\u003E\u003Cb\u003E\u003Ca href=\"/wiki/Platform_Area\" title=\"Platform Area\"\u003EPlatform Area\u003C/a\u003E\u003C/b\u003E\n\u003C/p\u003E\u003C/b\u003E\u003Chr /\u003E\u003Cp\u003E51.56528, -4.30439\n\u003C/p\u003E","title":"Platform Area\n","link":"","lat":51.56522,"lon":-4.30439,"icon":"/testwiki/images/4/43/Orange.png"},{"text":"\u003Cb\u003E\u003Cp\u003E\u003Cb\u003E\u003Ca href=\"/wiki/Poser_Buttress\" title=\"Poser Buttress\"\u003EPoser Buttress\u003C/a\u003E\u003C/b\u003E\n\u003C/p\u003E\u003C/b\u003E\u003Chr /\u003E\u003Cp\u003E51.564773, -4.304904\n\u003C/p\u003E","title":"Poser Buttress\n","link":"","lat":51.564773,"lon":-4.304904,"icon":"/testwiki/images/4/43/Orange.png"},{"text":"\u003Cb\u003E\u003Cp\u003E\u003Cb\u003E\u003Ca href=\"/wiki/Kitchen_Corner\" title=\"Kitchen Corner\"\u003EKitchen Corner\u003C/a\u003E\u003C/b\u003E\n\u003C/p\u003E\u003C/b\u003E\u003Chr /\u003E\u003Cp\u003E51.563678, -4.306523\n\u003C/p\u003E","title":"Kitchen Corner\n","link":"","lat":51.563678,"lon":-4.306523,"icon":"/testwiki/images/4/43/Orange.png"},{"text":"\u003Cb\u003E\u003Cp\u003E\u003Ca href=\"/wiki/Worms_Head\" title=\"Worms Head\"\u003EWorms Head\u003C/a\u003E\n\u003C/p\u003E\u003C/b\u003E\u003Chr /\u003E\u003Cp\u003E51.564990, -4.331069\n\u003C/p\u003E","title":"Worms Head\n","link":"","lat":51.56499,"lon":-4.331069,"icon":"/testwiki/images/4/43/Orange.png"},{"text":"\u003Cb\u003E\u003Cp\u003E\u003Ca href=\"/wiki/Upper_Jacky%27s_Tor\" title=\"Upper Jacky's Tor\"\u003EUpper Jacky's Tor\u003C/a\u003E\n\u003C/p\u003E\u003C/b\u003E\u003Chr /\u003E\u003Cp\u003E51.561781, -4.284720\n\u003C/p\u003E","title":"Upper Jacky's Tor\n","link":"","lat":51.561781,"lon":-4.28472,"icon":"/testwiki/images/4/43/Orange.png"},{"text":"\u003Cb\u003E\u003Cp\u003E\u003Ca href=\"/wiki/Rolly_Bottom_Buttress\" title=\"Rolly Bottom Buttress\"\u003ERolly Bottom Buttress\u003C/a\u003E\n\u003C/p\u003E\u003C/b\u003E\u003Chr /\u003E\u003Cp\u003E51.561792, -4.284171\n\u003C/p\u003E","title":"Rolly Bottom Buttress\n","link":"","lat":51.561792,"lon":-4.284171,"icon":"/testwiki/images/4/43/Orange.png"},{"text":"\u003Cb\u003E\u003Cp\u003E\u003Ca href=\"/wiki/Grey_Wall\" title=\"Grey Wall\"\u003EGrey Wall\u003C/a\u003E\n\u003C/p\u003E\u003C/b\u003E\u003Chr /\u003E\u003Cp\u003E51.561926, -4.279876\n\u003C/p\u003E","title":"Grey Wall\n","link":"","lat":51.561926,"lon":-4.279876,"icon":"/testwiki/images/4/43/Orange.png"},{"text":"\u003Cb\u003E\u003Cp\u003E\u003Ca href=\"/wiki/Mewslade_Slab\" class=\"mw-redirect\" title=\"Mewslade Slab\"\u003EMewslade Slab\u003C/a\u003E\n\u003C/p\u003E\u003C/b\u003E\u003Chr /\u003E\u003Cp\u003E51.564481, -4.274609\n\u003C/p\u003E","title":"Mewslade Slab\n","link":"","lat":51.564481,"lon":-4.274609,"icon":"/testwiki/images/4/43/Orange.png"},{"text":"\u003Cb\u003E\u003Cp\u003E\u003Ca href=\"/wiki/Richards_Rock\" title=\"Richards Rock\"\u003ERichards Rock\u003C/a\u003E\n\u003C/p\u003E\u003C/b\u003E\u003Chr /\u003E\u003Cpre\u003E51.563522, -4.276806\n\u003C/pre\u003E\n","title":"Richards Rock\n","link":"","lat":51.563522,"lon":-4.276806,"icon":"/testwiki/images/4/43/Orange.png"},{"text":"\u003Cb\u003E\u003Cp\u003E\u003Ca href=\"/wiki/Mewslade_Short_Wall\" title=\"Mewslade Short Wall\"\u003EMewslade Short Wall\u003C/a\u003E\n\u003C/p\u003E\u003C/b\u003E\u003Chr /\u003E\u003Cp\u003E51.562032, -4.278316\n\u003C/p\u003E","title":"Mewslade Short Wall\n","link":"","lat":51.562032,"lon":-4.278316,"icon":"/testwiki/images/4/43/Orange.png"},{"text":"\u003Cb\u003E\u003Cp\u003E\u003Ca href=\"/wiki/King_Wall\" title=\"King Wall\"\u003EKing Wall\u003C/a\u003E \n\u003C/p\u003E\u003C/b\u003E\u003Chr /\u003E\u003Cp\u003E51.561742, -4.289088 \n\u003C/p\u003E","title":"King Wall \n","link":"","lat":51.561742,"lon":-4.289088,"icon":"/testwiki/images/4/43/Orange.png"},{"text":"\u003Cb\u003E\u003Cp\u003E\u003Ca href=\"/wiki/Giant%27s_Cave\" title=\"Giant's Cave\"\u003EGiant's Cave\u003C/a\u003E \n\u003C/p\u003E\u003C/b\u003E\u003Chr /\u003E\u003Cp\u003E51.561734, -4.288136 \n\u003C/p\u003E","title":"Giant's Cave \n","link":"","lat":51.561734,"lon":-4.288136,"icon":"/testwiki/images/4/43/Orange.png"},{"text":"\u003Cb\u003E\u003Cp\u003E\u003Ca href=\"/wiki/Devil%27s_Truck_Area\" title=\"Devil's Truck Area\"\u003EDevil's Truck Area\u003C/a\u003E \n\u003C/p\u003E\u003C/b\u003E\u003Chr /\u003E\u003Cp\u003E51.561633, -4.287369 \n\u003C/p\u003E","title":"Devil's Truck Area \n","link":"","lat":51.561633,"lon":-4.287369,"icon":"/testwiki/images/4/43/Orange.png"},{"text":"\u003Cb\u003E\u003Cp\u003E\u003Ca href=\"/wiki/Hairy_Dog_Wall\" title=\"Hairy Dog Wall\"\u003EHairy Dog Wall\u003C/a\u003E \n\u003C/p\u003E\u003C/b\u003E\u003Chr /\u003E\u003Cp\u003E51.561747, -4.287066 \n\u003C/p\u003E","title":"Hairy Dog Wall \n","link":"","lat":51.561747,"lon":-4.287066,"icon":"/testwiki/images/4/43/Orange.png"},{"text":"\u003Cb\u003E\u003Cp\u003E\u003Ca href=\"/wiki/Little_Block\" title=\"Little Block\"\u003ELittle Block\u003C/a\u003E \n\u003C/p\u003E\u003C/b\u003E\u003Chr /\u003E\u003Cp\u003E51.562028, -4.286222 \n\u003C/p\u003E","title":"Little Block \n","link":"","lat":51.562028,"lon":-4.286222,"icon":"/testwiki/images/4/43/Orange.png"},{"text":"\u003Cb\u003E\u003Cp\u003E\u003Ca href=\"/wiki/Yellow_Wall\" title=\"Yellow Wall\"\u003EYellow Wall\u003C/a\u003E \n\u003C/p\u003E\u003C/b\u003E\u003Chr /\u003E\u003Cp\u003E51.562144, -4.286106 \n\u003C/p\u003E","title":"Yellow Wall \n","link":"","lat":51.562144,"lon":-4.286106,"icon":"/testwiki/images/4/43/Orange.png"},{"text":"\u003Cb\u003E\u003Cp\u003E\u003Ca href=\"/wiki/Conglomerate_Cliff\" title=\"Conglomerate Cliff\"\u003EConglomerate Cliff\u003C/a\u003E \n\u003C/p\u003E\u003C/b\u003E\u003Chr /\u003E\u003Cp\u003E51.561858, -4.285425 \n\u003C/p\u003E","title":"Conglomerate Cliff \n","link":"","lat":51.561987,"lon":-4.285913,"icon":"/testwiki/images/4/43/Orange.png"},{"text":"\u003Cb\u003E\u003Cp\u003E\u003Ca href=\"/wiki/Eyeball_Wall\" title=\"Eyeball Wall\"\u003EEyeball Wall\u003C/a\u003E \n\u003C/p\u003E\u003C/b\u003E\u003Chr /\u003E\u003Cp\u003E51.561847, -4.285751 \n\u003C/p\u003E","title":"Eyeball Wall \n","link":"","lat":51.561847,"lon":-4.285751,"icon":"/testwiki/images/4/43/Orange.png"},{"text":"\u003Cb\u003E\u003Cp\u003E\u003Ca href=\"/wiki/Jacky%27s_Tor\" title=\"Jacky's Tor\"\u003EJacky's Tor\u003C/a\u003E \n\u003C/p\u003E\u003C/b\u003E\u003Chr /\u003E\u003Cp\u003E51.561632, -4.285699 \n\u003C/p\u003E","title":"Jacky's Tor \n","link":"","lat":51.56125,"lon":-4.285503,"icon":"/testwiki/images/4/43/Orange.png"},{"text":"\u003Cb\u003E\u003Cp\u003E\u003Ca href=\"/wiki/Cathedral_Wall\" title=\"Cathedral Wall\"\u003ECathedral Wall\u003C/a\u003E \n\u003C/p\u003E\u003C/b\u003E\u003Chr /\u003E\u003Cp\u003E51.561308, -4.284839 \n\u003C/p\u003E","title":"Cathedral Wall \n","link":"","lat":51.561308,"lon":-4.284839,"icon":"/testwiki/images/4/43/Orange.png"},{"text":"\u003Cb\u003E\u003Cp\u003E\u003Ca href=\"/wiki/The_Pulpit\" title=\"The Pulpit\"\u003EThe Pulpit\u003C/a\u003E \n\u003C/p\u003E\u003C/b\u003E\u003Chr /\u003E\u003Cp\u003E51.561432, -4.284452 \n\u003C/p\u003E","title":"The Pulpit \n","link":"","lat":51.561432,"lon":-4.284452,"icon":"/testwiki/images/4/43/Orange.png"},{"text":"\u003Cb\u003E\u003Cp\u003E\u003Ca href=\"/wiki/The_Prows\" title=\"The Prows\"\u003EThe Prows\u003C/a\u003E \n\u003C/p\u003E\u003C/b\u003E\u003Chr /\u003E\u003Cp\u003E51.561468, -4.284275 \n\u003C/p\u003E","title":"The Prows \n","link":"","lat":51.561468,"lon":-4.284275,"icon":"/testwiki/images/4/43/Orange.png"},{"text":"\u003Cb\u003E\u003Cp\u003E\u003Ca href=\"/wiki/The_Aisle\" title=\"The Aisle\"\u003EThe Aisle\u003C/a\u003E \n\u003C/p\u003E\u003C/b\u003E\u003Chr /\u003E\u003Cp\u003E51.561474, -4.284079 \n\u003C/p\u003E","title":"The Aisle \n","link":"","lat":51.561474,"lon":-4.284079,"icon":"/testwiki/images/4/43/Orange.png"},{"text":"\u003Cb\u003E\u003Cp\u003E\u003Ca href=\"/wiki/White_Edge_(Mewslade)\" class=\"mw-redirect\" title=\"White Edge (Mewslade)\"\u003EWhite Edge (Mewslade)\u003C/a\u003E \n\u003C/p\u003E\u003C/b\u003E\u003Chr /\u003E\u003Cp\u003E51.561316, -4.283165 \n\u003C/p\u003E","title":"White Edge (Mewslade) \n","link":"","lat":51.561316,"lon":-4.283165,"icon":"/testwiki/images/4/43/Orange.png"},{"text":"\u003Cb\u003E\u003Cp\u003E\u003Ca href=\"/wiki/Block_Buttress\" title=\"Block Buttress\"\u003EBlock Buttress\u003C/a\u003E \n\u003C/p\u003E\u003C/b\u003E\u003Chr /\u003E\u003Cp\u003E51.561053, -4.282313 \n\u003C/p\u003E","title":"Block Buttress \n","link":"","lat":51.561053,"lon":-4.282313,"icon":"/testwiki/images/4/43/Orange.png"},{"text":"\u003Cb\u003E\u003Cp\u003E\u003Ca href=\"/wiki/Trident_Gully_and_Ridge\" title=\"Trident Gully and Ridge\"\u003ETrident Gully and Ridge\u003C/a\u003E \n\u003C/p\u003E\u003C/b\u003E\u003Chr /\u003E\u003Cp\u003E51.561135, -4.281924 \n\u003C/p\u003E","title":"Trident Gully and Ridge \n","link":"","lat":51.561135,"lon":-4.281924,"icon":"/testwiki/images/4/43/Orange.png"},{"text":"\u003Cb\u003E\u003Cp\u003E\u003Ca href=\"/wiki/Catacomb_Gully\" title=\"Catacomb Gully\"\u003ECatacomb Gully\u003C/a\u003E \n\u003C/p\u003E\u003C/b\u003E\u003Chr /\u003E\u003Cp\u003E51.561289, -4.281652 \n\u003C/p\u003E","title":"Catacomb Gully \n","link":"","lat":51.561289,"lon":-4.281652,"icon":"/testwiki/images/4/43/Orange.png"},{"text":"\u003Cb\u003E\u003Cp\u003E\u003Ca href=\"/wiki/Four_Gullies\" title=\"Four Gullies\"\u003EFour Gullies\u003C/a\u003E \n\u003C/p\u003E\u003C/b\u003E\u003Chr /\u003E\u003Cp\u003E51.560991, -4.281283 \n\u003C/p\u003E","title":"Four Gullies \n","link":"","lat":51.560991,"lon":-4.281283,"icon":"/testwiki/images/4/43/Orange.png"},{"text":"\u003Cb\u003E\u003Cp\u003E\u003Ca href=\"/wiki/Zero_Gully\" title=\"Zero Gully\"\u003EZero Gully\u003C/a\u003E \n\u003C/p\u003E\u003C/b\u003E\u003Chr /\u003E\u003Cp\u003E51.561113, -4.280994 \n\u003C/p\u003E","title":"Zero Gully \n","link":"","lat":51.561113,"lon":-4.280994,"icon":"/testwiki/images/4/43/Orange.png"},{"text":"\u003Cb\u003E\u003Cp\u003E\u003Cb\u003E\u003Ca href=\"/wiki/Oxwich_Point\" title=\"Oxwich Point\"\u003EOxwich Point (East Buttress) \u003C/a\u003E\u003C/b\u003E\n\u003C/p\u003E\u003C/b\u003E\u003Chr /\u003E\u003Cp\u003E51.543053, -4.156058\n\u003C/p\u003E","title":"Oxwich Point (East Buttress) \n","link":"","lat":51.543053,"lon":-4.156058,"icon":"/testwiki/images/4/43/Orange.png"},{"text":"\u003Cb\u003E\u003Cp\u003E\u003Cb\u003E\u003Ca href=\"/wiki/Oxwich_Point\" title=\"Oxwich Point\"\u003EOxwich Point (West Buttress) \u003C/a\u003E\u003C/b\u003E\n\u003C/p\u003E\u003C/b\u003E\u003Chr /\u003E\u003Cp\u003E51.544051, -4.157923\n\u003C/p\u003E","title":"Oxwich Point (West Buttress) \n","link":"","lat":51.544051,"lon":-4.157923,"icon":"/testwiki/images/4/43/Orange.png"},{"text":"\u003Cb\u003E\u003Cp\u003E\u003Cb\u003E\u003Ca href=\"/wiki/Oxwich_Quarry\" title=\"Oxwich Quarry\"\u003EOxwich Quarry\u003C/a\u003E\u003C/b\u003E\n\u003C/p\u003E\u003C/b\u003E\u003Chr /\u003E\u003Cp\u003E51.549351, -4.149905\n\u003C/p\u003E","title":"Oxwich Quarry\n","link":"","lat":51.549351,"lon":-4.149905,"icon":"/testwiki/images/1/16/Blue.png"},{"text":"\u003Cb\u003E\u003Cp\u003E\u003Cb\u003E\u003Ca href=\"/wiki/Oxwich_Point#Holy.27s_Wash_Buttress\" title=\"Oxwich Point\"\u003EOxwich Point (Holy's Wash Buttress)\u003C/a\u003E\u003C/b\u003E\n\u003C/p\u003E\u003C/b\u003E\u003Chr /\u003E\u003Cp\u003E51.546538, -4.168107\n\u003C/p\u003E","title":"Oxwich Point (Holy's Wash Buttress)\n","link":"","lat":51.546538,"lon":-4.168107,"icon":"/testwiki/images/4/43/Orange.png"},{"text":"\u003Cb\u003E\u003Cp\u003E\u003Ca href=\"/wiki/Shire_Combe_Buttress\" title=\"Shire Combe Buttress\"\u003EShire Combe Buttress\u003C/a\u003E\n\u003C/p\u003E\u003C/b\u003E\u003Chr /\u003E\u003Cp\u003E51.565621, -4.102869\n\u003C/p\u003E","title":"Shire Combe Buttress\n","link":"","lat":51.565621,"lon":-4.102869,"icon":"/testwiki/images/4/43/Orange.png"},{"text":"\u003Cb\u003E\u003Cp\u003E\u003Ca href=\"/wiki/Anemone_Wall\" title=\"Anemone Wall\"\u003EAnemone Wall\u003C/a\u003E\n\u003C/p\u003E\u003C/b\u003E\u003Chr /\u003E\u003Cp\u003E51.565471, -4.101229\n\u003C/p\u003E","title":"Anemone Wall\n","link":"","lat":51.565471,"lon":-4.101229,"icon":"/testwiki/images/4/43/Orange.png"},{"text":"\u003Cb\u003E\u003Cp\u003E\u003Ca href=\"/wiki/White_Cove\" title=\"White Cove\"\u003EWhite Cove\u003C/a\u003E\n\u003C/p\u003E\u003C/b\u003E\u003Chr /\u003E\u003Cp\u003E51.565481, -4.100271\n\u003C/p\u003E","title":"White Cove\n","link":"","lat":51.565481,"lon":-4.100271,"icon":"/testwiki/images/4/43/Orange.png"},{"text":"\u003Cb\u003E\u003Cp\u003E\u003Ca href=\"/wiki/Utopia_Slabs\" title=\"Utopia Slabs\"\u003EUtopia Slabs\u003C/a\u003E\n\u003C/p\u003E\u003C/b\u003E\u003Chr /\u003E\u003Cp\u003E51.565793, -4.099682\n\u003C/p\u003E","title":"Utopia Slabs\n","link":"","lat":51.565793,"lon":-4.099682,"icon":"/testwiki/images/1/16/Blue.png"},{"text":"\u003Cb\u003E\u003Cp\u003E\u003Ca href=\"/wiki/Ravens_Cliff_Gully\" title=\"Ravens Cliff Gully\"\u003ERavenscliff Gully\u003C/a\u003E\n\u003C/p\u003E\u003C/b\u003E\u003Chr /\u003E\u003Cp\u003E51.565561, -4.098614\n\u003C/p\u003E","title":"Ravenscliff Gully\n","link":"","lat":51.565561,"lon":-4.098614,"icon":"/testwiki/images/4/43/Orange.png"},{"text":"\u003Cb\u003E\u003Cp\u003E\u003Ca href=\"/wiki/White_Edge\" title=\"White Edge\"\u003EWhite Edge\u003C/a\u003E\n\u003C/p\u003E\u003C/b\u003E\u003Chr /\u003E\u003Cp\u003E51.565675, -4.097373\n\u003C/p\u003E","title":"White Edge\n","link":"","lat":51.565675,"lon":-4.097373,"icon":"/testwiki/images/4/43/Orange.png"},{"text":"\u003Cb\u003E\u003Cp\u003E\u003Ca href=\"/wiki/Watch_House_Slabs\" class=\"mw-redirect\" title=\"Watch House Slabs\"\u003EWatch House Slabs\u003C/a\u003E\n\u003C/p\u003E\u003C/b\u003E\u003Chr /\u003E\u003Cp\u003E51.565784, -4.096438\n\u003C/p\u003E","title":"Watch House Slabs\n","link":"","lat":51.565784,"lon":-4.096438,"icon":"/testwiki/images/1/16/Blue.png"},{"text":"\u003Cb\u003E\u003Cp\u003E\u003Ca href=\"/wiki/Watch_House_East\" title=\"Watch House East\"\u003EWatch House East\u003C/a\u003E\n\u003C/p\u003E\u003C/b\u003E\u003Chr /\u003E\u003Cp\u003E51.565539, -4.094245\n\u003C/p\u003E","title":"Watch House East\n","link":"","lat":51.565539,"lon":-4.094245,"icon":"/testwiki/images/1/16/Blue.png"},{"text":"\u003Cb\u003E\u003Cp\u003E\u003Ca href=\"/wiki/Foxhole_Cove\" title=\"Foxhole Cove\"\u003EFoxhole Cove\u003C/a\u003E\n\u003C/p\u003E\u003C/b\u003E\u003Chr /\u003E\u003Cp\u003E51.564963, -4.092269\n\u003C/p\u003E","title":"Foxhole Cove\n","link":"","lat":51.564963,"lon":-4.092269,"icon":"/testwiki/images/1/16/Blue.png"},{"text":"\u003Cb\u003E\u003Cp\u003E\u003Cb\u003E\u003Ca href=\"/wiki/Marble_Arch\" title=\"Marble Arch\"\u003EMarble Arch\u003C/a\u003E\u003C/b\u003E\n\u003C/p\u003E\u003C/b\u003E\u003Chr /\u003E\u003Cp\u003E51.562060, -4.084331\n\u003C/p\u003E","title":"Marble Arch\n","link":"","lat":51.56206,"lon":-4.084331,"icon":"/testwiki/images/4/43/Orange.png"},{"text":"\u003Cb\u003E\u003Cp\u003E\u003Cb\u003E\u003Ca href=\"/wiki/Minchen_Hole\" title=\"Minchen Hole\"\u003EMinchen Hole\u003C/a\u003E\u003C/b\u003E\n\u003C/p\u003E\u003C/b\u003E\u003Chr /\u003E\u003Cp\u003E51.562100, -4.085623\n\u003C/p\u003E","title":"Minchen Hole\n","link":"","lat":51.5621,"lon":-4.085623,"icon":"/testwiki/images/1/16/Blue.png"},{"text":"\u003Cb\u003E\u003Cp\u003E\u003Cb\u003E\u003Ca href=\"/wiki/Bowen%27s_Parlour\" title=\"Bowen's Parlour\"\u003EBowen's Parlour\u003C/a\u003E\u003C/b\u003E\n\u003C/p\u003E\u003C/b\u003E\u003Chr /\u003E\u003Cp\u003E51.561823, -4.082703\n\u003C/p\u003E","title":"Bowen's Parlour\n","link":"","lat":51.561823,"lon":-4.082703,"icon":"/testwiki/images/1/16/Blue.png"},{"text":"\u003Cb\u003E\u003Cp\u003E\u003Cb\u003E\u003Ca href=\"/wiki/Pantheon\" title=\"Pantheon\"\u003EPantheon\u003C/a\u003E\u003C/b\u003E\n\u003C/p\u003E\u003C/b\u003E\u003Chr /\u003E\u003Cp\u003E51.561964, -4.082273\n\u003C/p\u003E","title":"Pantheon\n","link":"","lat":51.561964,"lon":-4.082273,"icon":"/testwiki/images/1/16/Blue.png"},{"text":"\u003Cb\u003E\u003Cp\u003E\u003Cb\u003E\u003Ca href=\"/wiki/Prawn_Zawn\" title=\"Prawn Zawn\"\u003EPrawn Zawn\u003C/a\u003E\u003C/b\u003E\n\u003C/p\u003E\u003C/b\u003E\u003Chr /\u003E\u003Cp\u003E51.561819, -4.083517\n\u003C/p\u003E","title":"Prawn Zawn\n","link":"","lat":51.561819,"lon":-4.083517,"icon":"/testwiki/images/1/16/Blue.png"},{"text":"\u003Cb\u003E\u003Cp\u003E\u003Cb\u003E\u003Ca href=\"/wiki/Golden_Wall\" title=\"Golden Wall\"\u003EGolden Wall\u003C/a\u003E\u003C/b\u003E\n\u003C/p\u003E\u003C/b\u003E\u003Chr /\u003E\u003Cp\u003E51.562057, -4.080948\n\u003C/p\u003E","title":"Golden Wall\n","link":"","lat":51.562057,"lon":-4.080948,"icon":"/testwiki/images/1/16/Blue.png"},{"text":"\u003Cb\u003E\u003Cp\u003E\u003Cb\u003E\u003Ca href=\"/wiki/Bucketland\" title=\"Bucketland\"\u003EBucketland\u003C/a\u003E\u003C/b\u003E\n\u003C/p\u003E\u003C/b\u003E\u003Chr /\u003E\u003Cp\u003E51.562057, -4.080948\n\u003C/p\u003E","title":"Bucketland\n","link":"","lat":51.562304,"lon":-4.079205,"icon":"/testwiki/images/4/43/Orange.png"},{"text":"\u003Cb\u003E\u003Cp\u003E\u003Cb\u003E\u003Ca href=\"/wiki/Bosco%27s_Den\" class=\"mw-redirect\" title=\"Bosco's Den\"\u003EBosco's Den Area\u003C/a\u003E\u003C/b\u003E\n\u003C/p\u003E\u003C/b\u003E\u003Chr /\u003E\u003Cp\u003E51.562060, -4.080095\n\u003C/p\u003E","title":"Bosco's Den Area\n","link":"","lat":51.56206,"lon":-4.080095,"icon":"/testwiki/images/7/7f/Area.png"},{"text":"\u003Cb\u003E\u003Cp\u003E\u003Cb\u003E\u003Ca href=\"/wiki/Bacon_Hole\" title=\"Bacon Hole\"\u003EBacon Hole\u003C/a\u003E\u003C/b\u003E\n\u003C/p\u003E\u003C/b\u003E\u003Chr /\u003E\u003Cp\u003E51.561947, -4.078282\u003Cbr /\u003E\u003Cbr /\u003E\u003Cb\u003EN.B.\u003C/b\u003E Climbing here is \u003Cb\u003EBANNED\u003C/b\u003E. See \u003Ca href=\"/wiki/Bacon_Hole\" title=\"Bacon Hole\"\u003Ewiki page\u003C/a\u003E\n\u003C/p\u003E","title":"Bacon Hole\n","link":"","lat":51.561947,"lon":-4.078282,"icon":"/testwiki/images/1/16/Blue.png"},{"text":"\u003Cb\u003E\u003Cp\u003E\u003Cb\u003E\u003Ca href=\"/wiki/Quartz_Corner\" title=\"Quartz Corner\"\u003EQuartz Corner\u003C/a\u003E\u003C/b\u003E\n\u003C/p\u003E\u003C/b\u003E\u003Chr /\u003E\u003Cp\u003E51.561697, -4.077738\n\u003C/p\u003E","title":"Quartz Corner\n","link":"","lat":51.561697,"lon":-4.077738,"icon":"/testwiki/images/4/43/Orange.png"},{"text":"\u003Cb\u003E\u003Cp\u003E\u003Cb\u003E\u003Ca href=\"/wiki/Pennard_Buttress\" title=\"Pennard Buttress\"\u003EPennard Buttress\u003C/a\u003E\u003C/b\u003E\n\u003C/p\u003E\u003C/b\u003E\u003Chr /\u003E\u003Cp\u003E51.559764, -4.068604\n\u003C/p\u003E","title":"Pennard Buttress\n","link":"","lat":51.559764,"lon":-4.068604,"icon":"/testwiki/images/4/43/Orange.png"},{"text":"\u003Cb\u003E\u003Cp\u003E\u003Cb\u003E\u003Ca href=\"/wiki/High_Pennard\" title=\"High Pennard\"\u003EHigh Pennard\u003C/a\u003E\u003C/b\u003E\n\u003C/p\u003E\u003C/b\u003E\u003Chr /\u003E\u003Cp\u003E51.558755, -4.066858\n\u003C/p\u003E","title":"High Pennard\n","link":"","lat":51.558755,"lon":-4.066858,"icon":"/testwiki/images/4/43/Orange.png"},{"text":"\u003Cb\u003E\u003Cp\u003E\u003Cb\u003E\u003Ca href=\"/wiki/Gravesend_Wall\" class=\"mw-redirect\" title=\"Gravesend Wall\"\u003EGravesend Wall\u003C/a\u003E\u003C/b\u003E\n\u003C/p\u003E\u003C/b\u003E\u003Chr /\u003E\u003Cp\u003E51.558370, -4.065578\n\u003C/p\u003E","title":"Gravesend Wall\n","link":"","lat":51.55837,"lon":-4.065578,"icon":"/testwiki/images/4/43/Orange.png"},{"text":"\u003Cb\u003E\u003Cp\u003E\u003Cb\u003E\u003Ca href=\"/wiki/The_Great_Tower\" title=\"The Great Tower\"\u003EThe Great Tower\u003C/a\u003E\u003C/b\u003E\n\u003C/p\u003E\u003C/b\u003E\u003Chr /\u003E\u003Cp\u003E51.558276, -4.066419\n\u003C/p\u003E","title":"The Great Tower\n","link":"","lat":51.558276,"lon":-4.066419,"icon":"/testwiki/images/4/43/Orange.png"},{"text":"\u003Cb\u003E\u003Cp\u003E\u003Cb\u003E\u003Ca href=\"/wiki/Pwll_Du_Bay\" title=\"Pwll Du Bay\"\u003EPwll Du Bay\u003C/a\u003E\u003C/b\u003E\n\u003C/p\u003E\u003C/b\u003E\u003Chr /\u003E\u003Cp\u003E51.562591,-4.059829\n\u003C/p\u003E","title":"Pwll Du Bay\n","link":"","lat":51.562591,"lon":-4.059829,"icon":"/testwiki/images/1/16/Blue.png"},{"text":"\u003Cb\u003E\u003Cp\u003E\u003Ca href=\"/wiki/Thurba_West\" title=\"Thurba West\"\u003EThurba West\u003C/a\u003E\n\u003C/p\u003E\u003C/b\u003E\u003Chr /\u003E\u003Cp\u003E51.560998, -4.278393\n\u003C/p\u003E","title":"Thurba West\n","link":"","lat":51.560998,"lon":-4.278393,"icon":"/testwiki/images/4/43/Orange.png"},{"text":"\u003Cb\u003E\u003Cp\u003E\u003Cb\u003E\u003Ca href=\"/wiki/Thurba_Head\" title=\"Thurba Head\"\u003EThurba Head\u003C/a\u003E\u003C/b\u003E\n\u003C/p\u003E\u003C/b\u003E\u003Chr /\u003E\u003Cp\u003E51.558822, -4.279271\n\u003C/p\u003E","title":"Thurba Head\n","link":"","lat":51.558822,"lon":-4.279271,"icon":"/testwiki/images/4/43/Orange.png"},{"text":"\u003Cb\u003E\u003Cp\u003E\u003Ca href=\"/wiki/Thurba_East\" title=\"Thurba East\"\u003EThurba East\u003C/a\u003E\n\u003C/p\u003E\u003C/b\u003E\u003Chr /\u003E\u003Cp\u003E51.558083, -4.274400\n\u003C/p\u003E","title":"Thurba East\n","link":"","lat":51.558083,"lon":-4.2744,"icon":"/testwiki/images/4/43/Orange.png"},{"text":"\u003Cb\u003E\u003Cp\u003E\u003Cb\u003E\u003Ca href=\"/wiki/Thurba_East_Gully\" title=\"Thurba East Gully\"\u003EThurba East Gully\u003C/a\u003E\u003C/b\u003E\n\u003C/p\u003E\u003C/b\u003E\u003Chr /\u003E\u003Cp\u003E51.557709, -4.272306\n\u003C/p\u003E","title":"Thurba East Gully\n","link":"","lat":51.557709,"lon":-4.272306,"icon":"/testwiki/images/4/43/Orange.png"},{"text":"\u003Cb\u003E\u003Cp\u003E\u003Cb\u003E\u003Ca href=\"/wiki/Red_Chamber\" title=\"Red Chamber\"\u003ERed Chamber\u003C/a\u003E\u003C/b\u003E\n\u003C/p\u003E\u003C/b\u003E\u003Chr /\u003E\u003Cp\u003E51.557349, -4.271506\n\u003C/p\u003E","title":"Red Chamber\n","link":"","lat":51.557349,"lon":-4.271506,"icon":"/testwiki/images/4/43/Orange.png"},{"text":"\u003Cb\u003E\u003Cp\u003E\u003Ca href=\"/wiki/First_Sister\" title=\"First Sister\"\u003EFirst Sister\u003C/a\u003E\n\u003C/p\u003E\u003C/b\u003E\u003Chr /\u003E\u003Cp\u003E51.555300, -4.265838\n\u003C/p\u003E","title":"First Sister\n","link":"","lat":51.5553,"lon":-4.265838,"icon":"/testwiki/images/1/16/Blue.png"},{"text":"\u003Cb\u003E\u003Cp\u003E\u003Ca href=\"/wiki/Second_Sister\" title=\"Second Sister\"\u003ESecond Sister\u003C/a\u003E\n\u003C/p\u003E\u003C/b\u003E\u003Chr /\u003E\u003Cp\u003E51.555061, -4.265686\n\u003C/p\u003E","title":"Second Sister\n","link":"","lat":51.555061,"lon":-4.265686,"icon":"/testwiki/images/4/43/Orange.png"},{"text":"\u003Cb\u003E\u003Cp\u003E\u003Ca href=\"/wiki/Sister_2_and_Half\" title=\"Sister 2 and Half\"\u003ESister 2 and Half (Higher)\u003C/a\u003E\n\u003C/p\u003E\u003C/b\u003E\u003Chr /\u003E\u003Cp\u003E51.554842, -4.264604\n\u003C/p\u003E","title":"Sister 2 and Half (Higher)\n","link":"","lat":51.554842,"lon":-4.264604,"icon":"/testwiki/images/1/16/Blue.png"},{"text":"\u003Cb\u003E\u003Cp\u003E\u003Ca href=\"/wiki/Sister_2_and_Half\" title=\"Sister 2 and Half\"\u003ESister 2 and Half (Lower)\u003C/a\u003E\n\u003C/p\u003E\u003C/b\u003E\u003Chr /\u003E\u003Cp\u003E51.554436, -4.264437\n\u003C/p\u003E","title":"Sister 2 and Half (Lower)\n","link":"","lat":51.554436,"lon":-4.264437,"icon":"/testwiki/images/1/16/Blue.png"},{"text":"\u003Cb\u003E\u003Cp\u003E\u003Ca href=\"/wiki/Third_Sister#3rd_Sister_Main\" title=\"Third Sister\"\u003EThird Sister (Main)\u003C/a\u003E\n\u003C/p\u003E\u003C/b\u003E\u003Chr /\u003E\u003Cp\u003E51.554057, -4.263057\n\u003C/p\u003E","title":"Third Sister (Main)\n","link":"","lat":51.554057,"lon":-4.263057,"icon":"/testwiki/images/1/16/Blue.png"},{"text":"\u003Cb\u003E\u003Cp\u003E\u003Ca href=\"/wiki/Third_Sister#3rd_Sister_Lower\" title=\"Third Sister\"\u003EThird Sister (Lower)\u003C/a\u003E\n\u003C/p\u003E\u003C/b\u003E\u003Chr /\u003E\u003Cp\u003E51.55401, -4.264048\n\u003C/p\u003E","title":"Third Sister (Lower)\n","link":"","lat":51.55401,"lon":-4.264048,"icon":"/testwiki/images/1/16/Blue.png"},{"text":"\u003Cb\u003E\u003Cp\u003E\u003Ca href=\"/wiki/Third_Sister#Third_Sister_Bottom\" title=\"Third Sister\"\u003EThird Sister (Bottom)\u003C/a\u003E\n\u003C/p\u003E\u003C/b\u003E\u003Chr /\u003E\u003Cp\u003E51.55411, -4.25440\n\u003C/p\u003E","title":"Third Sister (Bottom)\n","link":"","lat":51.55411,"lon":-4.2544,"icon":"/testwiki/images/1/16/Blue.png"},{"text":"\u003Cb\u003E\u003Cp\u003E\u003Cb\u003E\u003Ca href=\"/wiki/Deborah%27s_Zawn\" title=\"Deborah's Zawn\"\u003EDeborah's Zawn\u003C/a\u003E\u003C/b\u003E\n\u003C/p\u003E\u003C/b\u003E\u003Chr /\u003E\u003Cp\u003E51.553834, -4.263359\n\u003C/p\u003E","title":"Deborah's Zawn\n","link":"","lat":51.553834,"lon":-4.263359,"icon":"/testwiki/images/1/16/Blue.png"},{"text":"\u003Cb\u003E\u003Cp\u003E\u003Cb\u003E\u003Ca href=\"/wiki/Deborah%27s_Overhang\" title=\"Deborah's Overhang\"\u003EDeborah's Overhang\u003C/a\u003E\u003C/b\u003E\n\u003C/p\u003E\u003C/b\u003E\u003Chr /\u003E\u003Cp\u003E51.553830, -4.261632\n\u003C/p\u003E","title":"Deborah's Overhang\n","link":"","lat":51.55383,"lon":-4.261632,"icon":"/testwiki/images/1/16/Blue.png"},{"text":"\u003Cb\u003E\u003Cp\u003E\u003Cb\u003E\u003Ca href=\"/wiki/Tooth_Fairy\" title=\"Tooth Fairy\"\u003ETooth Fairy\u003C/a\u003E\u003C/b\u003E\n\u003C/p\u003E\u003C/b\u003E\u003Chr /\u003E\u003Cp\u003E51.553687, -4.262429\n\u003C/p\u003E","title":"Tooth Fairy\n","link":"","lat":51.553687,"lon":-4.262429,"icon":"/testwiki/images/1/16/Blue.png"},{"text":"\u003Cb\u003E\u003Cp\u003E\u003Cb\u003E\u003Ca href=\"/wiki/TV_Zawn\" title=\"TV Zawn\"\u003ETV Zawn\u003C/a\u003E\u003C/b\u003E\n\u003C/p\u003E\u003C/b\u003E\u003Chr /\u003E\u003Cp\u003E51.553588, -4.262108\n\u003C/p\u003E","title":"TV Zawn\n","link":"","lat":51.553588,"lon":-4.262108,"icon":"/testwiki/images/1/16/Blue.png"},{"text":"\u003Cb\u003E\u003Cp\u003E\u003Cb\u003E\u003Ca href=\"/wiki/The_Knave\" title=\"The Knave\"\u003EThe Knave\u003C/a\u003E\u003C/b\u003E\n\u003C/p\u003E\u003C/b\u003E\u003Chr /\u003E\u003Cp\u003E51.553830, -4.261632\n\u003C/p\u003E","title":"The Knave\n","link":"","lat":51.552958,"lon":-4.262781,"icon":"/testwiki/images/4/43/Orange.png"},{"text":"\u003Cb\u003E\u003Cp\u003E\u003Cb\u003E\u003Ca href=\"/wiki/Seaspit_Small_Cove\" title=\"Seaspit Small Cove\"\u003ESeaspit Small Cove\u003C/a\u003E\u003C/b\u003E\n\u003C/p\u003E\u003C/b\u003E\u003Chr /\u003E\u003Cp\u003E51.553422, -4.259691\n\u003C/p\u003E","title":"Seaspit Small Cove\n","link":"","lat":51.553422,"lon":-4.259691,"icon":"/testwiki/images/4/43/Orange.png"},{"text":"\u003Cb\u003E\u003Cp\u003E\u003Cb\u003E\u003Ca href=\"/wiki/Rams_Grove_Crag\" title=\"Rams Grove Crag\"\u003ERams Grove Crag\u003C/a\u003E\u003C/b\u003E\n\u003C/p\u003E\u003C/b\u003E\u003Chr /\u003E\u003Cp\u003E51.556590, -4.267076\n\u003C/p\u003E","title":"Rams Grove Crag\n","link":"","lat":51.55659,"lon":-4.267076,"icon":"/testwiki/images/4/43/Orange.png"},{"text":"\u003Cb\u003E\u003Cp\u003E\u003Cb\u003E\u003Ca href=\"/wiki/Rams_Grove_Seaward_Crag\" title=\"Rams Grove Seaward Crag\"\u003ERams Grove Seaward Crag\u003C/a\u003E\u003C/b\u003E\n\u003C/p\u003E\u003C/b\u003E\u003Chr /\u003E\u003Cp\u003E51.556076, -4.267799\n\u003C/p\u003E","title":"Rams Grove Seaward Crag\n","link":"","lat":51.556076,"lon":-4.267799,"icon":"/testwiki/images/1/16/Blue.png"},{"text":"\u003Cb\u003E\u003Cp\u003E\u003Cb\u003E\u003Ca href=\"/wiki/Saddam%27s_Wall\" title=\"Saddam's Wall\"\u003ESaddam's Wall\u003C/a\u003E\u003C/b\u003E\n\u003C/p\u003E\u003C/b\u003E\u003Chr /\u003E\u003Cp\u003E51.557763, -4.264955\n\u003C/p\u003E","title":"Saddam's Wall\n","link":"","lat":51.557763,"lon":-4.264955,"icon":"/testwiki/images/1/16/Blue.png"},{"text":"\u003Cb\u003E\u003Cp\u003E\u003Cb\u003E\u003Ca href=\"/wiki/The_Hole\" title=\"The Hole\"\u003EThe Hole\u003C/a\u003E\u003C/b\u003E\n\u003C/p\u003E\u003C/b\u003E\u003Chr /\u003E\u003Cp\u003E51.551322, -4.259650 \n\u003C/p\u003E","title":"The Hole\n","link":"","lat":51.551322,"lon":-4.25965,"icon":"/testwiki/images/4/43/Orange.png"},{"text":"\u003Cb\u003E\u003Cp\u003E\u003Cb\u003E\u003Ca href=\"/wiki/Stallion_Cove\" title=\"Stallion Cove\"\u003EStallion Cove\u003C/a\u003E\u003C/b\u003E aka \u003Ca href=\"/wiki/Stallion_Cove_(Paviland_Wild_West)\" class=\"mw-redirect\" title=\"Stallion Cove (Paviland Wild West)\"\u003EPaviland Wild West\u003C/a\u003E\n\u003C/p\u003E\u003C/b\u003E\u003Chr /\u003E\u003Cp\u003E51.551088, -4.258683\u003Cbr /\u003E\u003Cbr /\u003EAlso known as \u003Ca href=\"/wiki/Paviland_Wild_West\" class=\"mw-redirect\" title=\"Paviland Wild West\"\u003EPaviland Wild West\u003C/a\u003E\n\u003C/p\u003E","title":"Stallion Cove aka Paviland Wild West\n","link":"","lat":51.551088,"lon":-4.258683,"icon":"/testwiki/images/4/43/Orange.png"},{"text":"\u003Cb\u003E\u003Cp\u003E\u003Cb\u003E\u003Ca href=\"/wiki/Paviland_Far_Far_Far_West\" title=\"Paviland Far Far Far West\"\u003EPaviland Far Far Far West\u003C/a\u003E\u003C/b\u003E\n\u003C/p\u003E\u003C/b\u003E\u003Chr /\u003E\u003Cp\u003E51.550981, -4.258198\n\u003C/p\u003E","title":"Paviland Far Far Far West\n","link":"","lat":51.550257,"lon":-4.25786,"icon":"/testwiki/images/4/43/Orange.png"},{"text":"\u003Cb\u003E\u003Cp\u003E\u003Cb\u003E\u003Ca href=\"/wiki/Paviland_Way_Out_West_(Quarter_Dome_Slabs)\" class=\"mw-redirect\" title=\"Paviland Way Out West (Quarter Dome Slabs)\"\u003EPaviland Way Out West (Quarter Dome Slabs)\u003C/a\u003E\u003C/b\u003E\n\u003C/p\u003E\u003C/b\u003E\u003Chr /\u003E\u003Cp\u003E51.550892, -4.258066\n\u003C/p\u003E","title":"Paviland Way Out West (Quarter Dome Slabs)\n","link":"","lat":51.550892,"lon":-4.258066,"icon":"/testwiki/images/4/43/Orange.png"},{"text":"\u003Cb\u003E\u003Cp\u003E\u003Cb\u003E\u003Ca href=\"/wiki/Paviland_Far_Far_West\" title=\"Paviland Far Far West\"\u003EPaviland Far Far West\u003C/a\u003E\u003C/b\u003E\n\u003C/p\u003E\u003C/b\u003E\u003Chr /\u003E\u003Cp\u003E51.5508372, -4.2568414\u003Cbr /\u003E\naka \u003Cb\u003E\u003Ca href=\"/wiki/Freeluncher%27s_Warm-Up_Zawn\" class=\"mw-redirect\" title=\"Freeluncher's Warm-Up Zawn\"\u003EFreeluncher's Warm-Up Zawn\u003C/a\u003E\u003C/b\u003E\n\u003C/p\u003E","title":"Paviland Far Far West\n","link":"","lat":51.5508372,"lon":-4.2568414,"icon":"/testwiki/images/1/16/Blue.png"},{"text":"\u003Cb\u003E\u003Cp\u003E\u003Cb\u003E\u003Ca href=\"/wiki/Above_Freelunchers_Zawn\" title=\"Above Freelunchers Zawn\"\u003EAbove Freelunchers Zawn\u003C/a\u003E\u003C/b\u003E\n\u003C/p\u003E\u003C/b\u003E\u003Chr /\u003E\u003Cp\u003E51.550651, -4.257335 \n\u003C/p\u003E","title":"Above Freelunchers Zawn\n","link":"","lat":51.550651,"lon":-4.257335,"icon":"/testwiki/images/1/16/Blue.png"},{"text":"\u003Cb\u003E\u003Cp\u003E\u003Cb\u003E\u003Ca href=\"/wiki/Paviland_Far_West\" title=\"Paviland Far West\"\u003EPaviland Far West\u003C/a\u003E aka \u003Ca href=\"/wiki/Zulu_Zawn\" class=\"mw-redirect\" title=\"Zulu Zawn\"\u003EZulu Zawn\u003C/a\u003E\u003C/b\u003E\n\u003C/p\u003E\u003C/b\u003E\u003Chr /\u003E\u003Cp\u003E51.550372, -4.2566854\n\u003C/p\u003E","title":"Paviland Far West aka Zulu Zawn\n","link":"","lat":51.550372,"lon":-4.2566854,"icon":"/testwiki/images/4/43/Orange.png"},{"text":"\u003Cb\u003E\u003Cp\u003E\u003Cb\u003E\u003Ca href=\"/wiki/Paviland\" class=\"mw-redirect\" title=\"Paviland\"\u003EPaviland\u003C/a\u003E\u003C/b\u003E\n\u003C/p\u003E\u003C/b\u003E\u003Chr /\u003E\u003Cp\u003E51.5503450, -4.255659\n\u003C/p\u003E","title":"Paviland\n","link":"","lat":51.550345,"lon":-4.255659,"icon":"/testwiki/images/4/43/Orange.png"},{"text":"\u003Cb\u003E\u003Cp\u003EAbseil Point\n\u003C/p\u003E\u003C/b\u003E\u003Chr /\u003E\u003Cp\u003E51.550388, -4.255550\u003Cbr /\u003E\u003Cbr /\u003E\nRing bolt at the top of the crag\u003Cbr /\u003E\nIf you use it, \u003Cb\u003Eback it up!\u003C/b\u003E\u003Cbr /\u003E\u003Cbr /\u003E\n\u003C/p\u003E\n\u003Cdiv class=\"thumb tleft\"\u003E\u003Cdiv class=\"thumbinner\" style=\"width:102px;\"\u003E\u003Ca href=\"/wiki/File:Paviland_abseil_ring-bolt.jpg\" class=\"image\"\u003E\u003Cimg alt=\"\" src=\"/testwiki/images/thumb/5/5c/Paviland_abseil_ring-bolt.jpg/100px-Paviland_abseil_ring-bolt.jpg\" width=\"100\" height=\"75\" class=\"thumbimage\" srcset=\"/testwiki/images/thumb/5/5c/Paviland_abseil_ring-bolt.jpg/150px-Paviland_abseil_ring-bolt.jpg 1.5x, /testwiki/images/thumb/5/5c/Paviland_abseil_ring-bolt.jpg/200px-Paviland_abseil_ring-bolt.jpg 2x\" data-file-width=\"1024\" data-file-height=\"768\" /\u003E\u003C/a\u003E \u003Cdiv class=\"thumbcaption\"\u003E\u003Cdiv class=\"magnify\"\u003E\u003Ca href=\"/wiki/File:Paviland_abseil_ring-bolt.jpg\" class=\"internal\" title=\"Enlarge\"\u003E\u003C/a\u003E\u003C/div\u003EAbseil Ring on \u003Cb\u003E\u003Ca href=\"/wiki/Paviland_Main_Cliff\" title=\"Paviland Main Cliff\"\u003EPaviland\u003Cbr /\u003EMain Cliff\u003C/a\u003E\u003C/b\u003E\u003C/div\u003E\u003C/div\u003E\u003C/div\u003E\n","title":"Abseil Point\n","link":"","lat":51.550388,"lon":-4.25555,"icon":"/testwiki/images/a/a1/Abseil_point.png"},{"text":"\u003Cb\u003E\u003Cp\u003E\u003Cb\u003E\u003Ca href=\"/wiki/Liberty_Zawn\" title=\"Liberty Zawn\"\u003ELiberty Zawn\u003C/a\u003E\u003C/b\u003E\n\u003C/p\u003E\u003C/b\u003E\u003Chr /\u003E\u003Cp\u003E\u003Cb\u003E51.549813, -4.255530\u003C/b\u003E\n\u003C/p\u003E","title":"Liberty Zawn\n","link":"","lat":51.549813,"lon":-4.25553,"icon":"/testwiki/images/4/43/Orange.png"},{"text":"\u003Cb\u003E\u003Cp\u003E\u003Cb\u003E\u003Ca href=\"/wiki/Juniper_Wall\" title=\"Juniper Wall\"\u003EJuniper Wall\u003C/a\u003E\u003C/b\u003E\n\u003C/p\u003E\u003C/b\u003E\u003Chr /\u003E\u003Cp\u003E51.549429, -4.253615\n\u003C/p\u003E","title":"Juniper Wall\n","link":"","lat":51.549429,"lon":-4.253615,"icon":"/testwiki/images/4/43/Orange.png"},{"text":"\u003Cb\u003E\u003Cp\u003E\u003Cb\u003E\u003Ca href=\"/wiki/Eos_Zawn\" title=\"Eos Zawn\"\u003EEos Zawn\u003C/a\u003E\u003C/b\u003E\n\u003C/p\u003E\u003C/b\u003E\u003Chr /\u003E\u003Cp\u003E51.549400, -4.252918\n\u003C/p\u003E","title":"Eos Zawn\n","link":"","lat":51.5494,"lon":-4.252918,"icon":"/testwiki/images/4/43/Orange.png"},{"text":"\u003Cb\u003E\u003Cp\u003E\u003Cb\u003E\u003Ca href=\"/wiki/Hollow_Top\" title=\"Hollow Top\"\u003EHollow Top\u003C/a\u003E\u003C/b\u003E\n\u003C/p\u003E\u003C/b\u003E\u003Chr /\u003E\u003Cp\u003E51.549568, -4.252035\n\u003C/p\u003E","title":"Hollow Top\n","link":"","lat":51.549568,"lon":-4.252035,"icon":"/testwiki/images/4/43/Orange.png"},{"text":"\u003Cb\u003E\u003Cp\u003E\u003Cb\u003E\u003Ca href=\"/wiki/Stalking_Horse_Zawn\" title=\"Stalking Horse Zawn\"\u003EStalking Horse Zawn\u003C/a\u003E\u003C/b\u003E\n\u003C/p\u003E\u003C/b\u003E\u003Chr /\u003E\u003Cp\u003E51.548705, -4.251479 \n\u003C/p\u003E","title":"Stalking Horse Zawn\n","link":"","lat":51.548705,"lon":-4.251479,"icon":"/testwiki/images/1/16/Blue.png"},{"text":"\u003Cb\u003E\u003Cp\u003E\u003Cb\u003E\u003Ca href=\"/wiki/Horses_Cliff\" title=\"Horses Cliff\"\u003EHorses Cliff\u003C/a\u003E\u003C/b\u003E\n\u003C/p\u003E\u003C/b\u003E\u003Chr /\u003E\u003Cp\u003E51.548562, -4.250826\n\u003C/p\u003E","title":"Horses Cliff\n","link":"","lat":51.548562,"lon":-4.250826,"icon":"/testwiki/images/4/43/Orange.png"},{"text":"\u003Cb\u003E\u003Cp\u003E\u003Cb\u003E\u003Ca href=\"/wiki/Fetlock_Zawn\" title=\"Fetlock Zawn\"\u003EFetlock Zawn\u003C/a\u003E\u003C/b\u003E\n\u003C/p\u003E\u003C/b\u003E\u003Chr /\u003E\u003Cp\u003E51.548528, -4.250472\n\u003C/p\u003E","title":"Fetlock Zawn\n","link":"","lat":51.548528,"lon":-4.250472,"icon":"/testwiki/images/1/16/Blue.png"},{"text":"\u003Cb\u003E\u003Cp\u003E\u003Cb\u003E\u003Ca href=\"/wiki/Yellow_Buttress\" title=\"Yellow Buttress\"\u003EYellow Buttress\u003C/a\u003E\u003C/b\u003E aka \u003Ca href=\"/wiki/Easter_Buttress#Lower_Tier\" class=\"mw-redirect\" title=\"Easter Buttress\"\u003EEaster Buttress#Lower Tier\u003C/a\u003E\n\u003C/p\u003E\u003C/b\u003E\u003Chr /\u003E\u003Cp\u003E51.547746, -4.249204\n\u003C/p\u003E","title":"Yellow Buttress aka Easter Buttress#Lower Tier\n","link":"","lat":51.547746,"lon":-4.249204,"icon":"/testwiki/images/4/43/Orange.png"},{"text":"\u003Cb\u003E\u003Cp\u003E\u003Cb\u003E\u003Ca href=\"/wiki/Devil%27s_Cwm\" title=\"Devil's Cwm\"\u003EDevil's Cwm/Yellow Buttress Lower Tier\u003C/a\u003E\u003C/b\u003E\n\u003C/p\u003E\u003C/b\u003E\u003Chr /\u003E\u003Cp\u003E51.547422, -4.249507\n\u003C/p\u003E","title":"Devil's Cwm/Yellow Buttress Lower Tier\n","link":"","lat":51.547422,"lon":-4.249507,"icon":"/testwiki/images/4/43/Orange.png"},{"text":"\u003Cb\u003E\u003Cp\u003E\u003Cb\u003E\u003Ca href=\"/wiki/Blackhole_Gut\" title=\"Blackhole Gut\"\u003EBlackhole Gut\u003C/a\u003E\u003C/b\u003E\n\u003C/p\u003E\u003C/b\u003E\u003Chr /\u003E\u003Cp\u003E51.547641, -4.248656\n\u003C/p\u003E","title":"Blackhole Gut\n","link":"","lat":51.547641,"lon":-4.248656,"icon":"/testwiki/images/4/43/Orange.png"},{"text":"\u003Cb\u003E\u003Cp\u003E\u003Cb\u003E\u003Ca href=\"/wiki/White_Pillar\" title=\"White Pillar\"\u003EWhite Pillar\u003C/a\u003E\u003C/b\u003E\n\u003C/p\u003E\u003C/b\u003E\u003Chr /\u003E\u003Cp\u003E51.546657, -4.247710\n\u003C/p\u003E","title":"White Pillar\n","link":"","lat":51.546657,"lon":-4.24771,"icon":"/testwiki/images/4/43/Orange.png"},{"text":"\u003Cb\u003E\u003Cp\u003E\u003Cb\u003E\u003Ca href=\"/wiki/Blackhole_Crag\" class=\"mw-redirect\" title=\"Blackhole Crag\"\u003EBlackhole Crag\u003C/a\u003E\u003C/b\u003E\n\u003C/p\u003E\u003C/b\u003E\u003Chr /\u003E\u003Cp\u003E51.544282, -4.241060\n\u003C/p\u003E","title":"Blackhole Crag\n","link":"","lat":51.544282,"lon":-4.24106,"icon":"/testwiki/images/4/43/Orange.png"},{"text":"\u003Cb\u003E\u003Cp\u003E\u003Cb\u003E\u003Ca href=\"/wiki/Boiler_Slab\" title=\"Boiler Slab\"\u003EBoiler Slab\u003C/a\u003E\u003C/b\u003E\n\u003C/p\u003E\u003C/b\u003E\u003Chr /\u003E\u003Cp\u003E51.542704, -4.236298\n\u003C/p\u003E","title":"Boiler Slab\n","link":"","lat":51.542704,"lon":-4.236298,"icon":"/testwiki/images/4/43/Orange.png"},{"text":"\u003Cb\u003E\u003Cp\u003E\u003Cb\u003E\u003Ca href=\"/wiki/Engine_Room_Slab\" title=\"Engine Room Slab\"\u003EEngine Room Slab\u003C/a\u003E\u003C/b\u003E\n\u003C/p\u003E\u003C/b\u003E\u003Chr /\u003E\u003Cp\u003E51.542514, -4.235688\n\u003C/p\u003E","title":"Engine Room Slab\n","link":"","lat":51.542514,"lon":-4.235688,"icon":"/testwiki/images/4/43/Orange.png"},{"text":"\u003Cb\u003E\u003Cp\u003E\u003Cb\u003E\u003Ca href=\"/wiki/Longhole_Cave_Buttress\" title=\"Longhole Cave Buttress\"\u003ELonghole Cave Buttress\u003C/a\u003E\u003C/b\u003E\n\u003C/p\u003E\u003C/b\u003E\u003Chr /\u003E\u003Cp\u003E51.543001, -4.234897\n\u003C/p\u003E","title":"Longhole Cave Buttress\n","link":"","lat":51.543001,"lon":-4.234897,"icon":"/testwiki/images/4/43/Orange.png"},{"text":"\u003Cb\u003E\u003Cp\u003E\u003Cb\u003E\u003Ca href=\"/wiki/Longhole_Cliff\" title=\"Longhole Cliff\"\u003ELonghole Cliff\u003C/a\u003E\u003C/b\u003E\n\u003C/p\u003E\u003C/b\u003E\u003Chr /\u003E\u003Cp\u003E51.542067, -4.230999\n\u003C/p\u003E","title":"Longhole Cliff\n","link":"","lat":51.542067,"lon":-4.230999,"icon":"/testwiki/images/4/43/Orange.png"},{"text":"\u003Cb\u003E\u003Cp\u003E\u003Cb\u003E\u003Ca href=\"/wiki/Overton_Cliff\" title=\"Overton Cliff\"\u003EOverton Cliff\u003C/a\u003E\u003C/b\u003E\n\u003C/p\u003E\u003C/b\u003E\u003Chr /\u003E\u003Cp\u003E51.5418940, -4.2287817\n\u003C/p\u003E","title":"Overton Cliff\n","link":"","lat":51.541894,"lon":-4.2287817,"icon":"/testwiki/images/4/43/Orange.png"},{"text":"\u003Cb\u003E\u003Cp\u003E\u003Cb\u003E\u003Ca href=\"/wiki/Culver_Hole\" title=\"Culver Hole\"\u003ECulver Hole\u003C/a\u003E\u003C/b\u003E\n\u003C/p\u003E\u003C/b\u003E\u003Chr /\u003E\u003Cp\u003E51.53930, -4.21423\n\u003C/p\u003E","title":"Culver Hole\n","link":"","lat":51.5393,"lon":-4.21423,"icon":"/testwiki/images/4/43/Orange.png"},{"text":"\u003Cb\u003E\u003Cp\u003E\u003Cb\u003E\u003Ca href=\"/wiki/Port_Eynon_Cave\" title=\"Port Eynon Cave\"\u003EPort Eynon Cave\u003C/a\u003E\u003C/b\u003E\n\u003C/p\u003E\u003C/b\u003E\u003Chr /\u003E\u003Cp\u003E51.537225, -4.210449\n\u003C/p\u003E","title":"Port Eynon Cave\n","link":"","lat":51.537225,"lon":-4.210449,"icon":"/testwiki/images/4/43/Orange.png"},{"text":"\u003Cb\u003E\u003Cp\u003E\u003Cb\u003E\u003Ca href=\"/wiki/Port_Eynon_Cave_2\" title=\"Port Eynon Cave 2\"\u003EPort Eynon Cave 2\u003C/a\u003E\u003C/b\u003E\n\u003C/p\u003E\u003C/b\u003E\u003Chr /\u003E\u003Cp\u003E51.537246, -4.210034\n\u003C/p\u003E","title":"Port Eynon Cave 2\n","link":"","lat":51.537246,"lon":-4.210034,"icon":"/testwiki/images/1/16/Blue.png"},{"text":"\u003Cb\u003E\u003Cp\u003E\u003Cb\u003E\u003Ca href=\"/wiki/Three_Cliffs\" title=\"Three Cliffs\"\u003EThree Cliffs\u003C/a\u003E\u003C/b\u003E\n\u003C/p\u003E\u003C/b\u003E\u003Chr /\u003E\u003Cp\u003E51.569941, -4.111390\n\u003C/p\u003E","title":"Three Cliffs\n","link":"","lat":51.569941,"lon":-4.11139,"icon":"/testwiki/images/4/43/Orange.png"},{"text":"\u003Cb\u003E\u003Cp\u003E\u003Cb\u003E\u003Ca href=\"/wiki/Pobbles_Bays#Pobbles_Bay_West\" title=\"Pobbles Bays\"\u003EPobbles Bay West\u003C/a\u003E\u003C/b\u003E\n\u003C/p\u003E\u003C/b\u003E\u003Chr /\u003E\u003Cp\u003E51.569777, -4.109186\n\u003C/p\u003E","title":"Pobbles Bay West\n","link":"","lat":51.569777,"lon":-4.109186,"icon":"/testwiki/images/4/43/Orange.png"},{"text":"\u003Cb\u003E\u003Cp\u003E\u003Ca href=\"/wiki/Pobbles_Bays#Pobbles_Bay_East\" title=\"Pobbles Bays\"\u003EPobbles Bay East\u003C/a\u003E\n\u003C/p\u003E\u003C/b\u003E\u003Chr /\u003E\u003Cp\u003E51.567420, -4.104268\n\u003C/p\u003E","title":"Pobbles Bay East\n","link":"","lat":51.56742,"lon":-4.104268,"icon":"/testwiki/images/4/43/Orange.png"},{"text":"\u003Cb\u003E\u003Cp\u003E\u003Ca href=\"/wiki/Pobbles_Quarries#Upper_Quarry\" title=\"Pobbles Quarries\"\u003EPobbles Quarries (Upper Quarry)\u003C/a\u003E aka \u003Ca href=\"/testwiki/index.php?title=West_Cliff\u0026amp;action=edit\u0026amp;redlink=1\" class=\"new\" title=\"West Cliff (page does not exist)\"\u003EWest Cliff\u003C/a\u003E\n\u003C/p\u003E\u003C/b\u003E\u003Chr /\u003E\u003Cp\u003E51.567037, -4.102638\n\u003C/p\u003E","title":"Pobbles Quarries (Upper Quarry) aka West Cliff\n","link":"","lat":51.567037,"lon":-4.102638,"icon":"/testwiki/images/4/43/Orange.png"},{"text":"\u003Cb\u003E\u003Cp\u003E\u003Ca href=\"/wiki/Pobbles_Quarries#Middle_Quarry\" title=\"Pobbles Quarries\"\u003EPobbles Quarries (Middle Quarry)\u003C/a\u003E\n\u003C/p\u003E\u003C/b\u003E\u003Chr /\u003E\u003Cp\u003E51.567303, -4.103548\n\u003C/p\u003E","title":"Pobbles Quarries (Middle Quarry)\n","link":"","lat":51.567303,"lon":-4.103548,"icon":"/testwiki/images/4/43/Orange.png"},{"text":"\u003Cb\u003E\u003Cp\u003E\u003Ca href=\"/wiki/Pobbles_Quarries#Bottom_Quarry\" title=\"Pobbles Quarries\"\u003EPobbles Quarries (Bottom Quarry)\u003C/a\u003E\n\u003C/p\u003E\u003C/b\u003E\u003Chr /\u003E\u003Cp\u003E51.566929, -4.103358\n\u003C/p\u003E","title":"Pobbles Quarries (Bottom Quarry)\n","link":"","lat":51.566929,"lon":-4.103358,"icon":"/testwiki/images/4/43/Orange.png"},{"text":"\u003Cb\u003E\u003Cp\u003E\u003Ca href=\"/wiki/Cathole_Cave\" title=\"Cathole Cave\"\u003ECathole Cave\u003C/a\u003E\n\u003C/p\u003E\u003C/b\u003E\u003Chr /\u003E\u003Cp\u003E51.5898992, -4.1123902 \n\u003C/p\u003E","title":"Cathole Cave\n","link":"","lat":51.5898992,"lon":-4.1123902,"icon":"/testwiki/images/4/43/Orange.png"},{"text":"\u003Cb\u003E\u003Cp\u003E\u003Ca href=\"/wiki/Park_Wood_Quarry\" title=\"Park Wood Quarry\"\u003EPark Wood Quarry\u003C/a\u003E\n\u003C/p\u003E\u003C/b\u003E\u003Chr /\u003E\u003Cp\u003E51.588134, -4.111677\n\u003C/p\u003E","title":"Park Wood Quarry\n","link":"","lat":51.588134,"lon":-4.111677,"icon":"/testwiki/images/1/16/Blue.png"},{"text":"\u003Cb\u003E\u003Cp\u003E\u003Cb\u003E\u003Ca href=\"/wiki/Barland_Quarry\" title=\"Barland Quarry\"\u003EBarland Quarry\u003C/a\u003E\u003C/b\u003E\n\u003C/p\u003E\u003C/b\u003E\u003Chr /\u003E\u003Cp\u003E51.5861193, -4.0580303\n\u003C/p\u003E","title":"Barland Quarry\n","link":"","lat":51.5861193,"lon":-4.0580303,"icon":"/testwiki/images/1/16/Blue.png"},{"text":"\u003Cb\u003E\u003Cp\u003E\u003Cb\u003E\u003Ca href=\"/wiki/Caswell_Bay#Great_Slab\" title=\"Caswell Bay\"\u003ECaswell Bay - Great Slab\u003C/a\u003E\u003C/b\u003E\n\u003C/p\u003E\u003C/b\u003E\u003Chr /\u003E\u003Cp\u003E51.568715, -4.036611\n\u003C/p\u003E","title":"Caswell Bay - Great Slab\n","link":"","lat":51.568715,"lon":-4.036611,"icon":"/testwiki/images/4/43/Orange.png"},{"text":"\u003Cb\u003E\u003Cp\u003E\u003Cb\u003E\u003Ca href=\"/wiki/Caswell_Bay#Yellow_lecked_Slab\" title=\"Caswell Bay\"\u003ECaswell Bay - Yellow Flecked Slab\u003C/a\u003E\u003C/b\u003E\n\u003C/p\u003E\u003C/b\u003E\u003Chr /\u003E\u003Cp\u003E51.568480, -4.036893\n\u003C/p\u003E","title":"Caswell Bay - Yellow Flecked Slab\n","link":"","lat":51.56848,"lon":-4.036893,"icon":"/testwiki/images/4/43/Orange.png"},{"text":"\u003Cb\u003E\u003Cp\u003E\u003Cb\u003E\u003Ca href=\"/wiki/Caswell_Bay#Far_South_Slab\" title=\"Caswell Bay\"\u003ECaswell Bay - Far South Slab\u003C/a\u003E\u003C/b\u003E\n\u003C/p\u003E\u003C/b\u003E\u003Chr /\u003E\u003Cp\u003E51.568295, -4.037212\n\u003C/p\u003E","title":"Caswell Bay - Far South Slab\n","link":"","lat":51.568295,"lon":-4.037212,"icon":"/testwiki/images/4/43/Orange.png"},{"text":"\u003Cb\u003E\u003Cp\u003E\u003Cb\u003E\u003Ca href=\"/testwiki/index.php?title=Crab_Island\u0026amp;action=edit\u0026amp;redlink=1\" class=\"new\" title=\"Crab Island (page does not exist)\"\u003ECrab Island\u003C/a\u003E\u003C/b\u003E aka \u003Ca href=\"/wiki/Nightmares\" class=\"mw-redirect\" title=\"Nightmares\"\u003ENightmares\u003C/a\u003E\n\u003C/p\u003E\u003C/b\u003E\u003Chr /\u003E\u003Cp\u003E51.56463, -3.99835\n\u003C/p\u003E","title":"Crab Island aka Nightmares\n","link":"","lat":51.56463,"lon":-3.99835,"icon":"/testwiki/images/4/43/Orange.png"},{"text":"\u003Cb\u003E\u003Cp\u003E\u003Cb\u003E\u003Ca href=\"/wiki/Rams_Tor\" title=\"Rams Tor\"\u003ERams Tor\u003C/a\u003E\u003C/b\u003E\n\u003C/p\u003E\u003C/b\u003E\u003Chr /\u003E\u003Cp\u003E51.563556, -3.993518\n\u003C/p\u003E","title":"Rams Tor\n","link":"","lat":51.563556,"lon":-3.993518,"icon":"/testwiki/images/1/16/Blue.png"},{"text":"\u003Cb\u003E\u003Cp\u003E\u003Cb\u003E\u003Ca href=\"/wiki/Mumbles_Light_House_Cave\" title=\"Mumbles Light House Cave\"\u003EMumbles Light House Cave\u003C/a\u003E\u003C/b\u003E\n\u003C/p\u003E\u003C/b\u003E\u003Chr /\u003E\u003Cp\u003E51.56653, -3.97113\n\u003C/p\u003E","title":"Mumbles Light House Cave\n","link":"","lat":51.56653,"lon":-3.97113,"icon":"/testwiki/images/4/43/Orange.png"},{"text":"\u003Cb\u003E\u003Cp\u003E\u003Cb\u003E\u003Ca href=\"/wiki/Conservative_Club_Crag\" title=\"Conservative Club Crag\"\u003EConservative Club Crag\u003C/a\u003E\u003C/b\u003E\n\u003C/p\u003E\u003C/b\u003E\u003Chr /\u003E\u003Cp\u003E51.57206, -3.9906\n\u003C/p\u003E","title":"Conservative Club Crag\n","link":"","lat":51.57206,"lon":-3.9906,"icon":"/testwiki/images/4/43/Orange.png"},{"text":"\u003Cb\u003E\u003Cp\u003E\u003Cb\u003E\u003Ca href=\"/wiki/Ilston_Quarry\" title=\"Ilston Quarry\"\u003EIlston Quarry\u003C/a\u003E\u003C/b\u003E\n\u003C/p\u003E\u003C/b\u003E\u003Chr /\u003E\u003Cp\u003E51.5955699, -4.0883425\u003Cbr /\u003E\n\u003Cb\u003ENo routes recorded\u003C/b\u003E. A sizable limestone quarry with some\u003Cbr /\u003E\ninteresting looking lines. However, most of it looks horribly unstable.\n\u003C/p\u003E","title":"Ilston Quarry\n","link":"","lat":51.5955699,"lon":-4.0883425,"icon":"/testwiki/images/1/16/Blue.png"},{"text":"\u003Cb\u003E\u003Cp\u003E\u003Cb\u003E\u003Ca href=\"/wiki/Dunvant_Quarry\" title=\"Dunvant Quarry\"\u003EDunvant Quarry\u003C/a\u003E\u003C/b\u003E\n\u003C/p\u003E\u003C/b\u003E\u003Chr /\u003E\u003Cp\u003E51.627780, -4.029495\u003Cbr /\u003E\nNo routes recorded.\u003Cbr /\u003E\u003Cbr /\u003E\nWould have been possible to develop into a sizable sports venue\u003Cbr /\u003E\n30 years ago but is now very overgrown. There are some sizeable\u003Cbr /\u003E\nsandstone faces in this quarry.\u003Cbr /\u003E\u003Cbr /\u003E\nPossible \u003Cb\u003Ecommunity project\u003C/b\u003E to be completed by a group with\u003Cbr /\u003E\nbuckets of enthusiasm.\n\u003C/p\u003E","title":"Dunvant Quarry\n","link":"","lat":51.62778,"lon":-4.029495,"icon":"/testwiki/images/1/16/Blue.png"},{"text":"\u003Cb\u003E\u003Cp\u003E\u003Cb\u003E\u003Ca href=\"/wiki/Winter_Climbs#The_Carmarthen_Van\" class=\"mw-redirect\" title=\"Winter Climbs\"\u003EJoe's Waterfall\u003C/a\u003E\u003C/b\u003E\n\u003C/p\u003E\u003C/b\u003E\u003Chr /\u003E\u003Cp\u003E51.849167, -3.681627\n\u003C/p\u003E","title":"Joe's Waterfall\n","link":"","lat":51.849167,"lon":-3.681627,"icon":"/testwiki/images/a/a7/Winter.png"},{"text":"\u003Cb\u003E\u003Cp\u003E\u003Cb\u003E\u003Ca href=\"/wiki/Winter_Climbs#The_Carmarthen_Van\" class=\"mw-redirect\" title=\"Winter Climbs\"\u003EDave's Fault\u003C/a\u003E\u003C/b\u003E\n\u003C/p\u003E\u003C/b\u003E\u003Chr /\u003E\u003Cp\u003E51.879707, -3.739869\n\u003C/p\u003E","title":"Dave's Fault\n","link":"","lat":51.879707,"lon":-3.739869,"icon":"/testwiki/images/a/a7/Winter.png"},{"text":"\u003Cb\u003E\u003Cp\u003E\u003Cb\u003E\u003Ca href=\"/wiki/Craig-Y-Llyn\" class=\"mw-redirect\" title=\"Craig-Y-Llyn\"\u003ECraig-Y-Llyn\u003C/a\u003E\u003C/b\u003E\n\u003C/p\u003E\u003C/b\u003E\u003Chr /\u003E\u003Cp\u003E51.71689, -3.56789\n\u003C/p\u003E","title":"Craig-Y-Llyn\n","link":"","lat":51.71689,"lon":-3.56789,"icon":"/testwiki/images/a/a7/Winter.png"},{"text":"\u003Cb\u003E\u003Cp\u003E\u003Cb\u003E\u003Ca href=\"/wiki/Craig_Cerrig-gleisiad\" title=\"Craig Cerrig-gleisiad\"\u003ECraig Cerrig-gleisiad\u003C/a\u003E\u003C/b\u003E\n\u003C/p\u003E\u003C/b\u003E\u003Chr /\u003E\u003Cp\u003E51.886325, -3.507320\n\u003C/p\u003E","title":"Craig Cerrig-gleisiad\n","link":"","lat":51.886325,"lon":-3.50732,"icon":"/testwiki/images/a/a7/Winter.png"},{"text":"\u003Cb\u003E\u003Cp\u003E\u003Cb\u003E\u003Ca href=\"/wiki/Pen-Y-Fan\" title=\"Pen-Y-Fan\"\u003EPen-Y-Fan\u003C/a\u003E\u003C/b\u003E\n\u003C/p\u003E\u003C/b\u003E\u003Chr /\u003E\u003Cp\u003E51.884537, -3.430115\n\u003C/p\u003E","title":"Pen-Y-Fan\n","link":"","lat":51.884537,"lon":-3.430115,"icon":"/testwiki/images/a/a7/Winter.png"},{"text":"\u003Cb\u003E\u003Cp\u003E\u003Cb\u003E\u003Ca href=\"/wiki/Winter_Climbing#South_Wales_Valleys\" class=\"mw-redirect\" title=\"Winter Climbing\"\u003ECraig Cwm-du\u003C/a\u003E\u003C/b\u003E\n\u003C/p\u003E\u003C/b\u003E\u003Chr /\u003E\u003Cp\u003E51.880275, -3.532286\n\u003C/p\u003E","title":"Craig Cwm-du\n","link":"","lat":51.880275,"lon":-3.532286,"icon":"/testwiki/images/a/a7/Winter.png"},{"text":"\u003Cb\u003E\u003Cp\u003E\u003Cb\u003ECafe\u003C/b\u003E\n\u003C/p\u003E\u003C/b\u003E\u003Chr /\u003E\u003Cp\u003EBreakfasts, Teas, Coffee, Cakes, etc.\u003Cbr /\u003E\nSmall tidy and clean cafe. Nice coffee.\n\u003C/p\u003E","title":"Cafe\n","link":"","lat":51.567323,"lon":-4.088269,"icon":"/testwiki/images/c/c6/Food.png"},{"text":"\u003Cb\u003E\u003Cp\u003E\u003Cb\u003EShepherds of Parkmill\u003C/b\u003E\n\u003C/p\u003E\u003C/b\u003E\u003Chr /\u003E\u003Cp\u003EBreakfasts, Teas, Coffee, Cakes, etc.\u003Cbr /\u003E\n\u003Cb\u003ETel:\u003C/b\u003E 01792 371228\n\u003C/p\u003E\nSmall shop and cafe \u003Cdiv class=\"thumb tright\"\u003E\u003Cdiv class=\"thumbinner\" style=\"width:202px;\"\u003E\u003Ca href=\"/wiki/File:Shepherds.jpg\" class=\"image\"\u003E\u003Cimg alt=\"Shepherds.jpg\" src=\"/testwiki/images/thumb/0/0c/Shepherds.jpg/200px-Shepherds.jpg\" width=\"200\" height=\"151\" class=\"thumbimage\" srcset=\"/testwiki/images/0/0c/Shepherds.jpg 1.5x\" data-file-width=\"300\" data-file-height=\"227\" /\u003E\u003C/a\u003E \u003Cdiv class=\"thumbcaption\"\u003E\u003Cdiv class=\"magnify\"\u003E\u003Ca href=\"/wiki/File:Shepherds.jpg\" class=\"internal\" title=\"Enlarge\"\u003E\u003C/a\u003E\u003C/div\u003E\u003C/div\u003E\u003C/div\u003E\u003C/div\u003E\u003Cbr /\u003E\n","title":"Shepherds of Parkmill\n","link":"","lat":51.58283,"lon":-4.101627,"icon":"/testwiki/images/c/c6/Food.png"},{"text":"\u003Cb\u003E\u003Cp\u003E\u003Cb\u003ECafe\u003C/b\u003E\n\u003C/p\u003E\u003C/b\u003E\u003Chr /\u003E\u003Cp\u003E\u003Cb\u003EBIG\u003C/b\u003E Breakfasts, Teas, Coffee, Cakes, etc.\u003Cbr /\u003E\nQuantity rather than quality rules here!\n\u003C/p\u003E","title":"Cafe\n","link":"","lat":51.571119,"lon":-4.219043,"icon":"/testwiki/images/c/c6/Food.png"},{"text":"\u003Cb\u003E\u003Cp\u003E\u003Cb\u003E51.619601, -4.219431\u003Cbr /\u003E\u003Cbr /\u003ELandimore - Parking\u003C/b\u003E \n\u003C/p\u003E\u003C/b\u003E\u003Chr /\u003E\u003Cp\u003EFree\u003Cbr /\u003E\u003Cbr /\u003E \n\u003Ca href=\"/wiki/Tor_Gro\" title=\"Tor Gro\"\u003ETor Gro\u003C/a\u003E\u003Cbr /\u003E \n\u003Ca href=\"/wiki/North_Hill_Tor\" title=\"North Hill Tor\"\u003ENorth Hill Tor\u003C/a\u003E \n\u003C/p\u003E","title":"51.619601, -4.219431Landimore - Parking \n","link":"","lat":51.619601,"lon":-4.219431,"icon":"/testwiki/images/7/74/Parking.png"},{"text":"\u003Cb\u003E\u003Cp\u003E\u003Cb\u003E51.618646, -4.255126\u003C/b\u003E\n\u003C/p\u003E\u003C/b\u003E\u003Chr /\u003E\u003Cp\u003EFor \u003Ca href=\"/wiki/Prissen%27s_Tor\" title=\"Prissen's Tor\"\u003EPrissen's Tor\u003C/a\u003E and \u003Ca href=\"/wiki/Cwm_Ivy_Tor\" title=\"Cwm Ivy Tor\"\u003ECwm Ivy Tor\u003C/a\u003E\n\u003C/p\u003E","title":"51.618646, -4.255126\n","link":"","lat":51.618646,"lon":-4.255126,"icon":"/testwiki/images/7/74/Parking.png"},{"text":"\u003Cb\u003E\u003Cp\u003E\u003Cb\u003E51.566835, -4.087865\u003Cbr /\u003E\u003Cbr /\u003ENational Trust Parking\u003C/b\u003E\n\u003C/p\u003E\u003C/b\u003E\u003Chr /\u003E\u003Cp\u003ERun by the \u003Ca rel=\"nofollow\" class=\"external text\" href=\"http://www.nationaltrust.org.uk/main/w-global/w-localtoyou/w-wales.htm\"\u003ENational Trust\u003C/a\u003E.\u003Cbr /\u003E\u003Cbr /\u003E\nPay-and-Display\u003Cbr /\u003E\u003Cbr /\u003E\n\u003Ca href=\"/wiki/File:NT_parking_southgate_notice.jpg\" class=\"image\"\u003E\u003Cimg alt=\"NT parking southgate notice.jpg\" src=\"/testwiki/images/thumb/c/ca/NT_parking_southgate_notice.jpg/300px-NT_parking_southgate_notice.jpg\" width=\"300\" height=\"250\" srcset=\"/testwiki/images/thumb/c/ca/NT_parking_southgate_notice.jpg/450px-NT_parking_southgate_notice.jpg 1.5x, /testwiki/images/c/ca/NT_parking_southgate_notice.jpg 2x\" data-file-width=\"547\" data-file-height=\"456\" /\u003E\u003C/a\u003E\u003Cbr /\u003E\u003Cbr /\u003E\n\u003Cb\u003EFor\u003C/b\u003E \u003Ca href=\"/wiki/Gravesend\" class=\"mw-redirect\" title=\"Gravesend\"\u003EGravesend\u003C/a\u003E,\u003Cbr /\u003E\n\u003Ca href=\"/wiki/Pennard\" class=\"mw-redirect\" title=\"Pennard\"\u003EPennard\u003C/a\u003E,\u003Cbr /\u003E\n\u003Ca href=\"/wiki/Foxhole\" class=\"mw-redirect\" title=\"Foxhole\"\u003EFoxhole\u003C/a\u003E,\u003Cbr /\u003E\n\u003Ca href=\"/wiki/Pobbles_Quarries\" title=\"Pobbles Quarries\"\u003EPobbles Quarries\u003C/a\u003E,\u003Cbr /\u003E\n\u003Ca href=\"/wiki/Bowen%27s_Parlour\" title=\"Bowen's Parlour\"\u003EBowen's Parlour\u003C/a\u003E,\u003Cbr /\u003E\n\u003Ca href=\"/wiki/Shire_Combe\" class=\"mw-redirect\" title=\"Shire Combe\"\u003EShire Combe\u003C/a\u003E,\u003Cbr /\u003E\n\u003Ca href=\"/wiki/Watchhouse\" class=\"mw-redirect\" title=\"Watchhouse\"\u003EWatchhouse\u003C/a\u003E,\u003Cbr /\u003E\n\u003Ca href=\"/wiki/Three_Cliffs\" title=\"Three Cliffs\"\u003EThreeCliffs\u003C/a\u003E,\u003Cbr /\u003E\n\u003Ca class=\"mw-selflink selflink\"\u003EPobbles Bays\u003C/a\u003E\n\u003C/p\u003E","title":"51.566835, -4.087865National Trust Parking\n","link":"","lat":51.566835,"lon":-4.087865,"icon":"/testwiki/images/7/74/Parking.png"},{"text":"\u003Cb\u003E\u003Cp\u003E\u003Cb\u003E51.587451, -4.053336\u003Cbr /\u003E\u003Cbr /\u003EBarland Quarry - Free - (Second Choice)\u003C/b\u003E\n\u003C/p\u003E\u003C/b\u003E\u003Chr /\u003E\u003Cp\u003EUnsurfaced area. Possibly overlooked by the Site Manager's house.\u003Cbr /\u003E\nUse the other car park if at all possible.\u003Cbr /\u003E\u003Cbr /\u003E\n\u003Cb\u003EFor\u003C/b\u003E \u003Ca href=\"/wiki/Barland_Quarry\" title=\"Barland Quarry\"\u003EBarland Quarry\u003C/a\u003E\n\u003C/p\u003E","title":"51.587451, -4.053336Barland Quarry - Free - (Second Choice)\n","link":"","lat":51.587451,"lon":-4.053336,"icon":"/testwiki/images/7/74/Parking.png"},{"text":"\u003Cb\u003E\u003Cp\u003E\u003Cb\u003E51.584641, -4.058862\u003Cbr /\u003E\u003Cbr /\u003EBarland Quarry - Free - (First Choice)\u003C/b\u003E\n\u003C/p\u003E\u003C/b\u003E\u003Chr /\u003E\u003Cp\u003ESmall unsurfaced lay-by opposite the Spa grocery shop.\u003Cbr /\u003E\u003Cbr /\u003E\n\u003Cb\u003EFor\u003C/b\u003E \u003Ca href=\"/wiki/Barland_Quarry\" title=\"Barland Quarry\"\u003EBarland Quarry\u003C/a\u003E\n\u003C/p\u003E","title":"51.584641, -4.058862Barland Quarry - Free - (First Choice)\n","link":"","lat":51.584641,"lon":-4.058862,"icon":"/testwiki/images/7/74/Parking.png"},{"text":"\u003Cb\u003E\u003Cp\u003E51.570976, -4.030482\u003Cbr /\u003E\u003Cbr /\u003E\u003Cb\u003ECaswell Bay Parking.\u003C/b\u003E\n\u003C/p\u003E\u003C/b\u003E\u003Chr /\u003E\u003Cp\u003EPay and Display\u003Cbr /\u003E\u003Cbr /\u003E\nFor \u003Ca href=\"/wiki/Caswell_Bay\" title=\"Caswell Bay\"\u003ECaswell Bay\u003C/a\u003E and \u003Ca href=\"/wiki/Caswell_Bay_(Bouldering)\" title=\"Caswell Bay (Bouldering)\"\u003ECaswell_Bay_(Bouldering)\u003C/a\u003E\n\u003C/p\u003E\n\u003Cdiv class=\"thumb tleft\"\u003E\u003Cdiv class=\"thumbinner\" style=\"width:202px;\"\u003E\u003Ca href=\"/wiki/File:Caswell-parking_tariffs.jpg\" class=\"image\"\u003E\u003Cimg alt=\"\" src=\"/testwiki/images/thumb/c/c1/Caswell-parking_tariffs.jpg/200px-Caswell-parking_tariffs.jpg\" width=\"200\" height=\"267\" class=\"thumbimage\" srcset=\"/testwiki/images/thumb/c/c1/Caswell-parking_tariffs.jpg/300px-Caswell-parking_tariffs.jpg 1.5x, /testwiki/images/thumb/c/c1/Caswell-parking_tariffs.jpg/400px-Caswell-parking_tariffs.jpg 2x\" data-file-width=\"2048\" data-file-height=\"2731\" /\u003E\u003C/a\u003E \u003Cdiv class=\"thumbcaption\"\u003E\u003Cdiv class=\"magnify\"\u003E\u003Ca href=\"/wiki/File:Caswell-parking_tariffs.jpg\" class=\"internal\" title=\"Enlarge\"\u003E\u003C/a\u003E\u003C/div\u003ECaswell Parking Tariffs\u003C/div\u003E\u003C/div\u003E\u003C/div\u003E\n","title":"51.570976, -4.030482Caswell Bay Parking.\n","link":"","lat":51.570976,"lon":-4.030482,"icon":"/testwiki/images/7/74/Parking.png"},{"text":"\u003Cb\u003E\u003Cp\u003E\u003Cb\u003E51.566843, -3.981364\u003Cbr /\u003E\u003Cbr /\u003EMumbles - Parking\u003C/b\u003E\n\u003C/p\u003E\u003C/b\u003E\u003Chr /\u003E\u003Cp\u003E\u003Cb\u003EFor\u003C/b\u003E\u003Ca href=\"/wiki/Mumbles_Light_House_Cave\" title=\"Mumbles Light House Cave\"\u003EMumbles Light House Cave\u003C/a\u003E\u003Cbr /\u003E\n\u003Ca href=\"/wiki/Rams_Tor\" title=\"Rams Tor\"\u003ERamsTor\u003C/a\u003E\u003Cbr /\u003E\n\u003Ca href=\"/testwiki/index.php?title=Crab_Island\u0026amp;action=edit\u0026amp;redlink=1\" class=\"new\" title=\"Crab Island (page does not exist)\"\u003ECrab Island\u003C/a\u003E\u003Cbr /\u003E\n\u003Ca href=\"/wiki/Rams_Tor_Bouldering\" title=\"Rams Tor Bouldering\"\u003ERams Tor Bouldering\u003C/a\u003E\u003Cbr /\u003E\n\u003Ca href=\"/wiki/Limeslade\" title=\"Limeslade\"\u003ELimeslade\u003C/a\u003E\n\u003C/p\u003E","title":"51.566843, -3.981364Mumbles - Parking\n","link":"","lat":51.566843,"lon":-3.981364,"icon":"/testwiki/images/7/74/Parking.png"},{"text":"\u003Cb\u003E\u003Cp\u003E\u003Cb\u003E51.569301, -4.28840\u003Cbr /\u003E\u003Cbr /\u003ERhossili - National Trust Pay and Display\u003C/b\u003E\n\u003Cbr /\u003E\u003Cbr /\u003E\n\u003Cb\u003ECharges apply from 09.00 to 18.00\u003C/b\u003E\u003Cbr /\u003E\n\u003Cb\u003ECars:\u003C/b\u003E\u00a32.50 up to two hours\u003Cbr /\u003E\n\u003Cb\u003ECars:\u003C/b\u003E\u00a35.00 over two hours\u003Cbr /\u003E\n\u003Cb\u003EMotorcycle:\u003C/b\u003E\u00a31.00 / \u00a32.00\u003Cbr /\u003E\n\u003Cb\u003EMotorhome:\u003C/b\u003E\u00a34.00 / \u00a38.00\u003Cbr /\u003E\n\u003Cb\u003EMinibus:\u003C/b\u003E\u00a34.00 / \u00a38.00\u003Cbr /\u003E\n\u003Cb\u003ECoach:\u003C/b\u003E\u00a312.00 over 2 hours\u003Cbr /\u003E\u003Cbr /\u003E\nNational Trust Members have \u003Cb\u003Efree parking\u003C/b\u003E when presenting their card for scanning.\n\u003C/p\u003E\u003C/b\u003E\u003Chr /\u003E\u003Cp\u003EFor \u003Ca href=\"/wiki/Rhossili_Upper_Crags\" class=\"mw-redirect\" title=\"Rhossili Upper Crags\"\u003ERhossili Upper\u003C/a\u003E and \u003Ca href=\"/wiki/Rhossili_Sea_Level\" class=\"mw-redirect\" title=\"Rhossili Sea Level\"\u003ESea Level Crags\u003C/a\u003E also \u003Ca href=\"/wiki/Fall_Bay\" class=\"mw-redirect\" title=\"Fall Bay\"\u003EFall Bay\u003C/a\u003E and \u003Ca href=\"/wiki/Mewslade\" class=\"mw-redirect\" title=\"Mewslade\"\u003EMewslade\u003C/a\u003E\n\u003C/p\u003E","title":"51.569301, -4.28840Rhossili - National Trust Pay and Display\n\nCharges apply from 09.00 to 18.00\nCars:\u00a32.50 up to two hours\nCars:\u00a35.00 over two hours\nMotorcycle:\u00a31.00 / \u00a32.00\nMotorhome:\u00a34.00 / \u00a38.00\nMinibus:\u00a34.00 / \u00a38.00\nCoach:\u00a312.00 over 2 hours\nNational Trust Members have free parking when presenting their card for scanning.\n","link":"","lat":51.569301,"lon":-4.2884,"icon":"/testwiki/images/7/74/Parking.png"},{"text":"\u003Cb\u003E\u003Cp\u003E\u003Cb\u003E51.569065, -4.285722\u003Cbr /\u003E\u003Cbr /\u003ERhossili Parking\u003C/b\u003E\u003Cbr /\u003E\u003Cbr /\u003E\n\u003C/p\u003E\u003C/b\u003E\u003Chr /\u003E\u003Cp\u003E\u003Ca href=\"/wiki/File:Parking_rhossili_st_marys_church.jpg\" class=\"image\"\u003E\u003Cimg alt=\"Parking rhossili st marys church.jpg\" src=\"/testwiki/images/thumb/8/85/Parking_rhossili_st_marys_church.jpg/200px-Parking_rhossili_st_marys_church.jpg\" width=\"200\" height=\"150\" srcset=\"/testwiki/images/thumb/8/85/Parking_rhossili_st_marys_church.jpg/300px-Parking_rhossili_st_marys_church.jpg 1.5x, /testwiki/images/thumb/8/85/Parking_rhossili_st_marys_church.jpg/400px-Parking_rhossili_st_marys_church.jpg 2x\" data-file-width=\"1000\" data-file-height=\"750\" /\u003E\u003C/a\u003E\u003Cbr /\u003E\u003Cbr /\u003E\u003Cb\u003EChurch car park - Honesty Box\u003C/b\u003E\u003Cbr /\u003E\n\u003C/p\u003E","title":"51.569065, -4.285722Rhossili Parking\n","link":"","lat":51.569065,"lon":-4.285722,"icon":"/testwiki/images/7/74/Parking.png"},{"text":"\u003Cb\u003E\u003Cp\u003E\u003Cb\u003E51.567326, -4.278292\u003Cbr /\u003E\u003Cbr /\u003EMiddleton Parking\u003C/b\u003E\n\u003C/p\u003E\u003C/b\u003E\u003Chr /\u003E\u003Cp\u003EFree - Park carefully on the verge.\u003Cbr /\u003E\u003Cbr /\u003E\n\u003Cb\u003EFor\u003C/b\u003E Mewslade,\u003Cbr /\u003E \n\u003Ca href=\"/wiki/Thurba_Head\" title=\"Thurba Head\"\u003EThurba Head\u003C/a\u003E,\u003Cbr /\u003E \n\u003Ca href=\"/wiki/Catacomb_Gully\" title=\"Catacomb Gully\"\u003ECatacomb Gully\u003C/a\u003E,\u003Cbr /\u003E \n\u003Ca href=\"/wiki/Jacky%27s_Tor\" title=\"Jacky's Tor\"\u003EJacky's Tor\u003C/a\u003E,\u003Cbr /\u003E \n\u003Ca href=\"/wiki/Category:Upper_Crags_Fall_Bay_To_Mewslade#Grey_Wall\" title=\"Category:Upper Crags Fall Bay To Mewslade\"\u003EGrey Wall\u003C/a\u003E,\u003Cbr /\u003E \nFall Bay\n\u003C/p\u003E","title":"51.567326, -4.278292Middleton Parking\n","link":"","lat":51.567326,"lon":-4.278292,"icon":"/testwiki/images/7/74/Parking.png"},{"text":"\u003Cb\u003E\u003Cp\u003E\u003Cb\u003E51.565752,-4.271136\u003C/b\u003E\u003Cbr /\u003E\u003Cbr /\u003E\u003Cb\u003EPitton Farm Parking\u003C/b\u003E\u003Cbr /\u003EA system of seasonal tariffs is now in operation. Payment is made via a machine or \u003Cb\u003E\u003Ca rel=\"nofollow\" class=\"external text\" href=\"https://www.paybyphone.co.uk\"\u003Epaybyphone \u24c7\u003C/a\u003E\u003C/b\u003E. See \u003Ca href=\"/wiki/File:Great_pitton_farm_parking_prices.jpg\" title=\"File:Great pitton farm parking prices.jpg\"\u003E\u003Ci\u003EPitton Parking\u003C/i\u003E\u003C/a\u003E for information on charges. Currently a maximum of \u00a35.00 is charged for parking from 06.00 to 22.00.\n\u003C/p\u003E\u003C/b\u003E\u003Chr /\u003E\u003Cp\u003EFor Mewslade, Three Sisters, Rams, Grove\n\u003C/p\u003E","title":"51.565752,-4.271136Pitton Farm ParkingA system of seasonal tariffs is now in operation. Payment is made via a machine or paybyphone \u24c7. See Pitton Parking for information on charges. Currently a maximum of \u00a35.00 is charged for parking from 06.00 to 22.00.\n","link":"","lat":51.565752,"lon":-4.271136,"icon":"/testwiki/images/7/74/Parking.png"},{"text":"\u003Cb\u003E\u003Cp\u003E\u003Cb\u003E51.561586, -4.242797\u003Cbr /\u003E\u003Cbr /\u003EPilton Green - Parking - Free\u003C/b\u003E\n\u003C/p\u003E\u003C/b\u003E\u003Chr /\u003E\u003Cp\u003EGrass strip at the side of a track. Don't get bogged!\n\u003C/p\u003E","title":"51.561586, -4.242797Pilton Green - Parking - Free\n","link":"","lat":51.561586,"lon":-4.242797,"icon":"/testwiki/images/7/74/Parking.png"},{"text":"\u003Cb\u003E\u003Cp\u003E\u003Cb\u003E51.544533, -4.211459\u003Cbr /\u003E\u003Cbr /\u003EParking - Port Eynon\u003C/b\u003E\n\u003C/p\u003E\u003C/b\u003E\u003Chr /\u003E\u003Cp\u003EThe sensible parking option for \u003Ca href=\"/wiki/Boiler_Slab\" title=\"Boiler Slab\"\u003EBoiler Slab\u003C/a\u003E\u003Cbr /\u003E\u003Cbr /\u003E\nThis is a 'Pay and Display' car park\u003Cbr /\u003E\u003Cbr /\u003E\nGates lock at 8.00pm.\n\u003C/p\u003E","title":"51.544533, -4.211459Parking - Port Eynon\n","link":"","lat":51.544533,"lon":-4.211459,"icon":"/testwiki/images/7/74/Parking.png"},{"text":"\u003Cb\u003E\u003Cp\u003E\u003Cb\u003E51.54486, -4.220247\u003Cbr /\u003E\u003Cbr /\u003EOverton - Parking\u003C/b\u003E\n\u003C/p\u003E\u003C/b\u003E\u003Chr /\u003E\u003Cp\u003EFree - Please park carefully and avoid obstructing roads and residents'\u003Cbr /\u003E\ndriveways. Very limited numbers of places. Use Port Eynon car park if\u003Cbr /\u003E\nyou cannot park considerately here\u003Cbr /\u003E\u003Cbr /\u003E\n\u003Cb\u003EFor:\u003C/b\u003E \u003Ca href=\"/wiki/Boiler_Slab\" title=\"Boiler Slab\"\u003EBoiler Slab\u003C/a\u003E\u003Cbr /\u003E\n\u003Ca href=\"/wiki/White_Pillar\" title=\"White Pillar\"\u003EWhite Pillar\u003C/a\u003E\n\u003C/p\u003E","title":"51.54486, -4.220247Overton - Parking\n","link":"","lat":51.54486,"lon":-4.220247,"icon":"/testwiki/images/7/74/Parking.png"},{"text":"\u003Cb\u003E\u003Cp\u003E\u003Cb\u003E51.565848, -4.270856\u003C/b\u003E\n\u003C/p\u003E\u003C/b\u003E\u003Chr /\u003E\u003Cb\u003EPitton Farm Parking\u003C/b\u003E\u003Cbr /\u003E\u003Cbr /\u003EPayment is made via a machine or \"paybyphone \u24c7\".\u003Cbr /\u003ECurrently a maximum of \u00a35.00 is charged for parking from 6am to 10pm. \u003Cbr /\u003E\u003Cbr /\u003E\u003Cdiv class=\"center\"\u003E\u003Cdiv class=\"thumb tnone\"\u003E\u003Cdiv class=\"thumbinner\" style=\"width:102px;\"\u003E\u003Ca href=\"/wiki/File:Great_pitton_farm_parking_prices.jpg\" class=\"image\"\u003E\u003Cimg alt=\"Great pitton farm parking prices.jpg\" src=\"/testwiki/images/thumb/e/ec/Great_pitton_farm_parking_prices.jpg/100px-Great_pitton_farm_parking_prices.jpg\" width=\"100\" height=\"133\" class=\"thumbimage\" srcset=\"/testwiki/images/thumb/e/ec/Great_pitton_farm_parking_prices.jpg/150px-Great_pitton_farm_parking_prices.jpg 1.5x, /testwiki/images/thumb/e/ec/Great_pitton_farm_parking_prices.jpg/200px-Great_pitton_farm_parking_prices.jpg 2x\" data-file-width=\"2736\" data-file-height=\"3648\" /\u003E\u003C/a\u003E \u003Cdiv class=\"thumbcaption\"\u003E\u003Cdiv class=\"magnify\"\u003E\u003Ca href=\"/wiki/File:Great_pitton_farm_parking_prices.jpg\" class=\"internal\" title=\"Enlarge\"\u003E\u003C/a\u003E\u003C/div\u003E\u003C/div\u003E\u003C/div\u003E\u003C/div\u003E\u003C/div\u003E\n","title":"51.565848, -4.270856\n","link":"","lat":51.565848,"lon":-4.270856,"icon":"/testwiki/images/7/74/Parking.png"},{"text":"\u003Cb\u003E\u003Cp\u003E\u003Cb\u003E51.557175, -4.162073\u003Cbr /\u003E\u003Cbr /\u003EParking - Oxwich Car Park\u003C/b\u003E\n\u003C/p\u003E\u003C/b\u003E\u003Chr /\u003E\u003Cp\u003ECosts a few quid.\u003Cbr /\u003E\u003Cbr /\u003E\n\u003Ca href=\"/wiki/Oxwich\" class=\"mw-redirect\" title=\"Oxwich\"\u003EOxwich\u003C/a\u003E\u003Cbr /\u003E\n\u003Ca href=\"/wiki/Oxwich_Point\" title=\"Oxwich Point\"\u003EOxwich Point\u003C/a\u003E\n\u003C/p\u003E","title":"51.557175, -4.162073Parking - Oxwich Car Park\n","link":"","lat":51.557175,"lon":-4.162073,"icon":"/testwiki/images/7/74/Parking.png"},{"text":"\u003Cb\u003E\u003Cp\u003E\u003Cb\u003EPitton Cross - Camping\u003C/b\u003E\n\u003C/p\u003E\u003C/b\u003E\u003Chr /\u003E\u003Cp\u003E\u003Cb\u003EContact:\u003C/b\u003E \u003Cb\u003ETel\u0026#160;:\u003C/b\u003E 01792 390 593\u003Cbr /\u003E\n\u003Cb\u003EFax\u0026#160;:\u003C/b\u003E 01792 391010\u003Cbr /\u003E\n\u003Cb\u003Eemail\u0026#160;:\u003C/b\u003E admin@pittoncross.co.uk\u003Cbr /\u003E\u003Cbr /\u003E\n\u003Cb\u003EFor:\u003C/b\u003E \u003Ca href=\"/wiki/Paviland\" class=\"mw-redirect\" title=\"Paviland\"\u003EPaviland\u003C/a\u003E,\u003Cbr /\u003E\u003Cbr /\u003E\nPossible parking here. Enquire at the campsite shop.\n\u003Ca href=\"/wiki/Juniper_Wall\" title=\"Juniper Wall\"\u003EJuniper Wall\u003C/a\u003E,\u003Cbr /\u003E\nMewslade, Fall Bay,\u003Cbr /\u003E\n\u003Ca href=\"/wiki/Rams_Grove\" class=\"mw-redirect\" title=\"Rams Grove\"\u003ERams Grove\u003C/a\u003E\u003Cbr /\u003E\n\u003Ca href=\"/wiki/Deborah%27s_Overhang_Area\" class=\"mw-redirect\" title=\"Deborah's Overhang Area\"\u003EDeborah's Overhang Area\u003C/a\u003E\u003Cbr /\u003E\n\u003Ca href=\"/wiki/Three_Sisters\" class=\"mw-redirect\" title=\"Three Sisters\"\u003EThree Sisters\u003C/a\u003E\n\u003C/p\u003E","title":"Pitton Cross - Camping\n","link":"","lat":51.567203,"lon":-4.260779,"icon":"/testwiki/images/9/9b/Camp.png"},{"text":"\u003Cb\u003E\u003Cp\u003E\u003Cb\u003ECamping - Three Cliffs\u003C/b\u003E\n\u003C/p\u003E\u003C/b\u003E\u003Chr /\u003E\u003Cp\u003E\u003Cb\u003EContact: \u003C/b\u003EPhone:\u003Cb\u003E +44 (0)1792 371-218\u003Cbr /\u003E \u003C/b\u003E\n\u003Cb\u003EAddress:\u003C/b\u003E North Hill Lane\u003Cbr /\u003E \nPenmaen\u003Cbr /\u003E \nSwansea\u003Cbr /\u003E \nWest Glamorgan\u003Cbr /\u003E \nSA3 2HB\u003Cbr /\u003E\u003Cbr /\u003E \n\u003Cb\u003EFor:\u003C/b\u003E \u003Ca href=\"/wiki/Three_Cliffs\" title=\"Three Cliffs\"\u003EThree Cliffs\u003C/a\u003E,\u003Cbr /\u003E \n\u003Ca class=\"mw-selflink selflink\"\u003EPobbles Bays\u003C/a\u003E,\u003Cbr /\u003E \n\u003Ca href=\"/wiki/Shire_Combe\" class=\"mw-redirect\" title=\"Shire Combe\"\u003EShire Combe\u003C/a\u003E,\u003Cbr /\u003E \n\u003Ca href=\"/wiki/Category:Tor_Bay_and_Great_Tor\" title=\"Category:Tor Bay and Great Tor\"\u003ETor Bay and Great Tor\u003C/a\u003E,\u003Cbr /\u003E \n\u003Ca href=\"/wiki/Odin%27s_Wall\" title=\"Odin's Wall\"\u003EOdin's Wall\u003C/a\u003E \n\u003C/p\u003E","title":"Camping - Three Cliffs\n","link":"","lat":51.577711,"lon":-4.115575,"icon":"/testwiki/images/9/9b/Camp.png"},{"text":"\u003Cb\u003E\u003Cp\u003E\u003Cb\u003ECamping - Nicholaston Farm\u003C/b\u003E\n\u003C/p\u003E\u003C/b\u003E\u003Chr /\u003E\u003Cp\u003E\u003Cb\u003EContact: \u003C/b\u003EPhone:\u003Cb\u003E 01792 371209 \u003C/b\u003EWebsite:\u003Cb\u003E \u003Ca rel=\"nofollow\" class=\"external free\" href=\"http://www.nicholastonfarm.co.uk/\"\u003Ehttp://www.nicholastonfarm.co.uk/\u003C/a\u003E\u003Cbr /\u003E\u003Cbr /\u003E \u003C/b\u003E\n\u003Cb\u003EAddress:\u003C/b\u003E Nicholaston Farm Carvan and Camping Site\u003Cbr /\u003E \nPenmaen\u003Cbr /\u003E \nGower\u003Cbr /\u003E \nSA3 2HL\u003Cbr /\u003E\u003Cbr /\u003E \n\u003Cb\u003EFor:\u003C/b\u003E \u003Ca href=\"/wiki/Three_Cliffs\" title=\"Three Cliffs\"\u003EThree Cliffs\u003C/a\u003E,\u003Cbr /\u003E\u003Ca class=\"mw-selflink selflink\"\u003EPobbles Bays\u003C/a\u003E,\u003Cbr /\u003E\u003Ca href=\"/wiki/Category:Tor_Bay_and_Great_Tor\" title=\"Category:Tor Bay and Great Tor\"\u003ETor Bay and Great Tor\u003C/a\u003E,\u003Cbr /\u003E\u003Ca href=\"/wiki/Odin%27s_Wall\" title=\"Odin's Wall\"\u003EOdin's Wall\u003C/a\u003E\u003Cbr /\u003E \n\u003C/p\u003E","title":"Camping - Nicholaston Farm\n","link":"","lat":51.574377,"lon":-4.13378,"icon":"/testwiki/images/9/9b/Camp.png"},{"text":"\u003Cb\u003E\u003Cp\u003E\u003Cb\u003E\u003Ca href=\"/wiki/Deborahs_Bouldering\" title=\"Deborahs Bouldering\"\u003EDeborahs Bouldering\u003C/a\u003E\u003C/b\u003E\n\u003C/p\u003E\u003C/b\u003E\u003Chr /\u003E\u003Cp\u003E51.553830, -4.261581\n\u003C/p\u003E","title":"Deborahs Bouldering\n","link":"","lat":51.55383,"lon":-4.261581,"icon":"/testwiki/images/0/0c/Bouldering.png"},{"text":"\u003Cb\u003E\u003Cp\u003E\u003Cb\u003E\u003Ca href=\"/wiki/Limeslade\" title=\"Limeslade\"\u003ELimeslade\u003C/a\u003E\u003C/b\u003E\n\u003C/p\u003E\u003C/b\u003E\u003Chr /\u003E\u003Cp\u003E51.56582, -3.98431\n\u003C/p\u003E","title":"Limeslade\n","link":"","lat":51.56582,"lon":-3.98431,"icon":"/testwiki/images/0/0c/Bouldering.png"},{"text":"\u003Cb\u003E\u003Cp\u003E\u003Cb\u003E\u003Ca href=\"/wiki/Oxwich_Bouldering\" title=\"Oxwich Bouldering\"\u003EOxwich Bouldering\u003C/a\u003E\u003C/b\u003E\n\u003C/p\u003E\u003C/b\u003E\u003Chr /\u003E\u003Cp\u003E51.5523683, -4.1554455\n\u003C/p\u003E","title":"Oxwich Bouldering\n","link":"","lat":51.5523683,"lon":-4.1554455,"icon":"/testwiki/images/0/0c/Bouldering.png"},{"text":"\u003Cb\u003E\u003Cp\u003E\u003Ca href=\"/wiki/Russian_Zawn\" title=\"Russian Zawn\"\u003ERussian Zawn\u003C/a\u003E\n\u003C/p\u003E\u003C/b\u003E\u003Chr /\u003E\u003Cp\u003E51.570470, -4.118757\n\u003C/p\u003E","title":"Russian Zawn\n","link":"","lat":51.57047,"lon":-4.118757,"icon":"/testwiki/images/0/0c/Bouldering.png"},{"text":"\u003Cb\u003E\u003Cp\u003E\u003Cb\u003E\u003Ca href=\"/wiki/Caswell_Bay_(Bouldering)\" title=\"Caswell Bay (Bouldering)\"\u003EBouldering - Caswell\u003C/a\u003E\u003C/b\u003E\n\u003C/p\u003E\u003C/b\u003E\u003Chr /\u003E\u003Cp\u003E51.567931, -4.031052\n\u003C/p\u003E","title":"Bouldering - Caswell\n","link":"","lat":51.567931,"lon":-4.031052,"icon":"/testwiki/images/0/0c/Bouldering.png"},{"text":"\u003Cb\u003E\u003Cp\u003E\u003Cb\u003E\u003Ca href=\"/wiki/Rotherslade\" title=\"Rotherslade\"\u003EBouldering - Rotherslade\u003C/a\u003E\u003C/b\u003E\n\u003C/p\u003E\u003C/b\u003E\u003Chr /\u003E\u003Cp\u003E51.567630, -4.00651\n\u003C/p\u003E","title":"Bouldering - Rotherslade\n","link":"","lat":51.56763,"lon":-4.00651,"icon":"/testwiki/images/0/0c/Bouldering.png"},{"text":"\u003Cb\u003E\u003Cp\u003E\u003Cb\u003E\u003Ca href=\"/wiki/Pwll_Du\" class=\"mw-redirect\" title=\"Pwll Du\"\u003EBouldering - Pwll Du\u003C/a\u003E\u003C/b\u003E\n\u003C/p\u003E\u003C/b\u003E\u003Chr /\u003E\u003Cp\u003E51.561400, -4.057453\n\u003C/p\u003E","title":"Bouldering - Pwll Du\n","link":"","lat":51.5614,"lon":-4.057453,"icon":"/testwiki/images/0/0c/Bouldering.png"},{"text":"\u003Cb\u003E\u003Cp\u003E\u003Cb\u003E\u003Ca href=\"/wiki/Pobbles_Pebbles\" title=\"Pobbles Pebbles\"\u003EPobbles Pebbles\u003C/a\u003E\u003C/b\u003E\n\u003C/p\u003E\u003C/b\u003E\u003Chr /\u003E\u003Cp\u003E51.569247, -4.105918\n\u003C/p\u003E","title":"Pobbles Pebbles\n","link":"","lat":51.569247,"lon":-4.105918,"icon":"/testwiki/images/0/0c/Bouldering.png"},{"text":"\u003Cb\u003E\u003Cp\u003E\u003Cb\u003E\u003Ca href=\"/wiki/Equal_Opportunities_Wall\" title=\"Equal Opportunities Wall\"\u003EEqual Opportunities Wall\u003C/a\u003E\u003C/b\u003E\n\u003C/p\u003E\u003C/b\u003E\u003Chr /\u003E\u003Cp\u003E51.565792, -4.098653\n\u003C/p\u003E","title":"Equal Opportunities Wall\n","link":"","lat":51.565792,"lon":-4.098653,"icon":"/testwiki/images/0/0c/Bouldering.png"},{"text":"\u003Cb\u003E\u003Cp\u003E\u003Cb\u003EBoulders\u003C/b\u003E\n\u003C/p\u003E\u003C/b\u003E\u003Chr /\u003E\u003Cp\u003E\u003Ca rel=\"nofollow\" class=\"external free\" href=\"http://bouldersuk.com/\"\u003Ehttp://bouldersuk.com/\u003C/a\u003E\n\u003C/p\u003E","title":"Boulders\n","link":"","lat":51.493365,"lon":-3.142137,"icon":"/testwiki/images/3/31/Red.png"},{"text":"\u003Cb\u003E\u003Cp\u003E\u003Cb\u003ESpot Climbing Centre\u003C/b\u003E\n\u003C/p\u003E\u003C/b\u003E\u003Chr /\u003E\u003Cp\u003E\u003Ca rel=\"nofollow\" class=\"external free\" href=\"http://www.spotclimbing.co.uk/\"\u003Ehttp://www.spotclimbing.co.uk/\u003C/a\u003E\n\u003C/p\u003E","title":"Spot Climbing Centre\n","link":"","lat":51.574744,"lon":-3.296757,"icon":"/testwiki/images/3/31/Red.png"},{"text":"\u003Cb\u003E\u003Cp\u003E\u003Cb\u003EDynamic Rock\u003C/b\u003E\n\u003C/p\u003E\u003C/b\u003E\u003Chr /\u003E\u003Cp\u003E\u003Ca rel=\"nofollow\" class=\"external free\" href=\"http://www.dynamicrock.co.uk/\"\u003Ehttp://www.dynamicrock.co.uk/\u003C/a\u003E\n\u003C/p\u003E","title":"Dynamic Rock\n","link":"","lat":51.694098,"lon":-3.89844,"icon":"/testwiki/images/3/31/Red.png"},{"text":"\u003Cb\u003E\u003Cp\u003E\u003Cb\u003ERock UK Summit Centre\u003C/b\u003E\n\u003C/p\u003E\u003C/b\u003E\u003Chr /\u003E\u003Cp\u003E\u003Ca rel=\"nofollow\" class=\"external free\" href=\"https://rockuk.org/centres/summit-centre/\"\u003Ehttps://rockuk.org/centres/summit-centre/\u003C/a\u003E\n\u003C/p\u003E","title":"Rock UK Summit Centre\n","link":"","lat":51.687247,"lon":-3.29975,"icon":"/testwiki/images/3/31/Red.png"},{"text":"\u003Cb\u003E\u003Cp\u003E\u003Cb\u003ECube Bouldering Gym\u003C/b\u003E\n\u003C/p\u003E\u003C/b\u003E\u003Chr /\u003E\u003Cp\u003E\u003Ca rel=\"nofollow\" class=\"external free\" href=\"http://www.ymcaporttalbot.wales/\"\u003Ehttp://www.ymcaporttalbot.wales/\u003C/a\u003E\n\u003C/p\u003E","title":"Cube Bouldering Gym\n","link":"","lat":51.589991,"lon":-3.777321,"icon":"/testwiki/images/3/31/Red.png"},{"text":"\u003Cb\u003E\u003Cp\u003E\u003Cb\u003ELlangorse Multi Activity Centre\u003C/b\u003E\n\u003C/p\u003E\u003C/b\u003E\u003Chr /\u003E\u003Cp\u003E\u003Ca rel=\"nofollow\" class=\"external free\" href=\"https://www.activityuk.com/\"\u003Ehttps://www.activityuk.com/\u003C/a\u003E\n\u003C/p\u003E","title":"Llangorse Multi Activity Centre\n","link":"","lat":51.932166,"lon":-3.240508,"icon":"/testwiki/images/3/31/Red.png"},{"text":"\u003Cb\u003E\u003Cp\u003E\u003Cb\u003EThe Climbing Hangar\u003C/b\u003E\n\u003C/p\u003E\u003C/b\u003E\u003Chr /\u003E\u003Cp\u003E\u003Ca rel=\"nofollow\" class=\"external free\" href=\"https://theclimbinghangar.com/\"\u003Ehttps://theclimbinghangar.com/\u003C/a\u003E\n\u003C/p\u003E","title":"The Climbing Hangar\n","link":"","lat":51.656821,"lon":-3.907802,"icon":"/testwiki/images/3/31/Red.png"},{"text":"\u003Cb\u003E\u003Cp\u003E\u003Cb\u003EMUUK Adventures\u003C/b\u003E\n\u003C/p\u003E\u003C/b\u003E\u003Chr /\u003E\u003Cp\u003E\u003Ca rel=\"nofollow\" class=\"external free\" href=\"https://www.muuk-adventures.com/\"\u003Ehttps://www.muuk-adventures.com/\u003C/a\u003E\n\u003C/p\u003E","title":"MUUK Adventures\n","link":"","lat":51.884597547921,"lon":-5.256467715,"icon":"/testwiki/images/3/31/Red.png"},{"text":"\u003Cb\u003E\u003Cp\u003E\u003Cb\u003EWild Lakes\u003C/b\u003E\n\u003C/p\u003E\u003C/b\u003E\u003Chr /\u003E\u003Cp\u003E\u003Ca rel=\"nofollow\" class=\"external free\" href=\"https://www.wildlakeswales.com/\"\u003Ehttps://www.wildlakeswales.com/\u003C/a\u003E \n\u003C/p\u003E","title":"Wild Lakes\n","link":"","lat":51.775059083689,"lon":-4.8101068083,"icon":"/testwiki/images/3/31/Red.png"},{"text":"\u003Cb\u003E\u003Cp\u003E\u003Cb\u003EThe Hangout\u003C/b\u003E\n\u003C/p\u003E\u003C/b\u003E\u003Chr /\u003E\u003Cp\u003E\u003Ca rel=\"nofollow\" class=\"external free\" href=\"https://www.pembrokeshire.gov.uk/the-climbing-wall/i-am-a-climber\"\u003Ehttps://www.pembrokeshire.gov.uk/the-climbing-wall/i-am-a-climber\u003C/a\u003E\n\u003C/p\u003E","title":"The Hangout\n","link":"","lat":51.7987605,"lon":-4.970135328,"icon":"/testwiki/images/3/31/Red.png"},{"text":"\u003Cb\u003E\u003Cp\u003E\u003Cb\u003ESwansea Leisure Centre\u003C/b\u003E\n\u003C/p\u003E\u003C/b\u003E\u003Chr /\u003E\u003Cp\u003E\u003Ca rel=\"nofollow\" class=\"external free\" href=\"https://www.thelcswansea.com/climb\"\u003Ehttps://www.thelcswansea.com/climb\u003C/a\u003E\n\u003C/p\u003E","title":"Swansea Leisure Centre\n","link":"","lat":51.617308,"lon":-3.940513,"icon":"/testwiki/images/3/31/Red.png"},{"text":"\u003Cb\u003E\u003Cp\u003E\u003Cb\u003EThe Overhang\u003C/b\u003E\n\u003C/p\u003E\u003C/b\u003E\u003Chr /\u003E\u003Cp\u003E\u003Ca rel=\"nofollow\" class=\"external free\" href=\"https://climboverhang.com/\"\u003Ehttps://climboverhang.com/\u003C/a\u003E\n\u003C/p\u003E","title":"The Overhang\n","link":"","lat":51.856601,"lon":-4.316699,"icon":"/testwiki/images/3/31/Red.png"},{"text":"\u003Cb\u003E\u003Cp\u003E\u003Cb\u003ERoc-Bloc\u003C/b\u003E\n\u003C/p\u003E\u003C/b\u003E\u003Chr /\u003E\u003Cp\u003E\u003Ca rel=\"nofollow\" class=\"external free\" href=\"http://roc-bloc.com/\"\u003Ehttp://roc-bloc.com/\u003C/a\u003E\n\u003C/p\u003E","title":"Roc-Bloc\n","link":"","lat":51.461398,"lon":-3.197916,"icon":"/testwiki/images/3/31/Red.png"},{"text":"\u003Cb\u003E\u003Cp\u003E\u003Cb\u003EBridend Life Centre\u003C/b\u003E\n\u003C/p\u003E\u003C/b\u003E\u003Chr /\u003E\u003Cp\u003E\u003Ca rel=\"nofollow\" class=\"external free\" href=\"https://haloleisure.org.uk/activities/bridgend/indoor-climbing\"\u003Ehttps://haloleisure.org.uk/activities/bridgend/indoor-climbing\u003C/a\u003E\n\u003C/p\u003E","title":"Bridend Life Centre\n","link":"","lat":51.503246,"lon":-3.582157,"icon":"/testwiki/images/3/31/Red.png"},{"text":"\u003Cb\u003E\u003Cp\u003E\u003Cb\u003EFlashpoint Swansea\u003C/b\u003E\n\u003C/p\u003E\u003C/b\u003E\u003Chr /\u003E\u003Cp\u003E\u003Ca rel=\"nofollow\" class=\"external free\" href=\"https://flashpointswansea.com/\"\u003Ehttps://flashpointswansea.com/\u003C/a\u003E\n\u003C/p\u003E","title":"Flashpoint Swansea\n","link":"","lat":51.622081942776,"lon":-3.9395480016,"icon":"/testwiki/images/3/31/Red.png"},{"text":"\u003Cb\u003E\u003Cp\u003E\u003Cb\u003EClyne Farm Centre\u003C/b\u003E\n\u003C/p\u003E\u003C/b\u003E\u003Chr /\u003E\u003Cp\u003E\u003Ca rel=\"nofollow\" class=\"external free\" href=\"https://clynefarm.com/\"\u003Ehttps://clynefarm.com/\u003C/a\u003E\n\u003C/p\u003E","title":"Clyne Farm Centre\n","link":"","lat":51.599517,"lon":-4.012362,"icon":"/testwiki/images/3/31/Red.png"}],"imageoverlays":null}
Take the offshoot of the B4436 leading into Southgate, then a right-hand lane (Bendrick Drive) just after the Golf Club (it will be necessary to park a little further on and walk back). Follow a path through fields and round a wood to gain a path leading down through dunes to Pobbles after about 15 minutes. It is also possible to follow the cliff top road and path as described in the Shire Combe area approach.
Pobbles West by easy scrambling at several places along the crag. Pobbles East and Scoop corner, by scrambling down and left in both cases.
A series of inlets and gullies lined with slabs provide a number of short easy routes at the far west end of Pobbles Bay (100m east of Three Cliffs). It is ideal for a visit with novices or when the tide is closing in on Three Cliffs. The first feature, lying some 75m right of Disappointment is a cave. To the right of the cave is a small slab with overhangs above its left side and a slabby pillar on the right.
Right again is a deep gully, with a coulourful slabby back wall. Its base is sometimes scoured out to leave a deep pool.
This crag is on the far east side of Pobbles Bay and not immediately obvious. It is about halfway between where the path from the Southgate approach leads out onto the beach and the eastern headland (Shire Combe), just to the east (right when facing inland) of where a long rock platform (Pobbles Pebbles) 10m above the beach finishes, tucked into a cylindrical cove.
To the west (left) of the opening of the cylindrical cove is an obvious smooth slab.
The back wall of the gully contains a through hole and slab, whilst the east wall has a prominent conglomerate overhang and is bounded on its south by a small zawn.
About 100m on from Pobbles East, towards Shire Combe, is a recessed scoop like bay. At the back, facing west, a definite crack runs up and right, with two distinct corner slabs at different levels rising up and left from it.